
A recent study indicates 1 in 8 individuals worldwide use spreadsheet software, such as Excel and Google Sheets, for data management. Often, these spreadsheets contain sensitive information, for example, personally identifiable information, revenue data, business plans, and so on.
You can’t be sure of who’s accessing your Excel files when sharing them over the internet. If the files aren’t protected, they can fall into the wrong hands, leaving you vulnerable to security breaches. In such scenarios, password protecting your Excel files can significantly scale up their security.
In this article, I’ll consider the different options to password protect your Excel files. Also, we’ll take a look at how reliable Excel’s password protection feature is in the first place.
Why Should You Password Protect Your Excel Spreadsheets?
Here are the main reasons why you should password protect your Excel files:
1. Protect Your Business’s Integrity
For businesses handling data in a responsible way, password protecting files is crucial. If you fail to adequately protect user data, you can severely tarnish your public reputation, resulting in reduced customer satisfaction, reliability, and, eventually, your earnings.
Losing your organizational information can also compromise your business’s integrity. Excel spreadsheets make up a large part of data-handling systems. To safeguard your Excel files against potential breaches, encrypting them with a password is the most straightforward security measure.
2. Compliance for Industries Handling Sensitive User Data
Regulatory frameworks like the EU’s General Data Protection Regulation (GDPR) and California’s Consumer Privacy Act (CCPA), require industries handling sensitive user data to take security measures for protecting it.
In these instances, password protecting data, including Excel spreadsheets that may contain sensitive information, becomes a compliance requirement. Failing to adhere can result in sever penalties and legal consequences.
3. Data Handling in Collaboration
Excel spreadsheets come in handy for collaboration and teamwork. However, sometimes you might not want everyone with access to the spreadsheet to see all of the data or be able to make changes to the spreadsheet.
Password protection can save the day for you. You can password protect specific worksheets and cells, and restrict users without a password from modifying specific parts of the spreadsheet.
4. Personal Privacy
If you’ve stored your personal data (such as financial information, revenue records, and the like) in Excel spreadsheets on cloud storage, flash drive, or even your PC, a malicious actor can possibly access and misuse it.
Adding a password to your spreadsheets acts as an extra layer of security for your Excel workbooks. That way, even if a malicious actor gets hold of them, they’d have to break the password to access your data.
How to Password Protect Excel Workbooks and Spreadsheets
Let’s cut to the chase. Here, I’ll show you how you can password protect your Excel workbooks, worksheets, and range of cells.
#1: Password Protect an Excel Workbook
Microsoft Office 2016 and newer versions offer a built-in option to protect file formats such as .docx, and .xlsx with 256-bit AES encryption. Here’s how you can enable it:
- Open the workbook. Go to File > Info from the top bar
- Click Protect Workbook
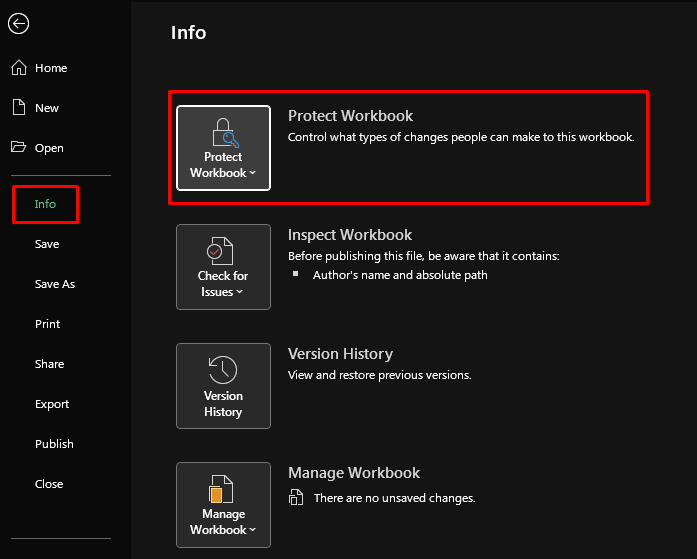
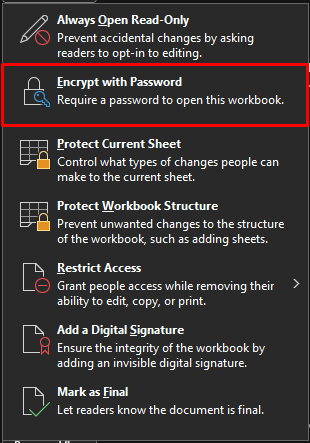
- Select Encrypt with Password
- Next, enter a password > OK
- Re-type the password > OK
And you’re done! The next time you open the workbook, Excel will prompt you for a password. Make sure the password is memorable and reasonably complex. If you forget it, it’s nearly impossible to open the workbook without it.
A Word of Caution on Password-Protecting Excels
Although Excel password protection provides a substantial level of security for your data, distributing password-protected files containing sensitive information, like credit card details or social security numbers, over the internet is still not safe.
Despite having a password, your files could still fall into the wrong hands, potentially allowing unintended access. Keep in mind simply locking a file with a password doesn’t guarantee complete protection against those with malicious intent.
Using a VPN can act as an added layer of protection to ensure your data remains secure and unreadable if your traffic is intercepted. CyberGhost VPN’s robust encryption masks your internet traffic, so snoopers access your data even if they snoop in on your traffic..
#2: Password Protect an Excel Worksheet
For protecting a separate worksheet in an Excel workbook, you have a couple of options. If you simply want to restrict users without the password from making changes to the worksheet, here’s what you can do:
- Open the workbook. Go to Review > Protect Sheet.
- Enter a password
- Then, check the changes you want to allow or restrict for users

Notice you no longer can make edits to the worksheet. If you want to make changes, you need to go to Review > Unprotect Sheet and enter the password when prompted.
That’s that. If you want to hide the worksheet from the users altogether, here’s what you can do:
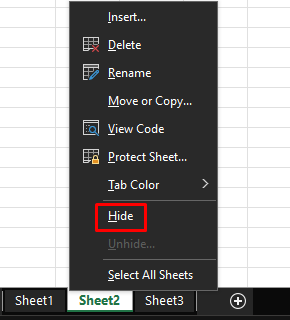
- Go to the worksheet. At the bottom bar, right-click on the tile with the sheet’s title
- Select Hide
- Next, go to Review and click Protect Workbook
- Enter a password > OK
- Re-type the password > OK
And you’re done! You just hid the worksheet and restricted the user from changing the structure of the workbook. To access the worksheet, the user now needs a password.
#3: Password Protect Range of Cells on Excel
Can you protect a range of cells in a worksheet? Of course you can. By stitching together a few Excel options, you can ultimately password protect a range of Excel cells. Here’s how:
- Go to the worksheet
- Select all of the cells in the worksheet and right-click
- Go to Format Cells > Protection

- Uncheck the Locked box and save

- Next, select the range of cells you want to protect and right click
- Go to Format Cells > Number > Custom
- Change Type from “General” to “;;;”
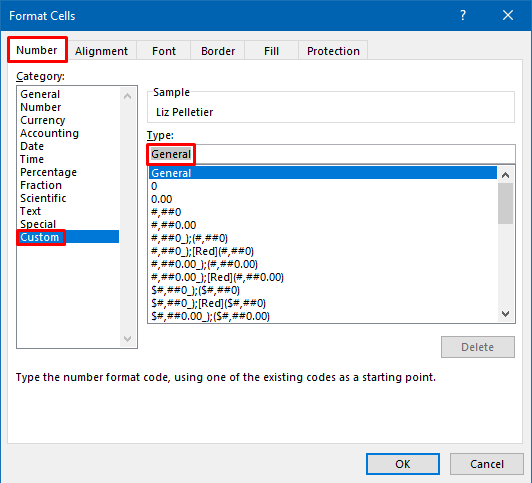
- After, navigate to Protection in the same window
- Check both Locked and Hidden and save

- Lastly, go to Review and click Protect Sheet
- Enter a password > OK
- Re-type the password > OK
That’s about it! Notice the protected cells are replaced with blank spaces. You cannot see their value or edit them in any way.
Now, if you want to undo the whole thing, Unprotect the sheet from the Review tab. And change back “;;;” to “General” at Format Cells > Number > Custom.
Can You Password Protect a Google Sheet?
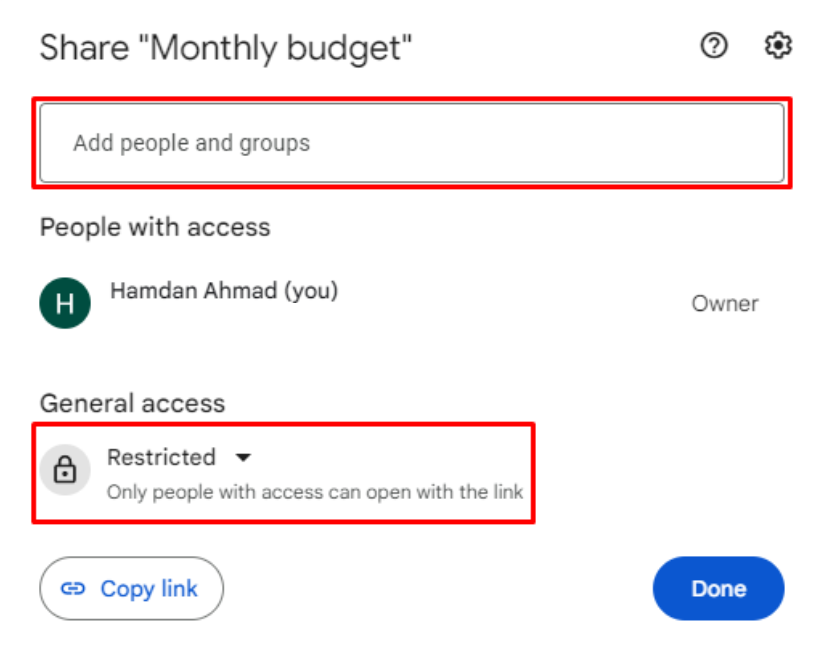
No, Google Sheets doesn’t offer a built-in password-protection protocol. It’s not as uncool as it may sound. Unlike Excel, Google Sheets has a totally different framework for protecting your data. By default, only you can access a spreadsheet you created.
Then, you can choose to grant others access to the spreadsheet using the Share button at the top-right corner. You can:
-
-
-
-
- Share it with a few select people
- Allow everybody to access it
-
-
-
You can select different options to decide how much control individuals have over the document. These include:
- Viewer
- Commenter
- Editor
Although Google Sheets doesn’t offer built-in options to restrict access to a specific sheet or a range of cells, you can impose some editing restrictions.
To keep others from editing a specific sheet, follow these steps:
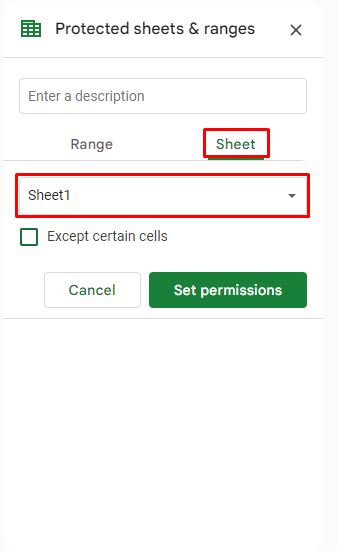
- Go to Data > Protect sheets and ranges from the top bar
- Go to Sheet
- Select the particular sheet and click Set permissions
To protect a range of cells:
- Navigate to Data > Protect sheets and ranges
- Select the range and go to Range
- Click Set permissions
Once that’s done, others with access to the spreadsheet can’t edit these parts of the spreadsheet. Keep in mind this feature is meant for saving the integrity of the argument and not to protect your data.
If you still want the sheet password protected, you can try using Google Apps Script (based on JavaScript) to create custom functions, automate tasks, and enhance the built-in features of the application.
Using scripts is like coding — you won’t be able to understand them without learning a bit about them. But you can copy and paste a script from a tutorial and implement it on your Google Apps Script.
How Secure Is Excel Password Protection?
So far, we’ve gone over the different methods on how to password protect an Excel spreadsheet or its components. But the question is, how secure is Excel’s password protection?
The primary aim of workbook structure and worksheet protection is to prevent your spreadsheet from being changed. It’s not really a security measure. Thus, it’s not difficult to break it. In fact, many software and methods are available on the internet to do so.
However, password protection with 256-bit AES encryption fares a lot better. 256-bit AES encryption is an industry-standard, NIST-recommended encryption algorithm which has repeatedly proven to be virtually unbreakable.
Nevertheless, password protecting your Excel sheets doesn’t entirely prevent cybercriminals from accessing them. Your files are still a risk when sharing, as third parties can intercept your traffic and access your sheets. To enhance your privacy and security, it’s recommended to layer password protection with a VPN.
A VPN ensures your internet connection is encrypted, making it significantly more difficult for attackers to intercept your data. For a reliable VPN solution, use CyberGhost VPN to protect your online activities and keep your files secure.
Sharing Excel Spreadsheets
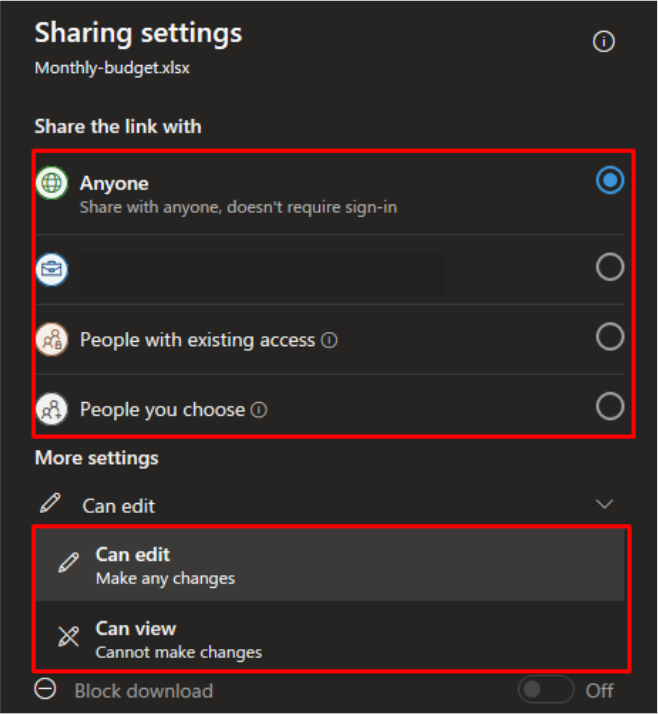
Following the sharing feature in Google Sheets, Excel also has introduced a similar protocol. And it works great for collaborating and sharing spreadsheets with a large team.
To utilize it, you have to save the Excel file on OneDrive. Then, click Share, at the top-right corner of the spreadsheet, and you can select the settings of your liking. You can share the spreadsheet with specific people or give everyone access. Also, you can limit the editing permissions of the spreadsheet.
Alternatively, you can save the spreadsheet on OneDrive or Google Drive. There, you can limit the access of the people by only allowing their email addresses to access it. You can also use Windows BitLocker and other encryption software, but in my opinion, they don’t offer any more security than Excel’s password-protected encryption.
Password Protecting an Excel — The Bottom Line
You can consider password protecting your Excel files for many reasons. Passwords make it easier to safeguard your personal and business data, keep your spreadsheet data intact, and more.
Depending on your needs, Excel gives you several options. You can encrypt the Excel file, protect the workbook structure, or protect individual worksheets. And by combining together a few options, you can even password protect a range of cells.
As for Google Sheets, the idea of password protection is replaced by access settings. Still, you can password protect individual sheets or a range of cells to protect the integrity of the sheet.
The 256-bit AES encryption option is the best when it comes to securing your files. All of the other options can be easily bypassed to extract your data. It’s important to note encryption only safeguards the document when it’s closed, not when it’s open. Additionally, transmitting and accessing password-protected files can be risky, as others may snoop on your traffic. To mitigate this risk, consider using a VPN.
If you’re looking for a trustworthy and easy-to-use VPN to safeguard your online privacy, get CyberGhost VPN. Our VPN service offers strong encryption, a strict No Logs policy, the fastest internet servers, and most of all, a 45-day money-back guarantee.
FAQ
To protect an Excel spreadsheet with a password, go to File > Info from the top bar. Click Protect Workbook. Next, choose Encrypt with Password. Lastly, enter (and reenter) a password.
Remember to choose a strong password to keep snoopers from getting access to your files and use a VPN for an additional layer of security. CyberGhost VPN sends your traffic through a secure VPN tunnel. This prevents anyone from being able to see your traffic, even if they intercept it.
To password-protect an Excel workbook while allowing read-only, navigate to File > Save as from the top bar. Next, browse a location for the file, and name it. At the bottom of the window, go to Tools > General options. In the tab that pops up, enter a password. Also, check the box reading Read-only recommended and save.
Additionally, secure your Excel files from misuse by using CyberGhost VPN during online transmission. We make sure your data remains impenetrable over the internet with our 256-bit AES encryption
To password-protect individual cells in Excel, first, select all cells in the worksheet. Right click and go to Format Cells > Protection. Here, uncheck the Locked box and save.
Next, select the range of cells you want to protect. Right-click and go to Format Cells > Number > Custom. Here, change the type from “General” to “;;;”. Navigate to Protection in the same window and check both the Locked and Hidden boxes. Lastly, go to Review > Protect Sheet. Enter a password, re-enter to confirm, and save.
Also, to protect the data in your Excel files from falling into the wrong hands, consider using CyberGhost VPN when transmitting them over the internet.
To reset the password for an Excel worksheet, go to Review. Click Unprotect Sheet. Enter the password when prompted. Now, you can reset the password by clicking Protect Sheet and entering the new password. Make sure to use a strong password to enhance the security of your files.


Leave a comment