
When you host your own Minecraft server, you set the rules, choose the game mode and difficulty, and decide who gets access. There’s no need to deal with random players or unwanted changes. Whether you want a relaxed survival world or a chaotic PvP arena, it’s entirely up to you. But before inviting others to your server, you need to let traffic from outside your network reach your device. This is where Minecraft server port forwarding comes in.
Port forwarding is a networking technique that allows external devices, like your friends’, to connect to a specific device on your home network. It works by redirecting incoming traffic from your router’s public IP address and chosen port to your computer’s local IP address and port. This guide shows you how to set up port forwarding for your Minecraft server so you can start playing with friends and build your own worlds together.
When you host a Minecraft server, your public IP address becomes visible to anyone who connects. This can expose your network to unwanted traffic or targeted attacks. Only share your server details with people you trust and consider using additional security measures to reduce risks.
What Is Port Forwarding for Minecraft?
When you run a Minecraft Java server, it listens for players on a specific default port set to 25565. Your home router blocks incoming connections from the internet for security reasons. To let friends join your server from outside your home network, you need to forward port 25565 on your router.
This is intentional. Routers are set up to protect your network, and allowing external traffic can introduce security risks. Because of this, people outside your home network can’t connect to your server right away.
Port forwarding lets you change this. You set a rule on your router that sends incoming traffic to your Minecraft server so players outside your network can connect to your server. Put simply, port forwarding creates a direct path from the internet to your Minecraft server. Without it, only players on your local network can join. Once it’s set up, anyone can connect using your public IP address by entering it in the Minecraft multiplayer menu.
Why Set Up Minecraft Port Forwarding?
Using port forwarding is the standard and often most reliable way to make your home-hosted Minecraft server publicly available. It can provide more direct connections with fewer intermediaries, which may help maintain stable performance depending on your setup.
How to Port Forward a Minecraft Server
Once you have the Minecraft server installed on your device, the next step is to allow traffic to it through port 25565. You’ll need access to your router’s administrator page to complete the steps below.
- Go to the folder where your server is kept.
- Open the file server.properties with a text editor and find the line “server-port=25565.”
- Note the port number (default is 25565).
- Find your computer’s local IP address.
- On Windows: Open Command Prompt and type “ipconfig.”
- On Mac: Go to System Settings > Network > your connection > Details.
- Find your router’s IP address.
- On Windows: Look for Default Gateway in the ipconfig output.
- On Mac: Check the Network Details screen.
- Log in to your router. Open a web browser, enter your router’s IP address, and log in with your admin credentials.
- Add a new port forwarding rule.
- Go to the Port Forwarding, NAT, or Virtual Servers section.
- Create a rule using port 25565, Protocol TCP/UDP (or Both), and your local IP address.
- Allow the port through your computer’s firewall.
- On Windows: Open Windows Defender Firewall > Advanced Settings > Inbound Rules > New Rule > Port 25565 (TCP) > Allow the connection. (The Java edition can only use TCP; if you’re running Bedrock, create a UDP rule for port 19132 instead.)
- On Mac: Go to System Settings > Privacy & Security > Firewall > Options and allow incoming connections for Java.
- Test the connection.
Restart your Minecraft server, then ask a friend to join using your public IP address and port 25565 (example: 123.45.67.89:25565). Please remember to only share your IP address with people you trust, as it can expose your network to potential risks.
How to Set Up a Minecraft Server
If you don’t already have a Minecraft server set up, these guides will show you how it’s done step-by-step. Setting up a Minecraft server isn’t as difficult as it sounds, so if you’re new to this, don’t worry.
The process is almost the same on Windows and macOS. The main difference is the tool you use to run commands. Windows uses the Command Prompt, while macOS uses the Terminal. We’ll walk you through both.
How to Set Up a Minecraft Server on Mac
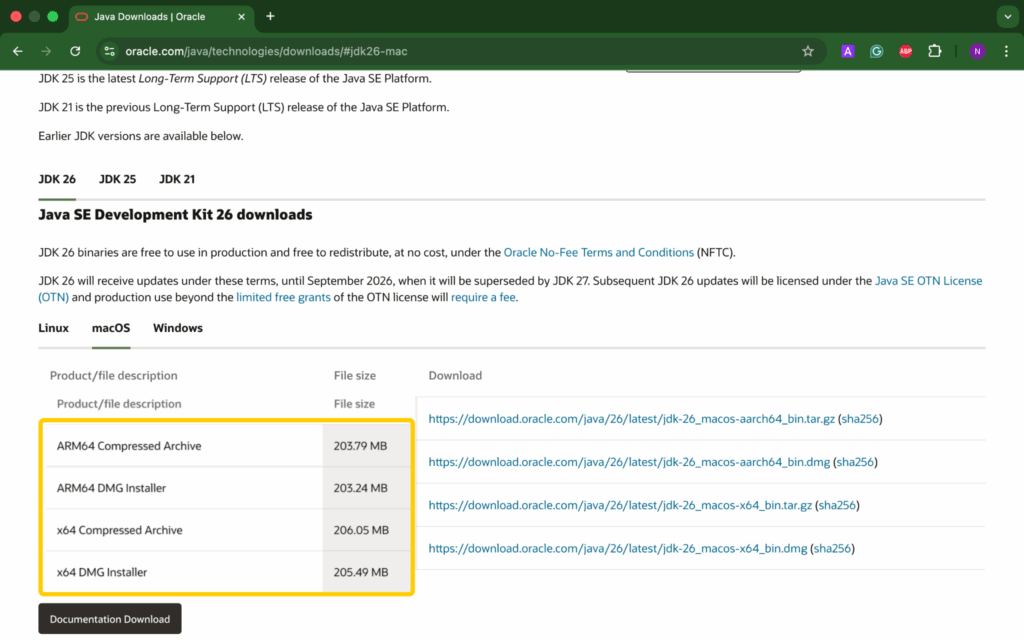
- Download Java, and make sure you choose the DMG installer that matches your Mac. Choose ARM64 for M1 or newer chips and x64 for Intel. To check which version you need, open the Apple icon > About This Mac and look at your processor.
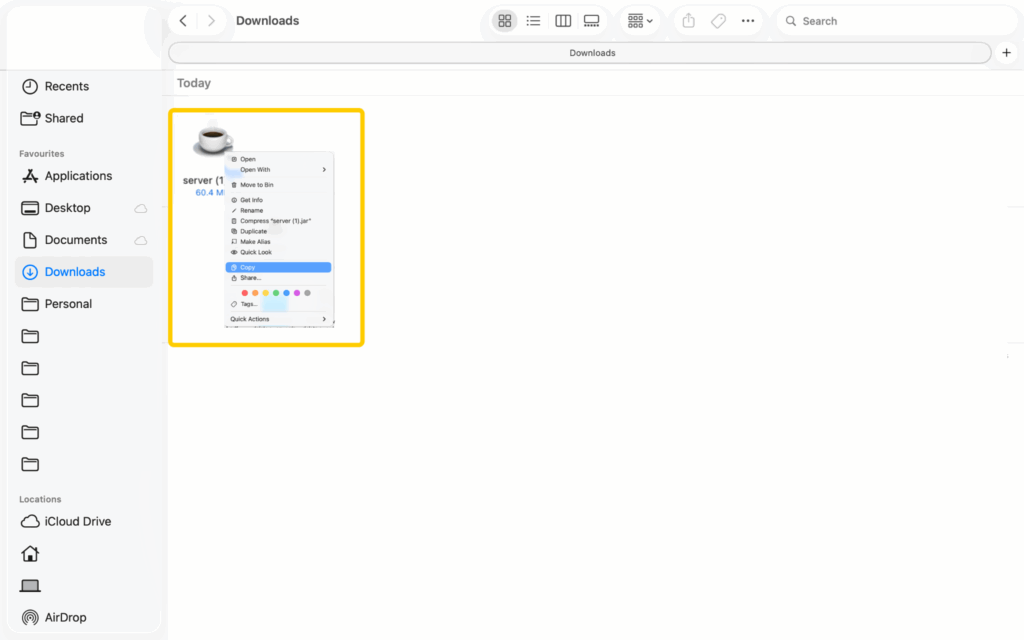
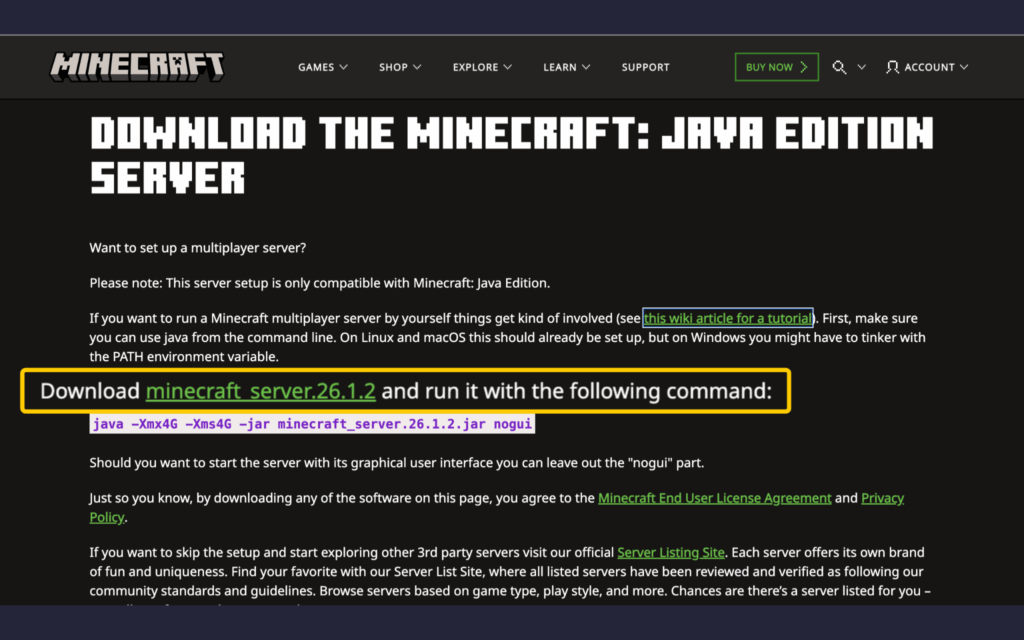
- Download the latest server.jar file from the official Minecraft website.

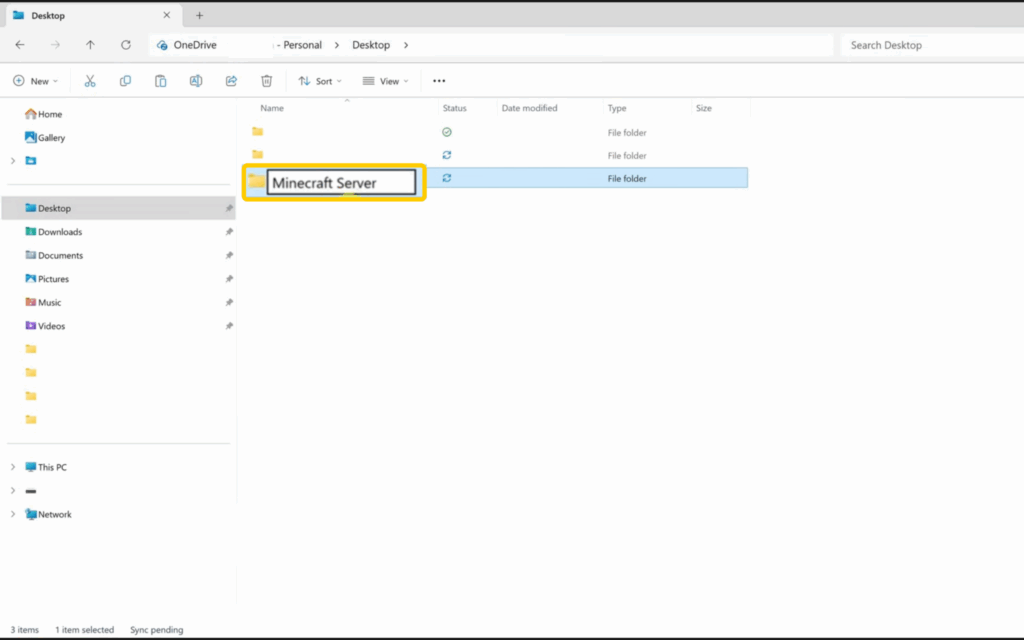
- Create a new folder for the server and name it.
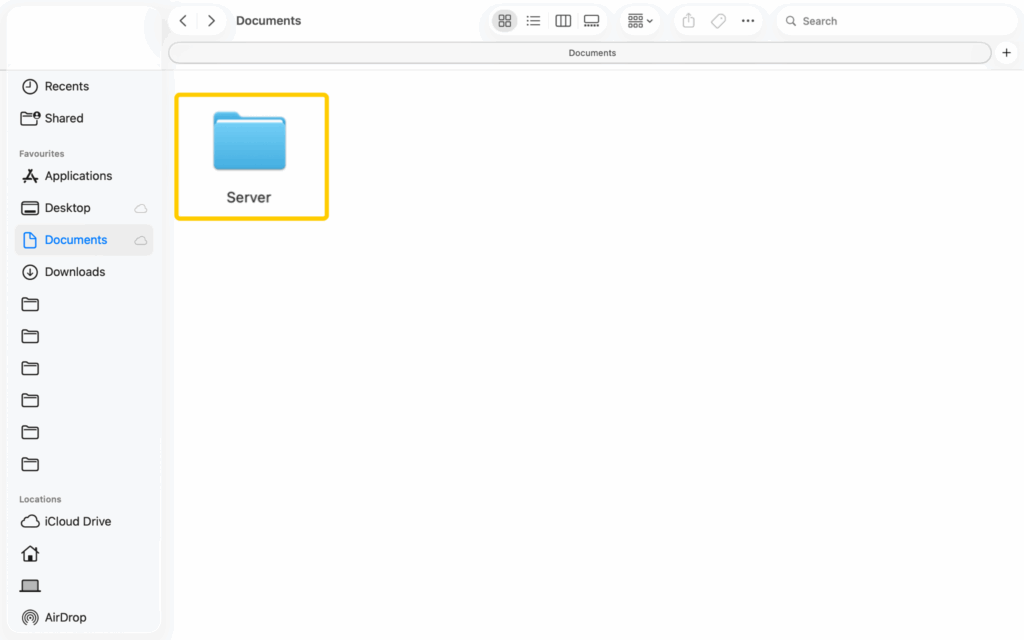
- Copy and paste the server.jar file into it.
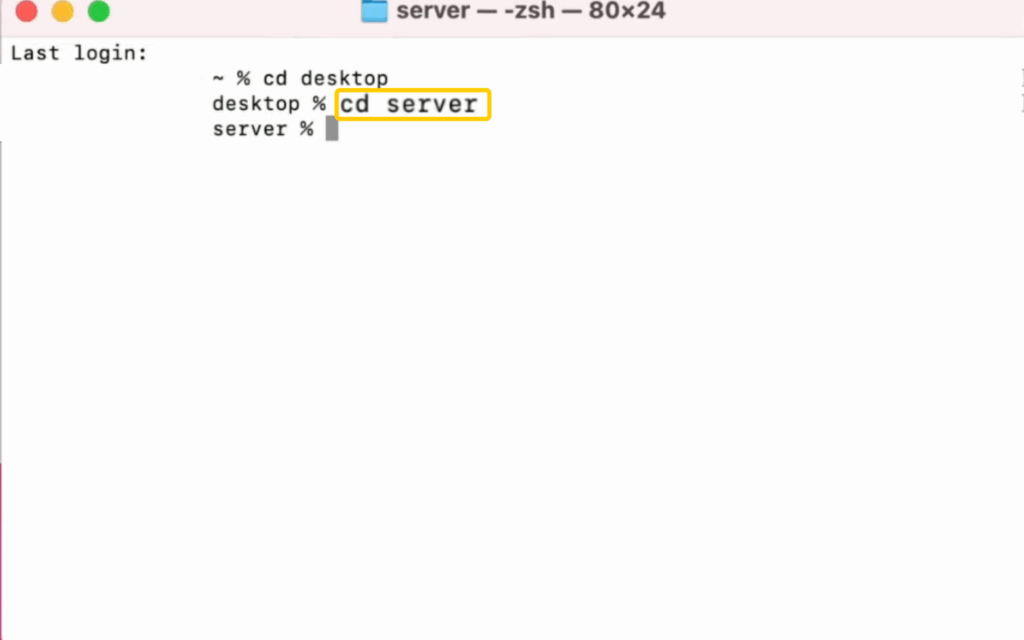
- Open Terminal. Go to your server folder by typing “cd desktop.”
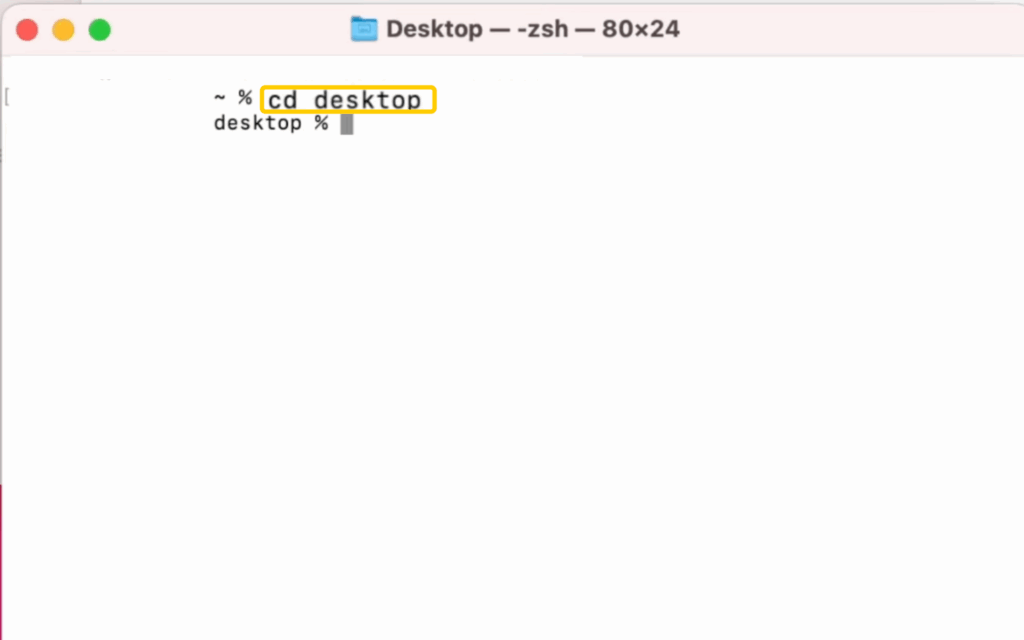
- Then, run the command “cd server.”
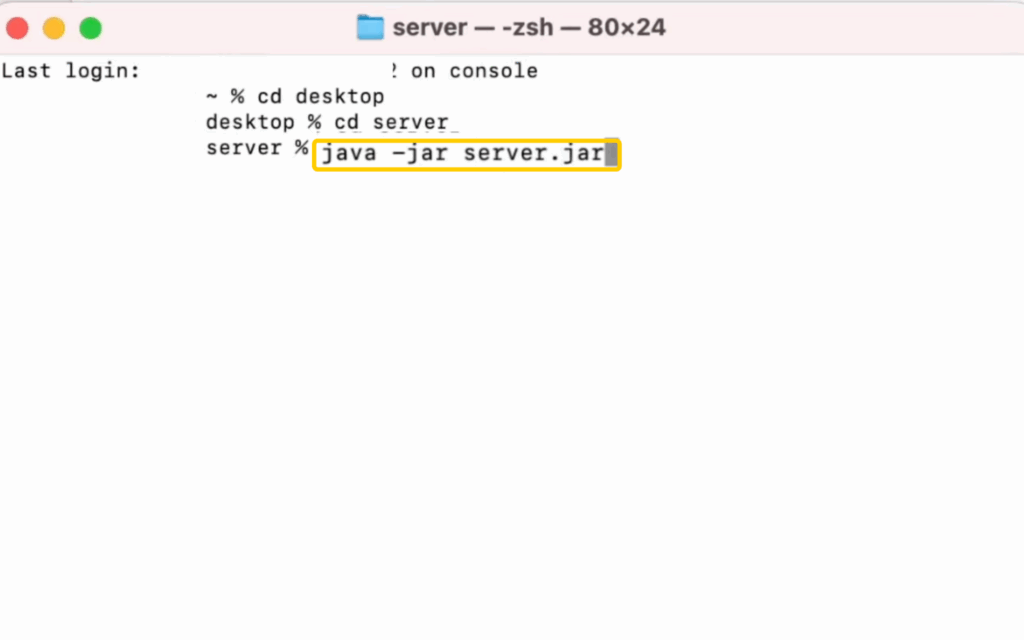
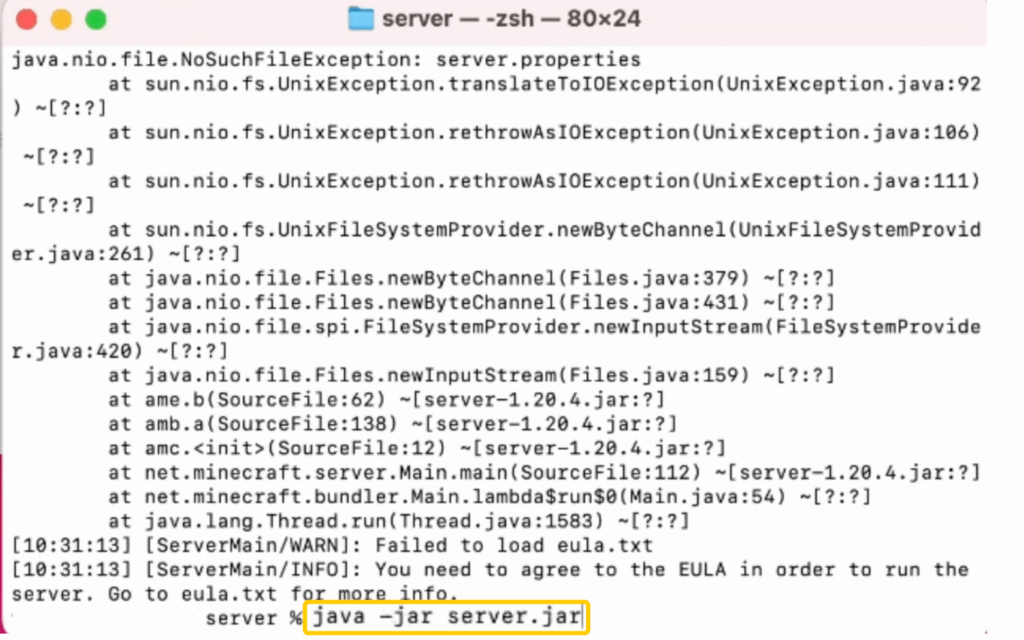
- Run the server for the first time with the following command: “java -jar server.jar.”
- Open the eula.txt file that appears. Change “eula=false” to “eula=true,” then save the file.

- Run the command again to start the server.
How to Set Up a Minecraft Server on Windows
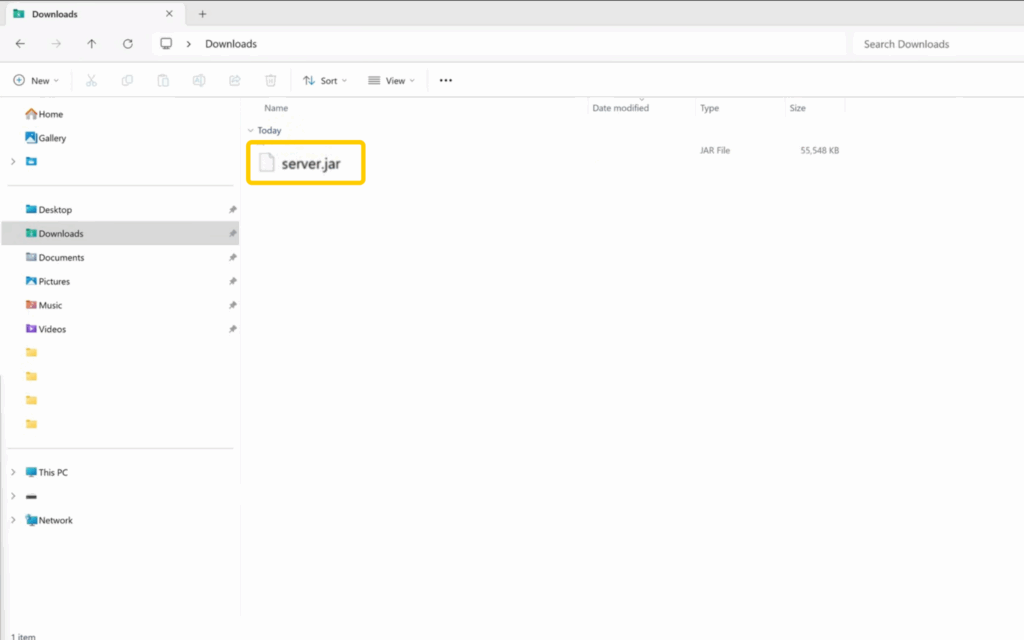
- Download the server.jar file from the official Minecraft website.
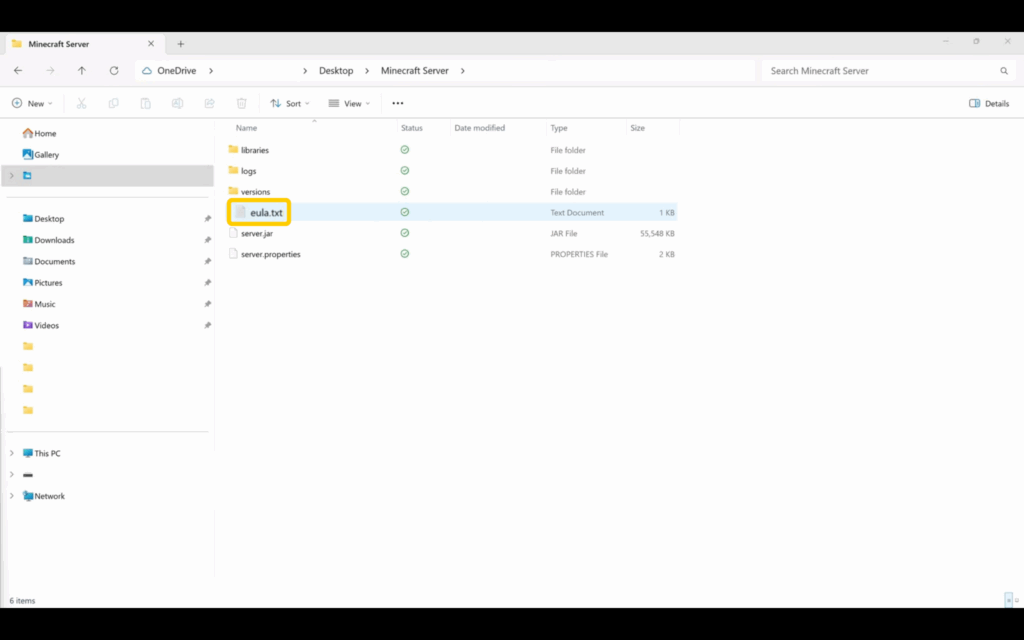
- Create a new folder for the server.
- From Downloads, move the server.jar file into the new folder you created.
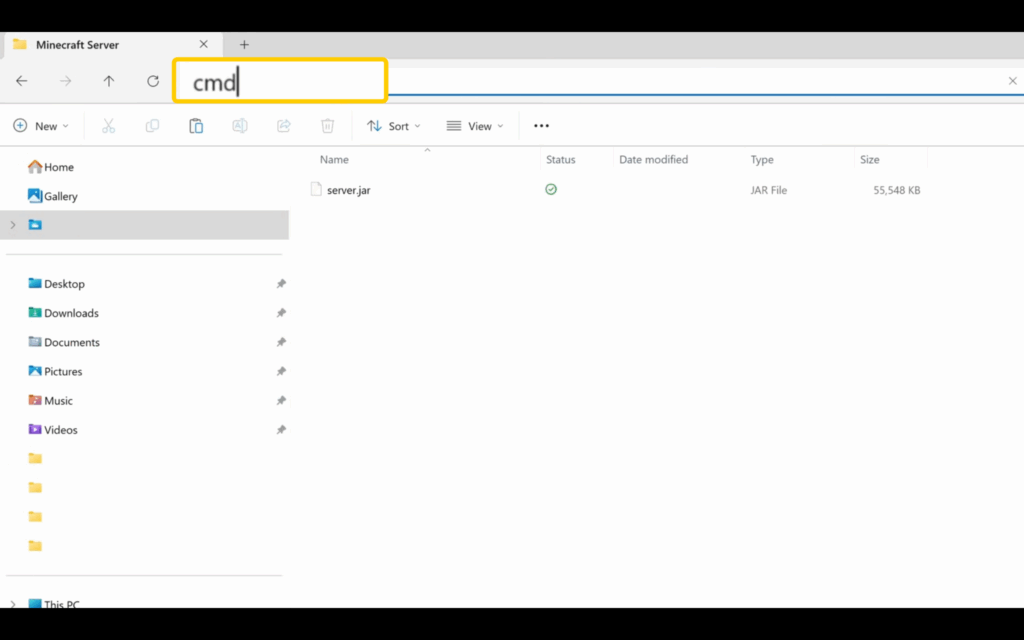
- Open Command Prompt for the Minecraft server by typing “cmd” into the search bar while the server file is open.
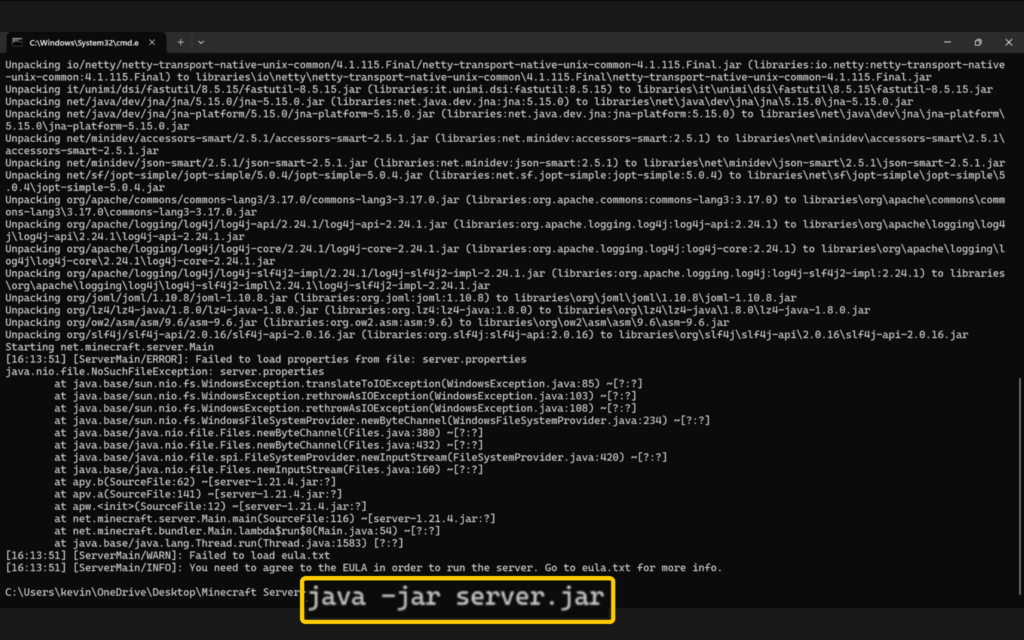
- Run the command “java -jar server.jar –nogui.”
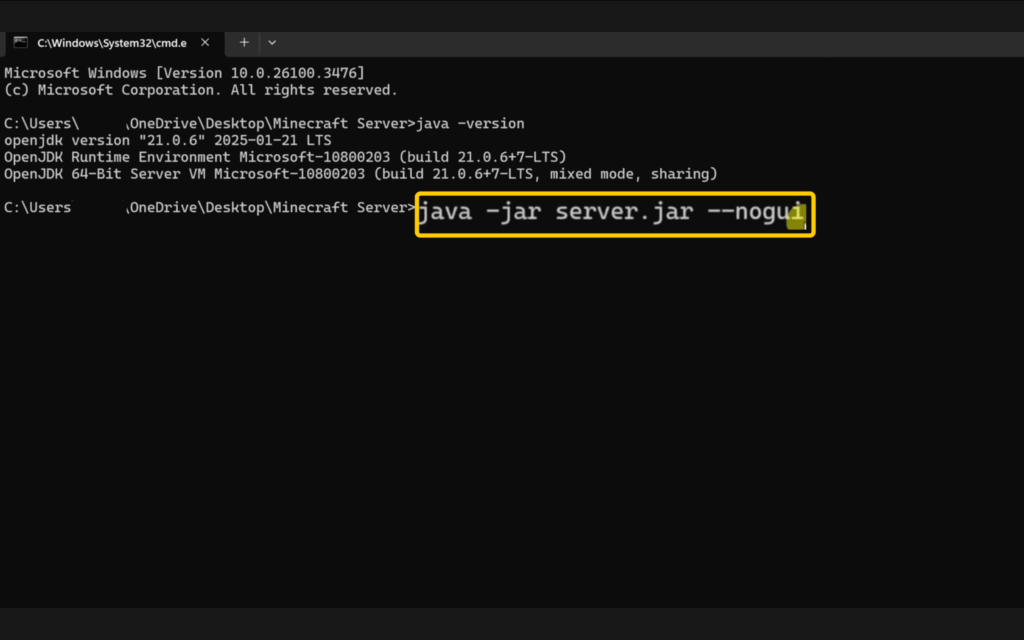
- You’ll then see an error message stating that you need to accept the End-User License Agreement (EULA).
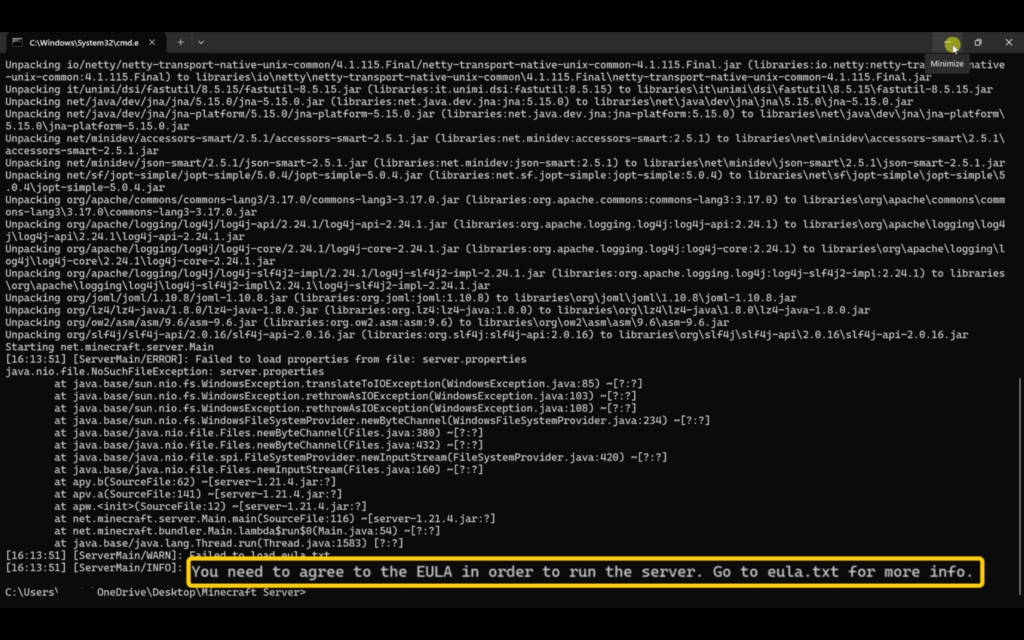
- Find the eula.txt file that appears in the server folder and open it with Notepad or another text editor.
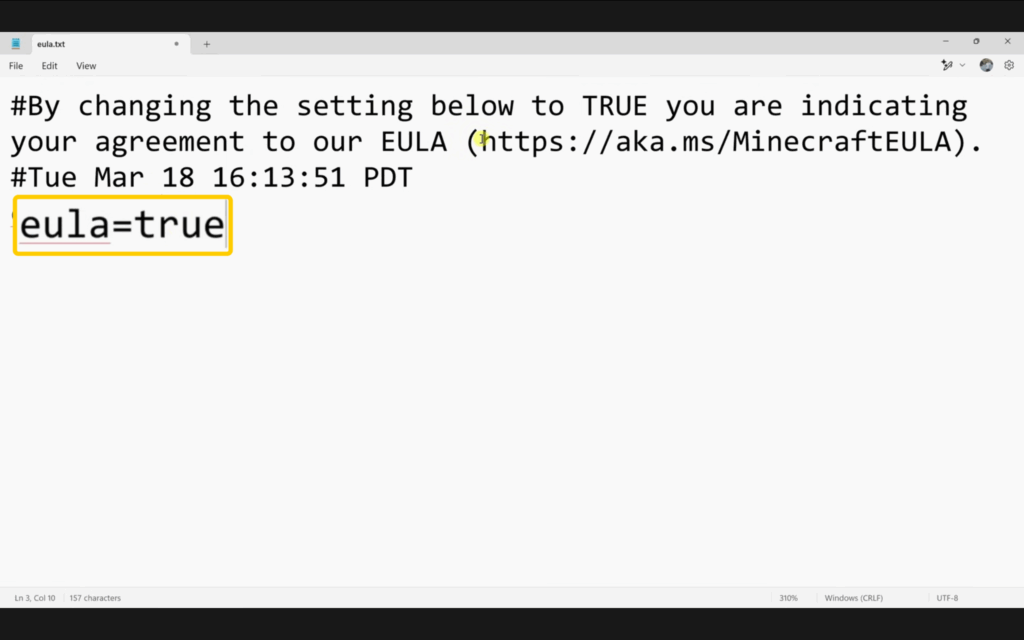
- Change “eula=false” to “eula=true,” then save it.
- Run the server again using this command: “java -jar server.jar.”
Common Risks of Hosting and Port Forwarding a Minecraft Server
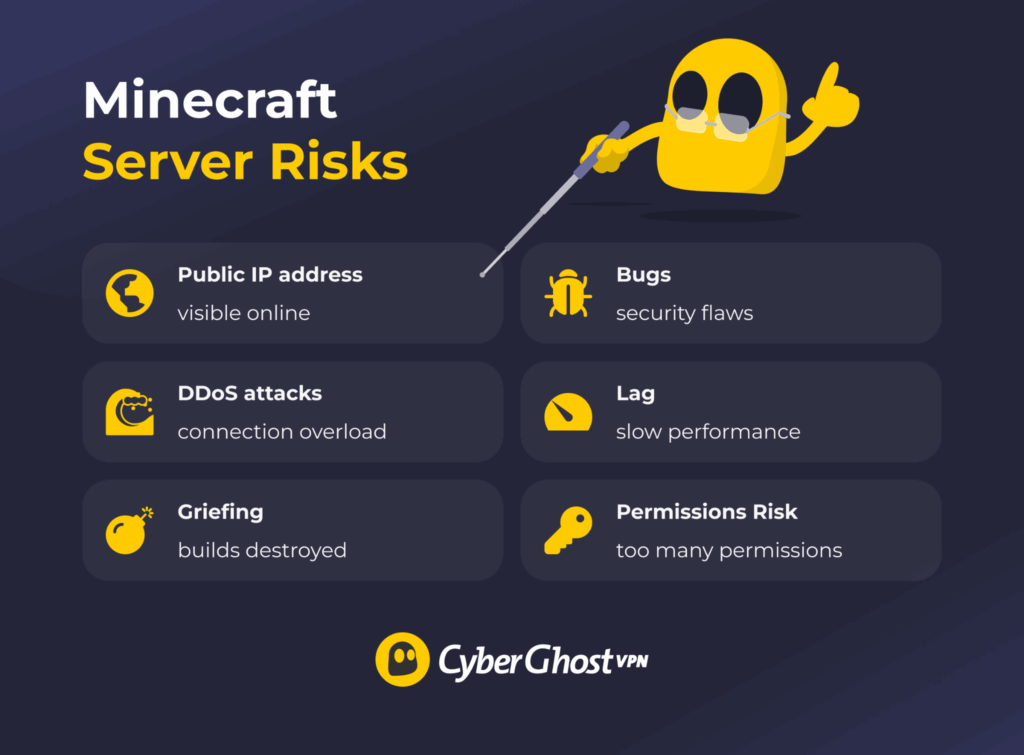
Port forwarding opens your home network to the internet so friends can join your Minecraft server, but it can also introduce potential risks. Here are the most common ones:
- Visible public IP address: When you enable port forwarding, your public IP address becomes visible to anyone who connects. This can make targeted attacks easier, increase the risk of DDoS attacks, reveal your approximate location, and attract unwanted attention from trolls or bots.
- DDoS attacks: Attackers can flood your connection with traffic, causing lag and disconnects. They could even take your server and home internet offline for a period of time.
- Griefing by players: If your server is open to anyone with your IP address, unwanted players can join and damage your world, steal items, or disrupt gameplay.
- Server vulnerabilities: Outdated Minecraft server software or Java versions can contain security flaws that attackers may exploit, potentially affecting your system beyond the game.
- Performance impact: Hosting a server uses CPU, RAM, and bandwidth. This can slow down your computer, affect other apps, and become more noticeable as more players join.
- High permissions risk: Running your server with administrator access can increase the impact of any exploit. Using a regular user account helps limit potential damage.
A VPN can add an extra layer of privacy when using port forwarding. While port forwarding allows players to connect to your Minecraft server, a VPN like CyberGhost VPN can help mask your IP address and make your online activity more private while you host or play. This can help reduce how much of your real network information is exposed online.
Can You Set Up a Minecraft Server Without Port Forwarding?
You can run a Minecraft server at home without opening any ports on your router. Many players do this using alternative methods that avoid the port forwarding process. Here’s how the other options compare to port forwarding.
| How It Works | Extra Software | Security | Best for | |
| Port Forwarding | Opens your router for direct access | No | Lower | Lowest lag, full control |
| VPN-Based Solutions | Creates a private network for friends | Yes (all players) | Higher | Small trusted groups |
| Tunneling Solutions | Routes traffic through a tunnel with a public connection link | No | Medium | Quick setup, no router changes |
VPN-Based Tools
You can run a Minecraft server without port forwarding by using VPN-based tools, often called virtual local area network (LAN) or mesh network tools. These create a private network between you and your friends and connect everyone through a shared virtual network. Once connected, your devices behave as if they’re on the same local network. Your Minecraft server runs like a LAN server, so there’s no need to adjust your router settings, and your public IP address isn’t shared directly in most setups.
Setups like this work best for small groups of trusted players. They help keep your connection private and typically use encryption for added security.
These tools are different from traditional VPN services like CyberGhost VPN. A typical VPN encrypts your traffic and routes it through remote servers to help protect your privacy. VPN-based gaming tools, on the other hand, often connect players more directly. This can sometimes result in lower latency or more stable connections, depending on the network setup.
Tunneling Tools
Tunneling tools let you share your Minecraft server online without port forwarding by routing traffic through an external service. They create a public address that links to your local server so your friends can connect using that address. Unlike VPN-based tools, your friends don’t need to install anything. They simply join using the provided address, similar to connecting to any standard multiplayer server.
This method works more like traditional hosting, since anyone with the address can join. Instead of opening ports on your router, the connection is handled through a tunnel between your device and the service, so traffic isn’t sent directly to your home network.
These tools are often used for small servers, testing, or temporary setups where you want quick access without changing router settings. Depending on the service, connections may be encrypted and routed through intermediary servers.
Is Port Forwarding the Right Choice for You?
Port forwarding is a good way to let your friends join your Minecraft server. It can give you more control and potentially strong performance, but it also comes with some risks. Opening a port makes your public IP address visible, exposing you to various online risks. It can also potentially expose your network to unwanted traffic.
If you do use port forwarding, you might want to consider using a whitelist, keeping your server and Java updated, and only sharing your IP address with people you trust. If you prefer not to open ports, you have other options for opening up your Minecraft server. For instance, VPN-based setups work well for small groups, and tunneling tools can let others connect without changing your router settings.
For extra privacy while hosting or gaming online, CyberGhost VPN can help mask your IP address and encrypt your connection. It won’t replace port forwarding, but it can add another layer of privacy while you play and help keep more of your network activity out of sight. Try out its top-of-the-range features completely risk free with a 45-day money-back guarantee (14 days for monthly users).
FAQ
How do I open port 25565 for a Minecraft server?
To open port 25565, you need to set up port forwarding on your router and allow the same port through your firewall. This allows incoming connections to reach your server. You can usually do this by accessing your router settings, creating a port forwarding rule for port 25565, and adding a firewall rule to allow that traffic.
Is 19132 TCP or UDP?
To use port 19132 for Minecraft Bedrock Edition, the connection runs over UDP, which can support fast gameplay and server discovery. Bedrock uses UDP exclusively. Port 19132 is for IPv4 connections, and port 19133 is for IPv6. Open UDP on both ports for full compatibility.
Is Minecraft TCP or UDP?
Minecraft uses different protocols depending on the edition. The Java Edition runs on TCP, which supports stable and reliable connections. Minecraft Bedrock Edition runs on UDP, which allows faster communication for gameplay and server discovery. Some features, like server queries, may also use UDP in certain cases.
Are ports 137 and 139 TCP or UDP?
Port 137 is officially assigned to UDP for NetBIOS Name Service. Some legacy Windows implementations also used TCP/137, but the standard and common assignment is UDP. Port 139 uses TCP only. They’re old Windows ports used for sharing files and printers on the same local network. These ports aren’t needed for Minecraft servers. Most people now use safer options and often keep them turned off.
Is SMB 139 or 445?
Older versions of SMB run on port 139, which works with an older helper called NetBIOS. Newer and more common versions use port 445, which connects more directly and efficiently. Port 445 is faster and preferred today because it works better for modern networks.
Is port 23 ftp?
No. Port 23 is used for Telnet, not FTP. Telnet is an old way to remotely control devices and access their command lines. FTP uses different ports for file transfers. Telnet sends everything without any encryption, so anyone watching the connection can see your commands and passwords. This makes it unsafe for most uses today.
Is port 20 secure?
No, port 20 isn’t automatically secure. It’s used as the data channel in active FTP mode, specifically where files are transferred between servers and clients. In passive FTP mode, which is more commonly used today, the server assigns a different high-numbered port for data transfer, while port 21 handles commands in both modes.
Because traditional FTP doesn’t use encryption, any data sent this way, including passwords and file contents, may be visible to others on the network. For safer file transfers, consider using encrypted alternatives or a VPN to help protect your data.
What is port 500?
Port 500 is used for VPN connections. It handles Internet Key Exchange, also called IKE. This port lets two devices safely agree on encryption keys and security settings before they build a protected VPN tunnel. You’ll often see it with tools that create secure connections to keep your internet traffic private and encrypted.
Why is port 179 open?
Port 179 may appear open because it is used by the Border Gateway Protocol (BGP), which helps large networks and ISPs exchange routing information and determine how data travels across the internet.
This protocol runs on carrier-grade or enterprise routers, not typical home routers. If a scan shows port 179 open on your network, it’s most likely detecting your ISP’s upstream equipment rather than your own device. In most cases, you don’t need to take any action.
Leave a comment