
Your iPhone is your pride and joy, so it’s only right you protect it. As much as we’d love to believe Apple devices are immune against cyber threats, they’re not. If you don’t apply extra security measures, unauthorized individuals can easily get access to your phone. Just imagine what they could steal – photos, messages, credit card information, it’s all there. That’s why you need a VPN.
A VPN keeps your iPhone and its data secure, shielding you from online spies. It also offers much more than security. A VPN can help you unblock restricted websites, track down discounts, and surf the web without censorship. Wondering where to start? We’ve got you. We’ll walk you through how to add a VPN to your iPhone and show you how to use it.
How to Quickly Set Up a VPN on Your iPhone
Simply follow these steps to set up a VPN on your iPhone:
- Sign up for CyberGhost VPN. It’s quick and easy.
- Download and install the CyberGhost VPN iOS app.
- Sign in, choose your server location, and connect.
- That’s it! Your VPN connection is up and running.
Why Use a VPN on Your iPhone?
Before we guide you through setting up a VPN on your iPhone, let’s answer the all-important question: why do you need a VPN? You can use a VPN to secure your iPhone data and stop it from falling into the wrong hands, but you’ll find many other use cases for your iPhone too:
-
-
🕵🏽 Keep your iPhone data private: A VPN encrypts your data and directs your traffic through a secure VPN tunnel. This keeps your iPhone activity private, so third parties like your ISP, government authorities, Wi-Fi admin, and other snoopers can’t spy on your online habits.
🛜 Use public Wi-Fi safely: Cybercriminals often use unsecured public Wi-Fi networks to snoop on your activities and steal your data. They can see when you log into your social media accounts or online banking, and easily steal your details. A VPN masks your traffic on public hotspots, so data-hungry cybercriminals can’t see what you’re doing – even if you’re on the same network.
💸 Find better deals: Prices for things like flights and hotels fluctuate everywhere you go. A VPN can help you save money by changing your virtual location to somewhere where prices are cheaper. When you connect to a VPN server, your IP address is replaced by the server’s address. If you use a VPN with a big server network, you can compare prices between as many locations as you want.
🔓 Access blocked websites: Some networks stop you from accessing your accounts, especially social media and streaming platforms. A VPN encrypts your traffic before it leaves your device, helping you get around firewall restrictions so you can continue streaming The Crown even if you’re at work (on your lunch break, of course).
🗺️ Stay secure on the go: No doubt you take your iPhone with you everywhere you go. Your VPN can go with you too! Just hit connect and you can stay safe on any network, wherever you are. If you’re abroad, you can even connect to a VPN server back home to avoid being cut off from the websites and platforms you prefer.
Setting Up a VPN on iPhone: Is an App or Manual Setup Better?
You can set up a VPN on your iPhone in two ways: manually or via a third-party app. The easiest and quickest way to install a VPN is by using a third-party app. You can simply download the iOS app from the App Store, log in, and hit connect. That said, apps can take up significant storage space and drain your iPhone’s battery faster.

The second option is to install the VPN manually via your iPhone settings. This is more technical and can take some time to set up, but it can give you greater control over your VPN, especially when choosing VPN protocols. Some apps limit your choice of VPN protocols, though you may be able to configure them with manual setup. Manual configuration also takes up less storage space for your iPhone, so there’s no need to delete those 10-year-old pictures in your camera roll.
Not all VPNs support manual connections. For those that do, you’ll need to download individual configurations and set up a connection for each server or VPN protocol you want to use, which is time consuming. With a VPN app, you only need to disconnect and try another server or quickly change the protocol in the app settings, so it’s more convenient.
Manual configurations can also cause problems if you don’t set them up correctly. It’s important to get the security settings right to ensure your iPhone is thoroughly protected. Otherwise, you could leave yourself vulnerable to cyber attacks and still be tracked by online spies.
How to Set Up a VPN on Your iPhone
Setting up a VPN on your iPhone is easy. Follow our step-by-step instructions to get started.
Setting Up a VPN on iPhone with a Third-Party App
A third-party app is the fastest way to set up a VPN on iPhone:
- Visit the CyberGhost VPN website and sign up.
- Open the App Store to download the CyberGhost VPN iOS app.
- Enter your credentials and log in to the app.
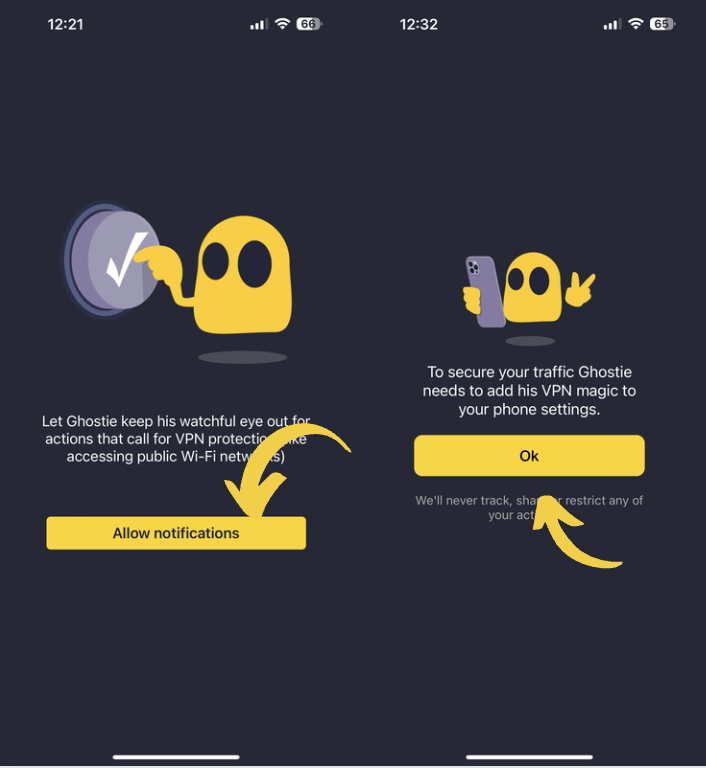
- Click to Allow Notifications, then press OK to give the app access to your settings. You may need to enter your iPhone screen lock code.
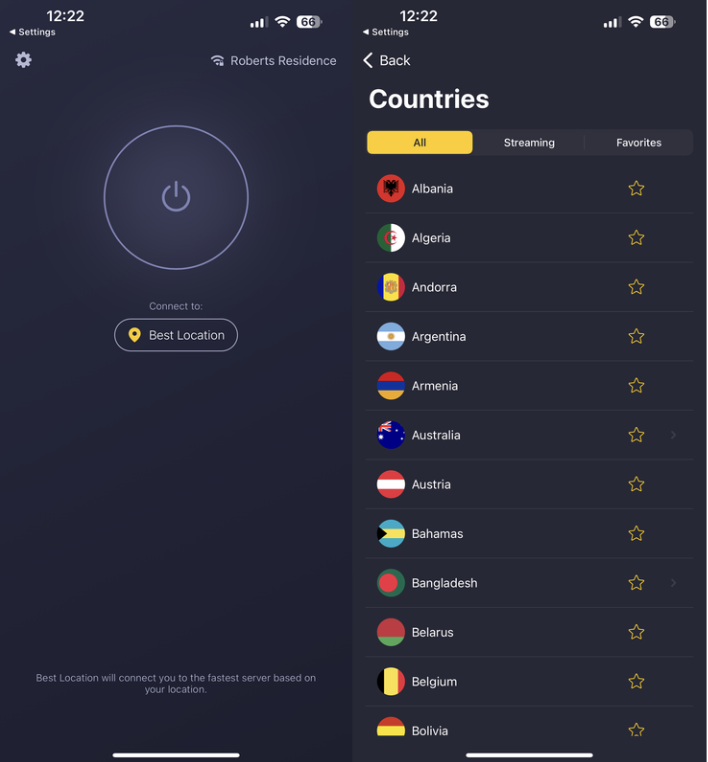
- Press the power button to find a server automatically (the best location is chosen for you), or click Best Location to browse other servers. Select the country you want.
- That’s it! Your VPN connection is set up and ready to use.
Setting Up a VPN Manually in Your iPhone Settings
iPhones have built-in IKEv2 and IPSec VPN connections, so you’ll just need a passkey and certificate from your chosen VPN provider to get started. We’ll walk you through the IKEv2/IPSec setup with CyberGhost VPN:
IKEv2/IPSec on iPhone
- Go to CyberGhost VPN’s website, sign up, and log in to your account.
- Click on the three lines in the top right-hand corner, then select VPN under products.
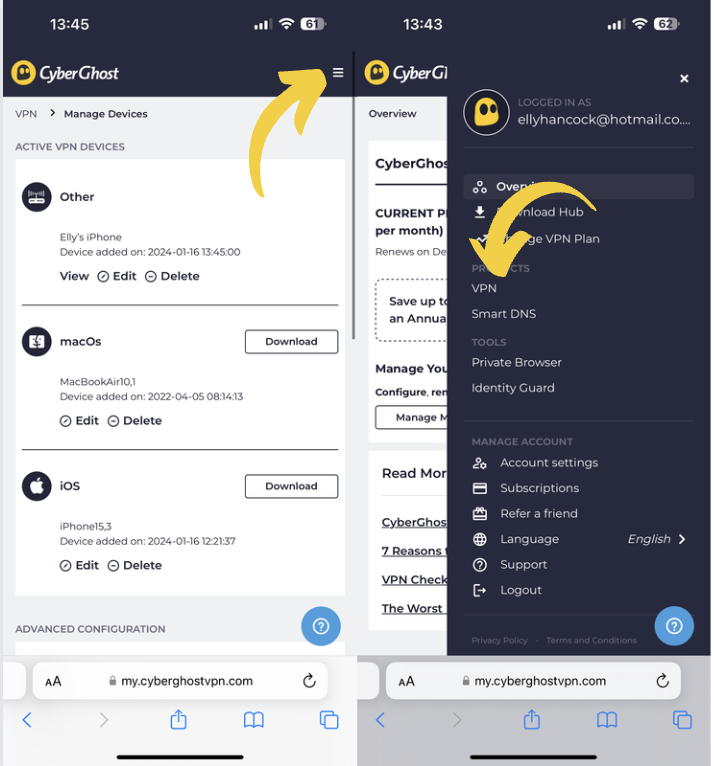
- Scroll down to Manual setup and select Configure Device.
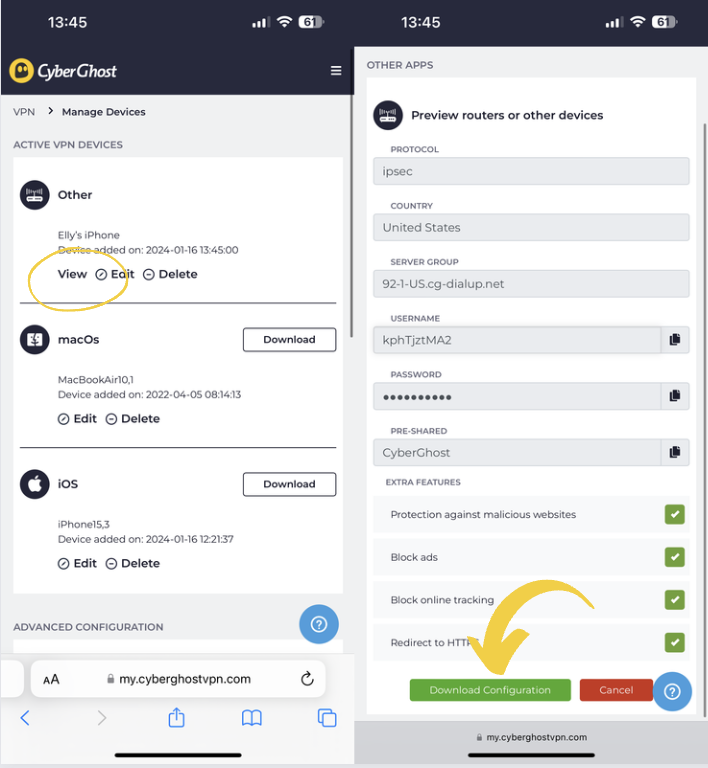
- Select the IPSec protocol from the drop-down, then select the desired server country. You should also choose which servers and extra features you’d like, then give your device a name.
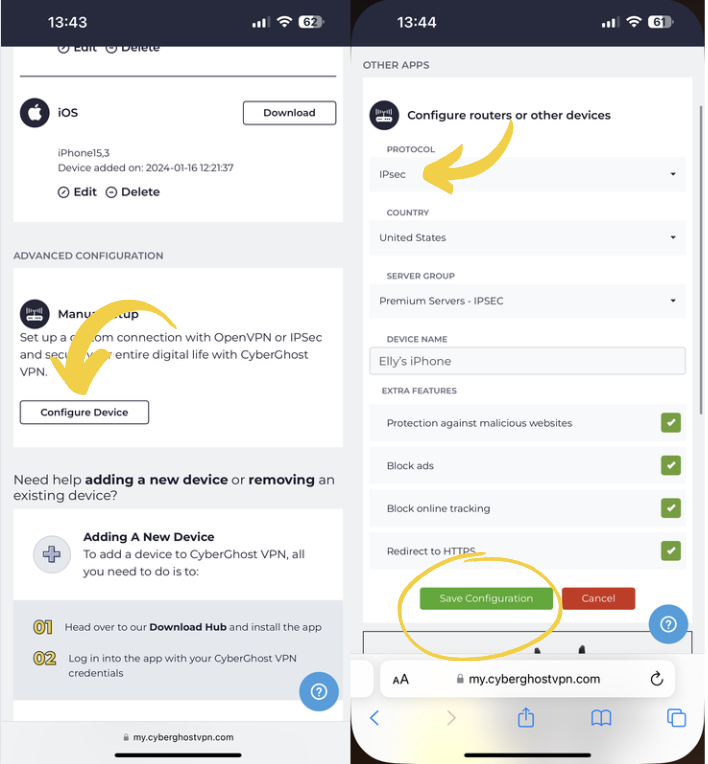
- Select Save Configuration.
- Go back to the Manage Devices homepage, then under the Other heading, you should see your new configuration. Select View.
- Here, you can see your server group, username, and password. Click Download Configuration.
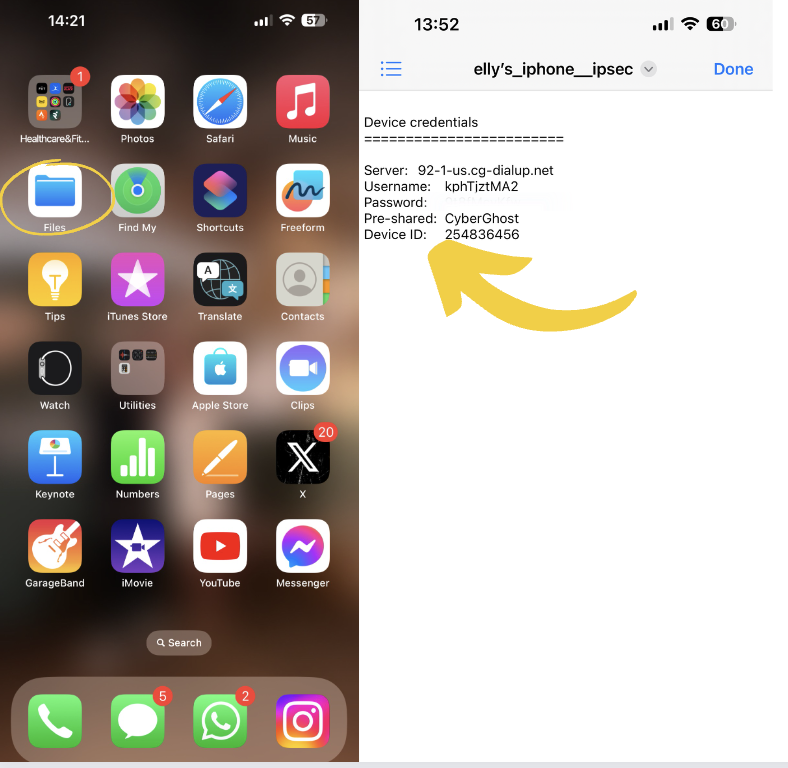
- Open Files on your iPhone, and find the downloaded file. Click it. You should see your server, username, password, pre-shared information, and device ID. Screenshot this or write the information down.
- Open Settings on your iPhone. Click VPN.
- Press Add VPN Configuration, and enter the details provided, as explained in step 8. Enter the password again in the Secret section. Make sure the Type is set to IPSec.

- Select Done to finish the setup. Head back to your VPN settings and click the toggle to activate your VPN connection.
OpenVPN on iPhone
You can also set up OpenVPN with CyberGhost on your iPhone. You’ll need to download the OpenVPN app via the App Store and configure your iPhone VPN settings that way.
- Follow steps 1-8 above for the IKEv2/IPSec setup, but change the chosen protocol to OpenVPN. You can choose OpenVPN UDP or OpenVPN TCP. If you’re unsure, read our OpenVPN TCP/UDP guide to help you decide.
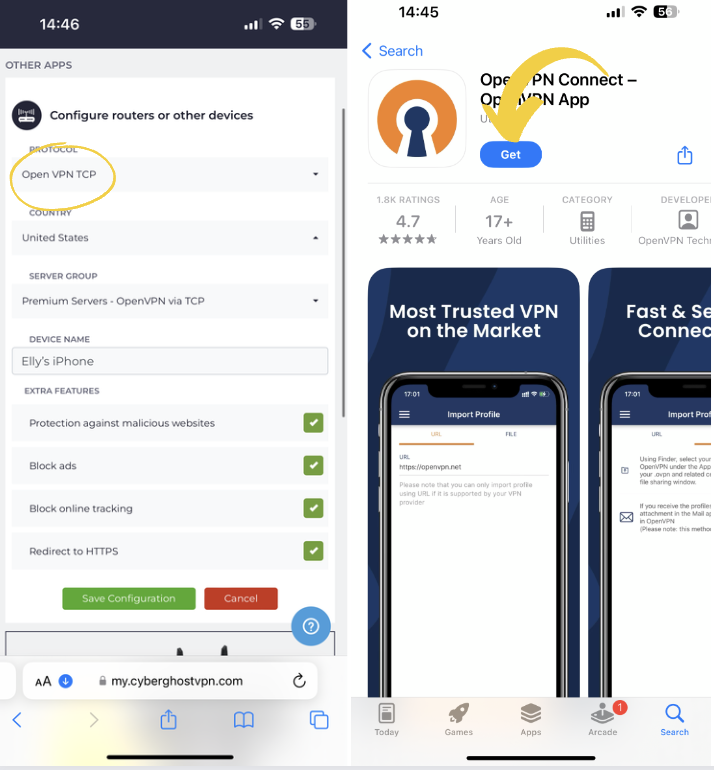
- Once you’ve found the file, open the App Store and download OpenVPN.
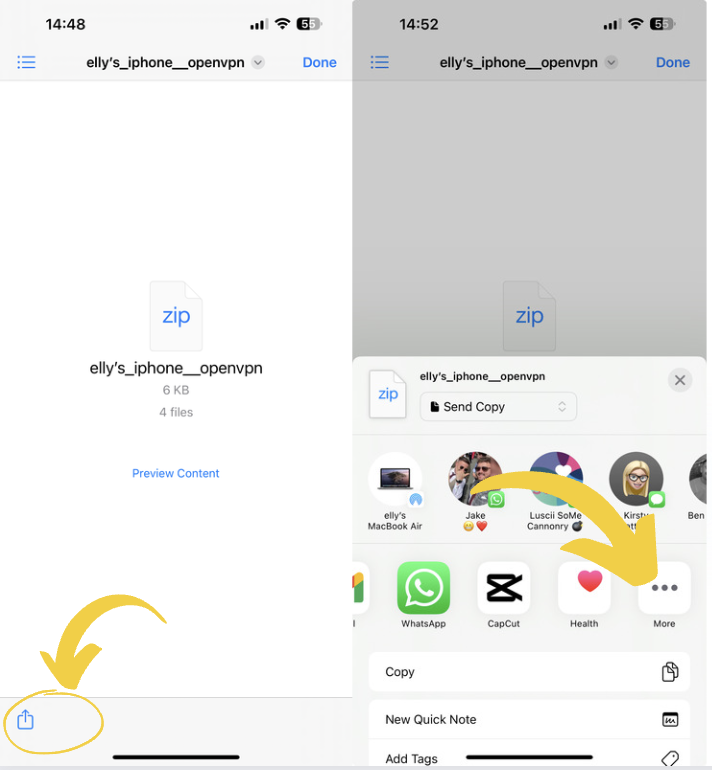
- To import the file, open Files on your iPhone. Click on the OpenVPN zip, and select the share button in the bottom left-hand corner.
- You’ll see a list of favorite apps. If OpenVPN doesn’t appear, scroll across and click More, then find OpenVPN from the list.
- The imported file should then appear in the OpenVPN app.
- Select Add under the imported file, and enter the required credentials. You’ll need the username and password listed in the downloaded OpenVPN file.
- Allow OpenVPN to access your VPN Configurations.
- Click the toggle to switch the VPN on.
How to Change VPN Settings on iPhone
You might want to alter your VPN settings on iPhone, such as swapping server locations, changing protocols, or switching certain features on and off. As with setup, it’s much easier to change your settings via a VPN app than with your manual VPN configurations. We’ll show you how to do both.
Using the VPN App
Change VPN protocol settings
- Click on the cog icon in the top left-hand corner.
- Select VPN, then click Protocol.
- You’ll see a pop-up where you can select your VPN protocol. The app will choose for you (auto), or you can change between IKEv2 and WireGuardⓇ.
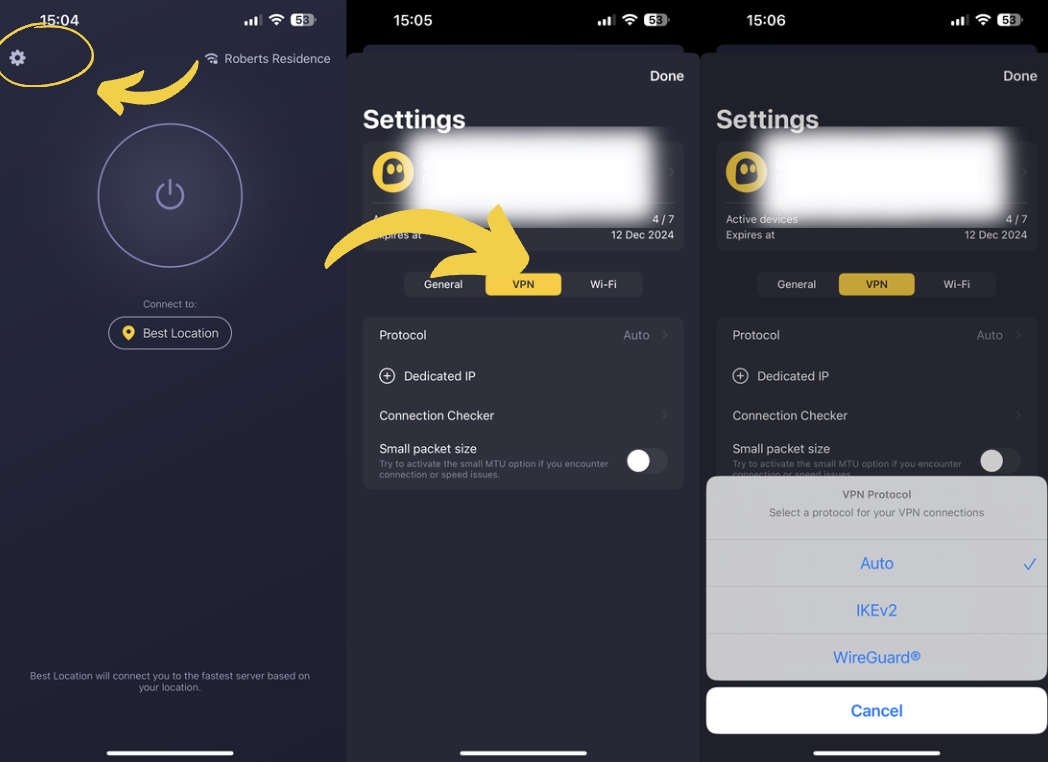
- Save your selection.
Change Wi-Fi settings
- Open the CyberGhost VPN iOS app, click on the cog icon, then, select Wi-Fi.
- You’ll see a toggle for Wi-Fi Auto-Protect, which you can turn off if needed. You’ll need to restart your iPhone to save this change. Remember, this means you’ll need to manually switch the VPN on when you connect to a network.
- You can click on Secure Wi-Fi or Open Wi-Fi to select whether the VPN automatically turns on when you connect to a network, or if you want it to ask you first. You can also select the app to automatically terminate your connection, which is helpful if you’re unsure of the security of a network.
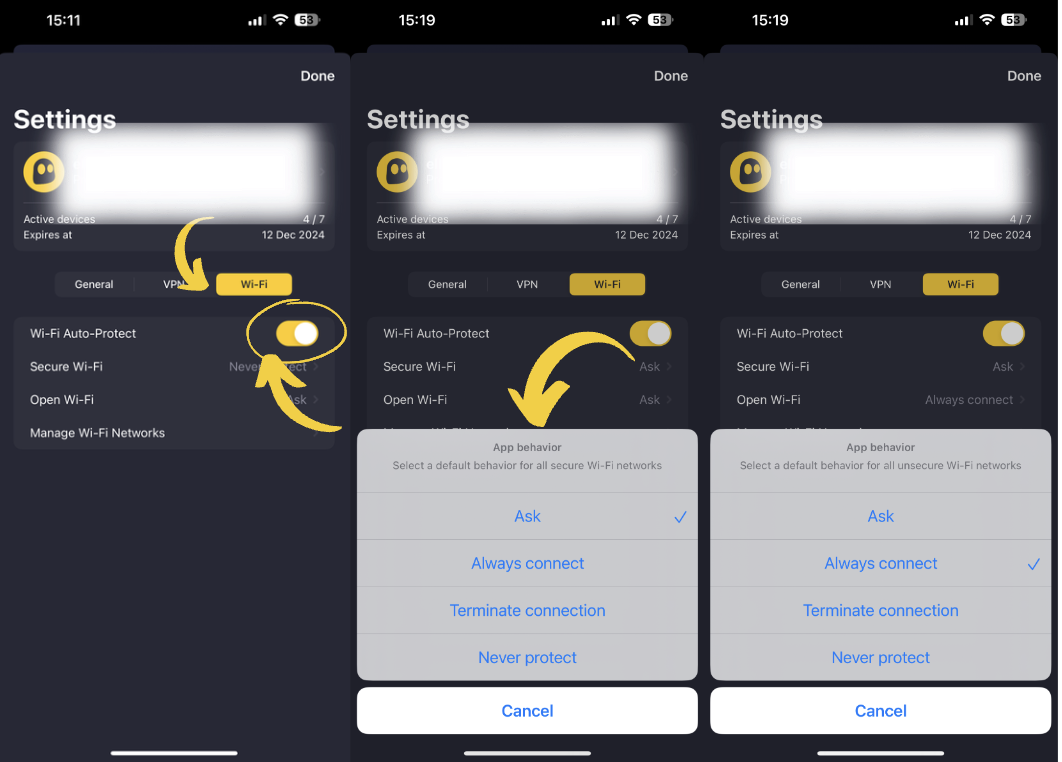
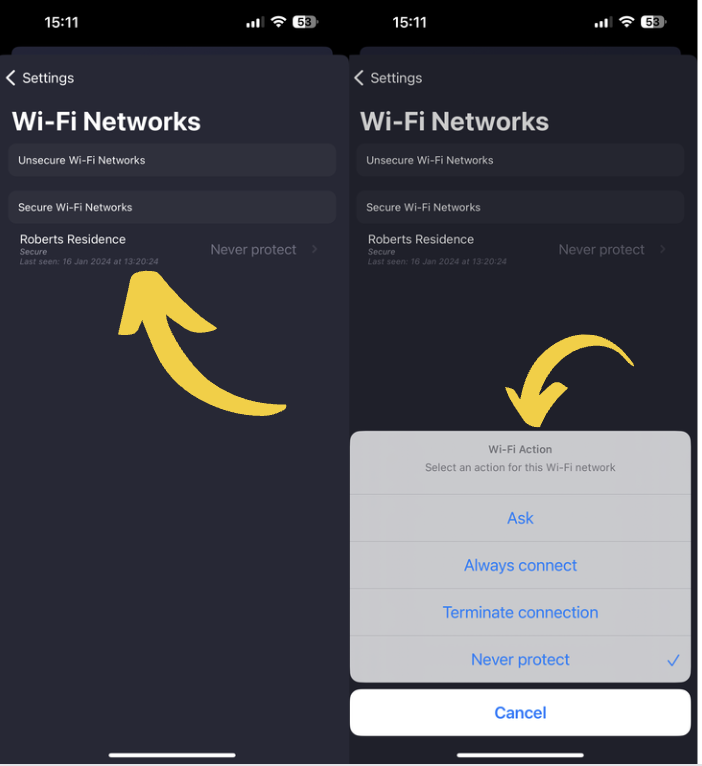
- Click on Manage Wi-Fi Networks to determine rules for certain networks.
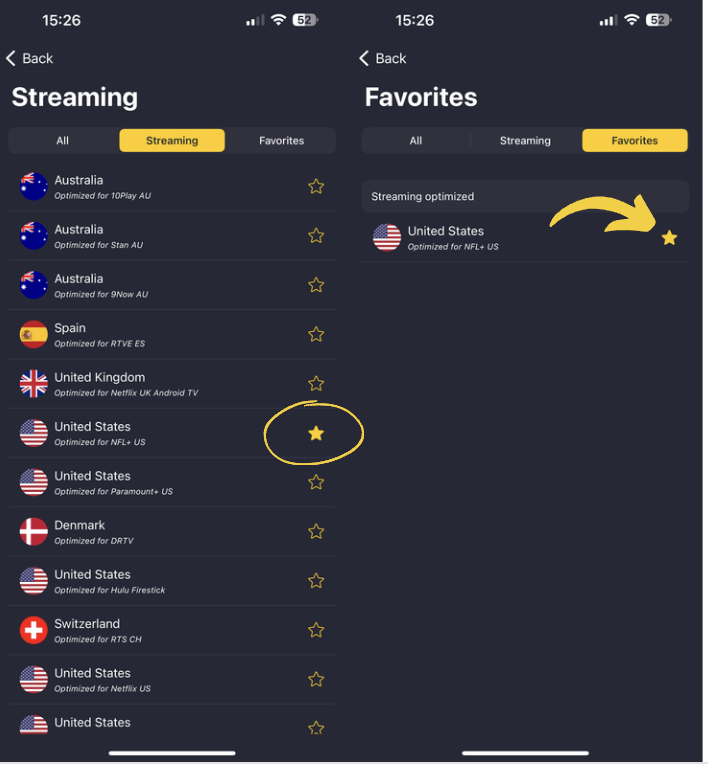
Change servers
- Turn off the VPN.
- Click on Best Location to view all servers.
- Browse all locations or find servers optimized for streaming.
- Click on any server you want to connect to and turn the VPN on again. The app will change location for you and give you a new IP address.
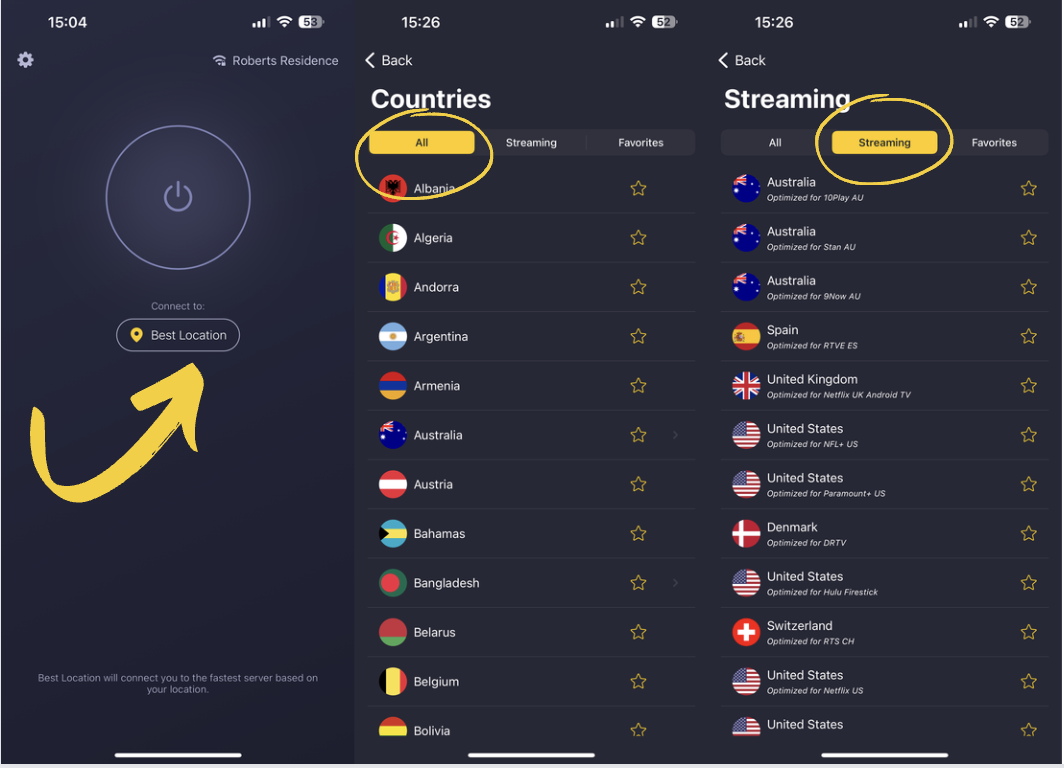
- You can also press the star icon to favorite a server so you can quickly access it from your Favorites tab.
In Your iPhone VPN Settings
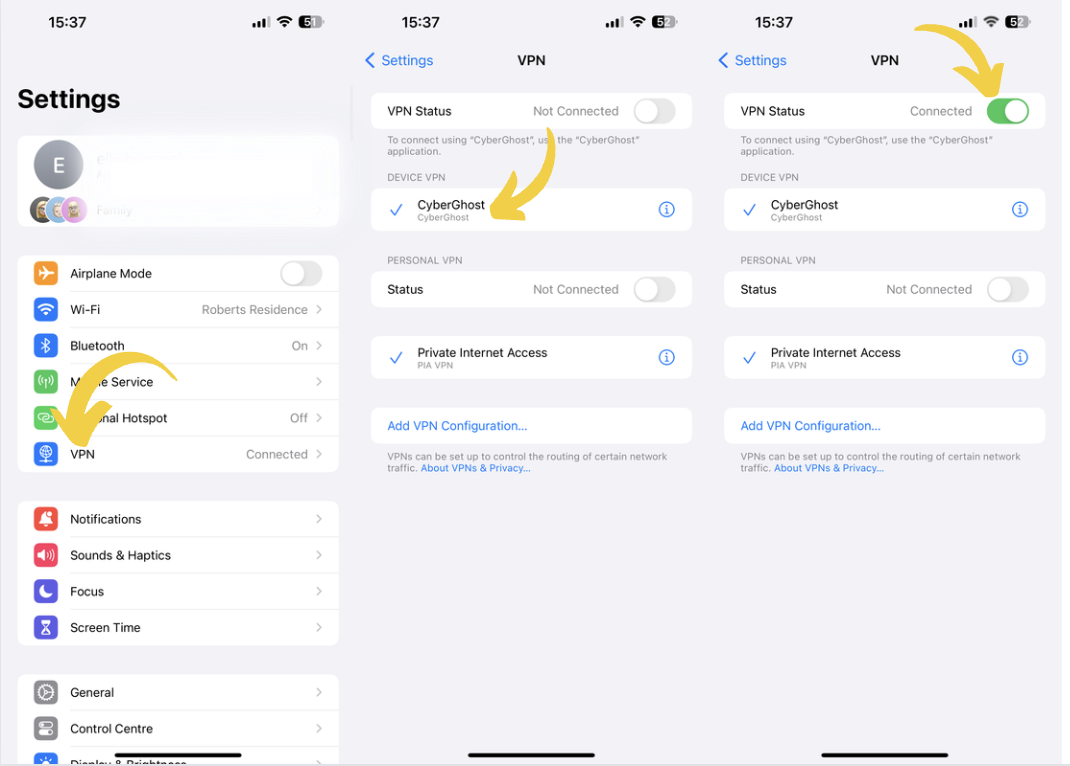
You can use your iPhone VPN settings to turn your VPN connection on or off, even if you’ve downloaded an app. To do this, follow these steps:
- Open Settings and click on VPN.
- You’ll see your VPN provider in the list.
- Make sure the VPN you want to use has a blue tick next to it.
- Click the toggle to turn your VPN connection on.
To change iPhone VPN settings for manual connections, you’ll need to set up a new connection each time. For example, if you want to switch to OpenVPN from IKEv2, you’ll need to set up another manual configuration, download the file, and enter new credentials following the steps outlined above.
You’ll also need to do the same for any new server locations. If you’re someone who likes to switch between locations and protocols, it can get quite messy and confusing having several manual configurations – not to mention the time spent setting each one up. That’s why it’s much easier to use the app.
When Should I Use a VPN on an iPhone?
We recommend using a VPN whenever you go online, even if you’re connecting to a trusted network. Online threats are still a risk, whether you’re at home or not.
Without a VPN, everything you do on your iPhone is visible. Snoopers can see which websites you’ve visited, your search queries, and what you’ve been streaming. If a cybercriminal gets access to your iPhone and installs spyware, they can see a whole lot more, including your personal details, credit card information, passwords, and private messages. That can leave you at risk of identity theft, fraud, and even doxxing.
A VPN stops online spies from tracking you. It keeps your traffic encrypted and away from snoopers, whether you’re at home, work, school, or connected to public Wi-Fi. That means no one can spy on your browsing history or sensitive information, no matter where you go.
You can also use a VPN when connected to restricted networks. Network firewalls can block you from accessing the sites you need, like streaming platforms and apps on your iPhone. VPN encryption stops firewalls from detecting which websites you visit so you can keep on streaming with no one watching.
How to Choose the Best VPN for Your iPhone
So you know you need a VPN for iPhone, but how do you choose which one? Not all VPNs are built the same, and not all are optimized for iPhones. Some limit their features for mobile, especially when it comes to security. Here’s a quick guide on what to look for when choosing the best VPN for your iPhone:
-
- Encryption and protocols: Look for VPNs that use 256-bit AES encryption and secure protocols to keep your iPhone data under wraps. Some VPN providers limit which protocols you can use on iPhones, and many use IKEv2 as a minimum. If you can find a VPN provider that offers WireGuardⓇ, even better. This is the best protocol for iPhone as it offers speed and security in one.
- Data logging: Make sure the VPN you choose has an independently verified no-logs policy. You need a VPN to help you avoid data tracking, not one that keeps logging your activity. Be careful – some shady VPNs might even sell your data to third parties. Always read the privacy policy first.
- Extra features: The best VPNs offer extra features to keep your iPhone secure, such as a kill switch, DNS leak protection, and automatic Wi-Fi protection. These features make sure your data doesn’t accidentally fall into the wrong hands.
- Servers: Find a provider with worldwide VPN servers, so you have plenty of locations to choose from. Look for VPNs that have high-quality server infrastructure, such as streaming-optimized servers or speed-boosted connections.
- Speeds: Your chosen VPN should offer reliable connections, with zero bandwidth or data caps. The last thing you need is sluggish speeds when you’re trying to upload a new story to Instagram.
- Compatibility: VPNs should be compatible with your other devices, including iPad and macOS. Make sure you find a VPN that supports multiple simultaneous connections per subscription so you can secure your iPhone alongside your other devices.
A Win, Win Solution for Your iPhone Privacy
Setting up a VPN on your iPhone is the best way to protect your online privacy and digital freedom. A VPN wraps your iPhone traffic in encryption, keeping secret spies away from your habits. It also changes your IP address to another, so you can get around network restrictions and unblock the websites you need to access, anywhere you are.
Setting up a VPN on your iPhone manually is one option, but it means time-consuming steps and new connections every time you want to change servers or VPN protocols. The fastest and safest way to set up a VPN on your iPhone is to download a third-party app. Everything you need is already set up and ready to go – all you need to do is find a server and press connect.
You can download CyberGhost VPN’s iOS app to secure your iPhone in seconds. You get tough encryption, super fast speeds, and 7 simultaneous connections so you can protect all of your Apple devices at once.
FAQ
We strongly recommend you keep your iPhone VPN on at all times. You’re at risk anywhere you go online, even while connected to trusted networks. Third parties still track your online habits and digitally profile you. With a VPN, you can keep your traffic encrypted and surf the web under the radar without being detected. That way, no one can collect your browsing data or see how much time you spent watching Stranger Things.
No, iPhone doesn’t have a built-in VPN. It has pre-configured settings for setting up IKEv2 and IPSec VPN connections. You’ll still need server information and credentials from a VPN provider to configure these. You can subscribe to CyberGhost to manually configure an IKEv2/IPSec VPN on your iPhone, or just download our iOS app to skip the extra steps and get connected right away.
You’ll see the VPN icon at the top of your iPhone screen when it’s connected. If you swipe down on your screen, It’s usually displayed next to the Wi-Fi icon in the top left corner. To turn the VPN off, open the app and click the power button, or go to your iPhone settings, select VPN, and stop the connection that way.
No, VPNs aren’t turned on automatically on iPhone unless you set them to do so. CyberGhost VPN lets you decide whether the app should connect automatically for specific Wi-Fi networks, so it’ll connect without you having to do anything. This is especially important on public Wi-Fi where cybercriminals are waiting to spy on your iPhone and steal your data.
A VPN switches your IP address, which changes your geo-location. This means that when you visit a website, all the website sees is your VPN IP address, not your actual location. A VPN doesn’t change your iPhone’s registered location though. To fully change your location on iPhone, you’ll need to switch your GPS and App Store region.


Leave a comment