
Are you thinking about setting up your very own game server to host a game for your friends? Perhaps you’re looking to get into your desktop from a remote location? Or even share files with networks outside your own? All of this is totally doable with one slick networking trick called port forwarding.
Think of port forwarding as a secret tunnel that bores straight through your router’s firewall, allowing outside traffic to connect directly with a device inside your local network. It opens up a world of possibilities for you in areas including online gaming and web and server hosting.
In this guide, we explain port forwarding on Windows and macOS starting from the basics. We’ll reveal everything you need to know about port forwarding and show you how to set up port forwarding on your computer. Let’s dive in!
What Is Port Forwarding?
Port forwarding is a technique that allows outside devices to access devices and applications inside your local network via the internet. Usually, devices can only access other devices when they’re both part of the same private local area network (LAN). Outsiders can’t normally find your devices over the web because your router only lets connections from the outside see its IP address. Port forwarding is the key to overcoming this limitation!
You can think of port forwarding as similar to call forwarding. You dial a number and to be forwarded to the right department, you also need to dial an extension. In port forwarding, the “phone number” is your router’s public IP address, and the “extension number” is the internal IP address and port number you’ve assigned to a specific device in your network, like your computer. To help you make sense of this, here’s a quick breakdown of what these terms mean:
-
- Public IP address: This is your router’s internet-facing IP address, the one your ISP assigns to your network. Your router also has a private IP address it uses to communicate with the devices inside your network.
- Internal IP address: To keep track of all the devices in your network, your router assigns an internal IP address to each. Normally, this address isn’t visible over the internet as your router acts as a middle-man and bouncer.
- Port: Just like different lanes on a highway, the internet uses different ports to manage traffic. Ports are often associated with specific types of data, for example, HTTPS uses port 443, HTTP uses port 80, and email services use port 25. This means, your browser would typically send data over these ports.
When you set up a port forwarding rule in your router’s settings, you’re telling the router to ignore its normal traffic management rules for a specific port and internal IP address combination. Instead, it’ll send any incoming traffic from that port (or port range) intended for its public IP address directly to the internal IP address.
It’s useful if you need to access security cameras remotely or give someone remote desktop access to a computer. Port forwarding is also often used in gaming by players who want to host a local server to let their friends join their game. It can also reduce lag and latency issues for players in online games that use peer-to-peer servers.
What Is NAT?
Network address translation (NAT) is a service on routers that translates internal IP addresses to a public IP address. It allows multiple internal IP addresses to use the same external IP address and it’s how the router keeps track so it can send data to the right device. Seem overly complicated? It kind of is. The reason we need NAT is because of a built-in flaw in IPv4 IP addresses.
When technicians created IPv4 addresses 50 years ago, they couldn’t have imagined how widespread the internet would become. So, when choosing a finite number, they thought 4 billion-plus would be plenty. Obviously, it wasn’t. Over the last 50 years, the world’s population skyrocketed and the internet has become central to life.
The initial limit of 4 billion-plus IPv4 addresses turned out to be sorely insufficient. NAT is like a bandaid for this inherent flaw, and it helps conserve the limited number of publicly routable IPv4 addresses. NAT software is built into all routers and configures IP addresses automatically by assigning addresses to devices when they connect to the router. Devices keep that address for as long as they’re connected.
NAT and your firewall often work together to manage incoming traffic. While NAT hides your internal addresses and manages incoming and outgoing data, your firewall blocks suspicious traffic and connections initiated outside your network.
Port forwarding is a NAT configuration. You change the NAT rules for one device from PAT (Port Address Translation), which is what most home routers use, to DNAT (Destination Network Address Translation). This is why people sometimes refer to port forwarding as DNAT. It’s the same thing as changing your NAT Type on PS4 or PS5, but the process looks different.
Local vs Remote vs Dynamic Port Forwarding
Different types of port forwarding serve different purposes. Local port forwarding, remote port forwarding, and dynamic port forwarding all achieve different outcomes.
Here’s how they differ:
-
- Local Port Forwarding. Local port forwarding lets you securely connect from your computer to another server. It’s like creating a secret tunnel. You can use it to bypass firewalls that block certain websites. When you connect, data from your computer gets forwarded through a secure tunnel to a destination server.
-
- Remote Port Forwarding. This is the opposite of local port forwarding. Let’s say you want to share a service on your computer with someone else, but your computer isn’t directly accessible from the internet. You can use remote port forwarding to make it accessible. Essentially, it lets you connect from the server side of the SSH tunnel.
-
- Dynamic Port Forwarding. Dynamic port forwarding lets you create a flexible tunnel through which you can route various types of traffic. You can use it to access resources on a private network, even if you’re not physically there. It allows you to specify a connect port to forward all incoming traffic to the remote server dynamically.
We’ve explained what port forwarding is and explained the different types of port forwarding. Now, let’s take a look at what port forwarding does in real terms.
What Is Port Forwarding Used For?

Port forwarding isn’t just for techy people. It might sound like some obscure networking setting, but it’s actually a useful tool for a variety of situations.
Port forwarding:
-
- Lets you access devices within your local network from over the internet
- Lets you directly share files with others over the internet
- Helps bypass firewalls and other security measures that might block incoming connections
- Enhances security if you direct traffic through a specific device or service that can inspect, filter, or monitor the data
- Allows for direct connections to gaming servers — letting you play locally with friends and improving gameplay on peer-to-peer networks
Before You Start: Some Port Forwarding Preparation
Pick a Port or Port Range
Before you start port forwarding, you need to know what port number to use for the program you want to set up. You can usually find this on the Online Port Checker. If the app or software you’re using doesn’t have a specific port number, you can use an unassigned number and configure it to your needs.
If you want to set your own port for a specific app then you’ll need to configure that app’s files to specify the same port as well. Our Minecraft port forwarding guide shows you how to do this.
You can use almost any port in the range of 1-65535, with a few exceptions as some ports are registered for specific uses and some ports are blocked by ISPs for various reasons. If you can’t use well-known ports like 80 or 443, then it’s a good idea to pick something above 10000. This helps you avoid cybercriminals who typically scan ports up to around that number looking for vulnerabilities.
Optional: Make Your Computer’s Internal IP Address Static
Before setting up port forwarding on a device, you might want to make the internal IP address of the device you’re going to use static. This means the router will keep assigning that internal address to that device even if it disconnects or is switched off. Otherwise, your port forwarding rule might stop working properly.
Here’s how to make your internal IP address static via your router’s settings. If your router doesn’t support this, you’ll be able to do it manually on Windows and Mac computers — you should be able to find guides online. Also, these steps will likely differ from one router to another so it’s better to find a guide for your specific brand, but here’s how it will generally go:
- Follow steps 1 to 6 for either Windows or Mac under How to set Up Port Forwarding Securely below.
- Open your browser and log into your router’s firmware settings.
- Look for a configuration called Static IP addresses, DHCP Reservations, or something similar (it may also be under the Advanced Settings or LAN Settings tab)
- Pick the device you want to use for port forwarding in the list of the devices and servers on your network. Sometimes the list of devices and static IP address settings are separate. In that case, you’ll have to note down the device’s MAC address, find the DHCP settings, and manually enter the MAC address and a static IP address.
- Set the IP address to static.
Note: If you want to host a website or server over a span of time, it’s also a good idea to get a static public IP address (either from your ISP or a VPN). If you don’t, the port forwarding rule will stop working if your ISP changes your IP address, which can happen at any time.
If you don’t want to do this, you’ll have to reconfigure your port forwarding rule so it works with the new internal/public IP address if either ever changes.
How to Set Up Port Forwarding Securely
In this guide, we’re only providing the steps for Windows and Mac, but the process will look different for every device. As an example, for security cameras and other IoT devices, you’ll likely need to log into the devices’ firmware from your phone or computer and change the network settings. It can get complicated depending on the device, but you should be able to find a guide for your specific brand online.

As for computers, port forwarding requires a little technical finesse, but luckily you don’t need to be a tech guru to get it done. The steps will likely differ depending on your router, so it’s always best to find a guide specifically for your brand or consult your manual. That said, if you follow the step-by-step instructions below, you should be able to get a general idea of what to do. I’m using a Netgear router for this guide.
These steps are for remote port forwarding. So, if a friend of yours sends a request with your specific port number and IP address combination, your router will grant them access to your application or device.
How to Set Up Port Forwarding on Windows
To do this, you’ve got to log in to your router’s configuration page on a web browser using your router’s private IP address. Here’s how:
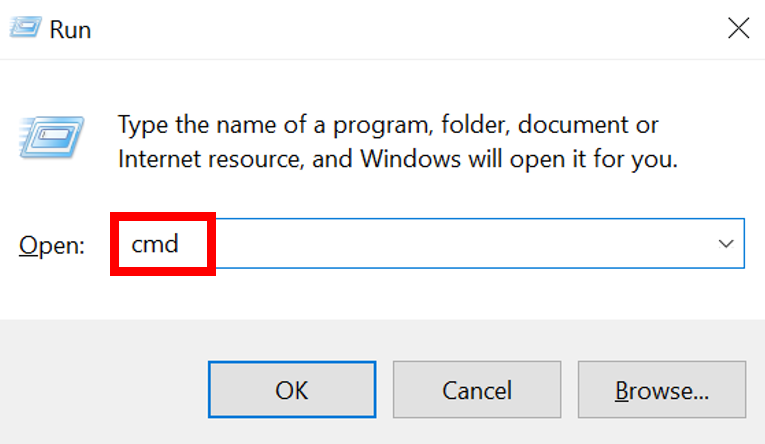
- Open the run prompt using the shortcut [Windows key + R].
- A dialogue box will appear at the bottom left of your screen. Type “cmd” into the bar and click OK.
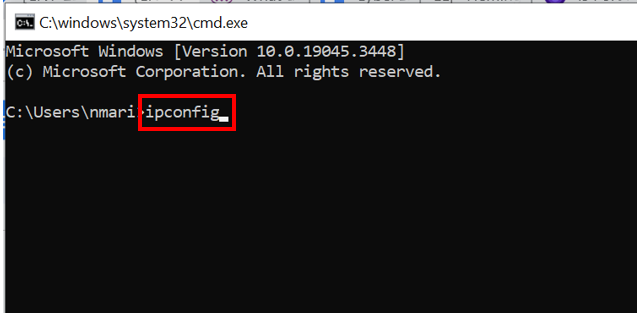
- The command prompt will open. To get your private IP address, type in “ipconfig” and press the Enter key
- Text will appear. The number beside Default Gateway is your router’s internal IP address. Also, take note of the IPv4 address as this is your computer’s internal IP address.
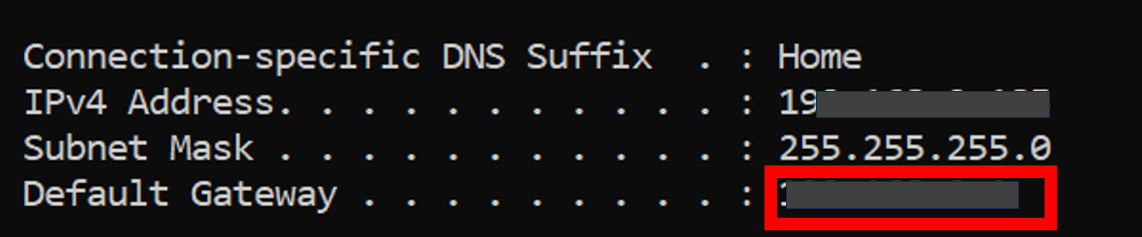
- Copy the number beside Default Gateway and paste it into your web browser. Your router configuration page should appear as a webpage.
- Log in using your router’s username and password.
Note: You’ll need your internet or broadband login credentials. If you’re not the Wi-Fi owner, you might not be able to get access. Also, the page layout and appearance can vary between routers, but core elements should be the same.
- Go to the port forwarding section, this may be called something else or under another section like the Advanced tab. On my router, it’s Advanced Setup > Port Forwarding/Port Triggering.
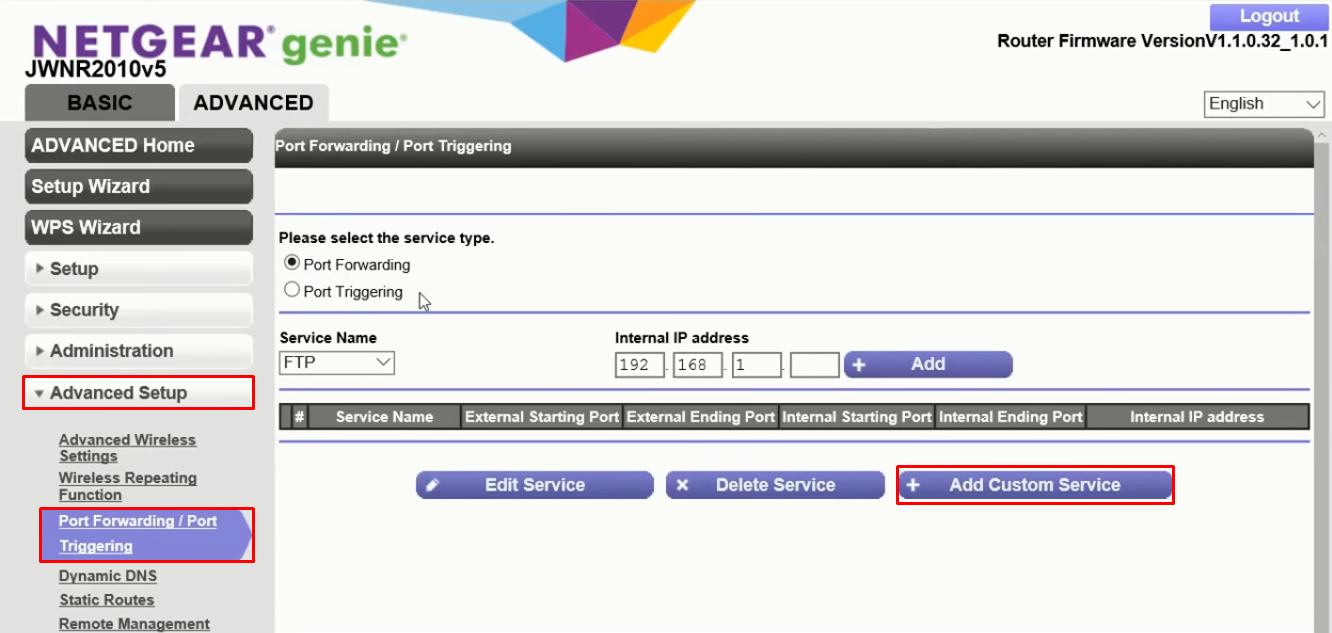
- Next, enter the following details:
-
- Service Name: Give the port a name so you can recognize it later.
- Service Type: TCP/UDP
- External Starting & Ending Port: Here, you can enter a single or a range of ports. To use a single port, enter the same port number at both starting and ending ports.
- Internal Starting & Ending Port: Select the same port numbers as the external ones.
- Internal IP address: Enter the internal IPv4 address for your device.
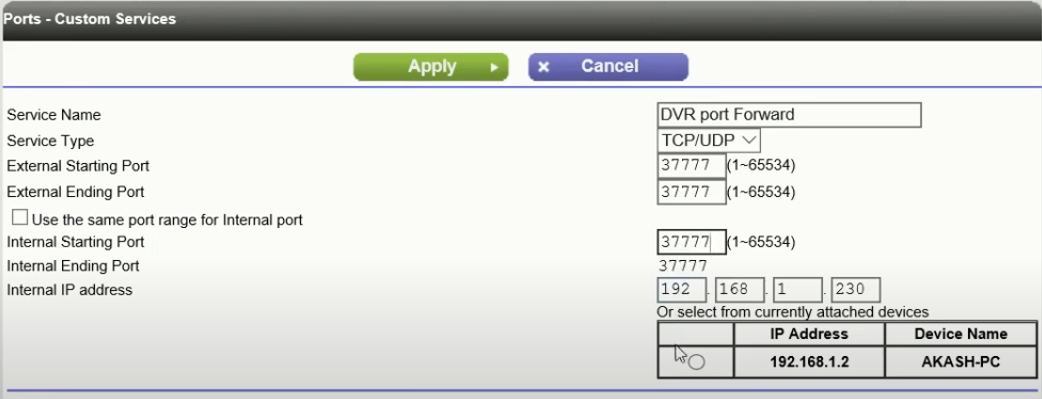
- Hit Apply. That’s that! You’ve now successfully forwarded a port on your connection.
How to Set Up Port Forwarding on Mac
The steps to find your router number and internal IP address are slightly different on macOS. Here’s how to do it:
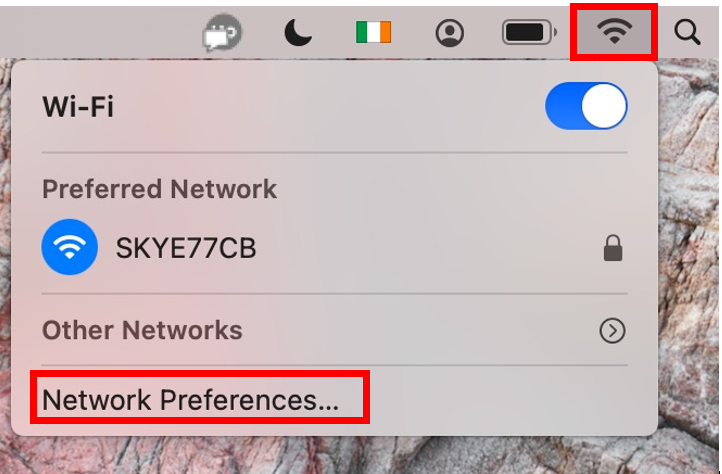
- Click the Wi-Fi icon from your menu bar to open Wi-Fi settings
- Select Network preferences from the drop-down menu
- Make sure the Wi-Fi section is highlighted and click Advanced
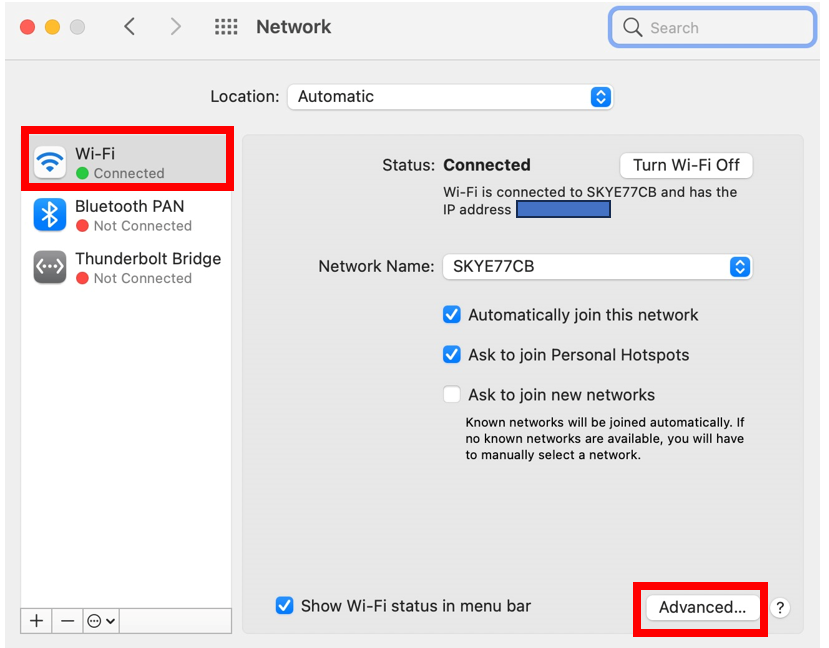
- From there, click TCP/IP. You should be able to see your IPv4 address and router number.
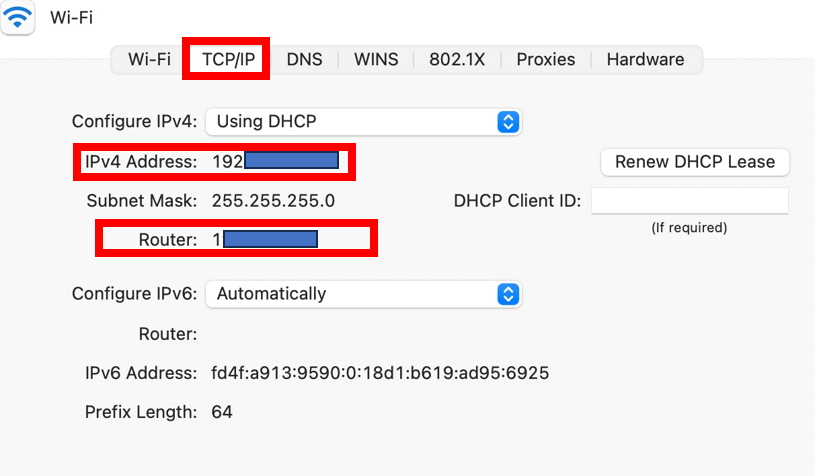
- Copy the number beside Default Gateway and paste it into your web browser. Your router configuration page should appear as a webpage.
- Log in using your router’s username and password.
Note: You’ll need your internet or broadband login credentials. If you’re not the Wi-Fi owner, you might not be able to get access. Also, the page layout and appearance can vary between routers, but core elements should be the same.
- Go to the port forwarding section, this may be called something else or under another section like the Advanced tab. On my router, it’s Advanced Setup > Port Forwarding/Port Triggering.
- Next, enter the following details:
-
- Service Name: Give the port a name so you can recognize it later.
- Service Type: TCP/UDP
- External Starting & Ending Port: Here, you can enter a single or a range of ports. To use a single port, enter the same port number at both starting and ending ports.
- Internal Starting & Ending Port: Select the same port numbers as the external ones.
- Internal IP address: Enter the internal IPv4 address for your device.
- Hit Apply. That’s that! You’ve now successfully forwarded a port on your connection.
Is Port Forwarding Safe?
Port forwarding is generally considered safe as long as your network has a strong firewall. Port forwarding on Xbox and PlayStation is safe while port forwarding on PC or for camera surveillance comes with a little more risk.
Since port forwarding is like “opening a door,” if hackers find a way in, it could be problematic. Even if done correctly and with added safety precautions, port forwarding still creates a security vulnerability. You’re no longer preventing outsiders from accessing a device on your network directly. So your firewall will let most traffic through if it doesn’t look suspicious, but the person on the other side may have malicious intent.
If your network has strong protection and you take steps to limit vulnerabilities, chances are you’ll be fine. It’s a good idea to:
-
- Only use safe, well-known ports
- Limit the number of ports you use
- Use port forwarding sparingly
- Adjust your firewall rules so only specific IP addresses can get access to the port
- Regularly update your router firmware and device operating systems
- Use a VPN on the devices you haven’t used with port forwarding to improve their security
- Monitor your network for suspicious activity
Want to add instant protection for all the devices connected to your router so you don’t have to worry about outside threats? Keep your network traffic secure and private by configuring CyberGhost VPN on your router. Sounds difficult? — It’s not. Here’s how to do it in 3 simple steps. Keep in mind, though, CyberGhost VPN doesn’t support port forwarding due to security concerns.
FAQ
What is port forwarding used for?
1. Port forwarding lets you access things on your home devices from the internet, like security cameras or files on your computer.
2. It helps you get around your router’s firewall, so you can unlock access to apps or games.
3. Lets you set up your own local server (for games that support that option) to host a game for friends.
What is port forwarding for gaming?
Some people use port forwarding to set up their own server if they want to host an online game for their friends. Port forwarding can also benefit gamers who play games that use peer-to-peer servers as it may help reduce lag and ping.
Can you get hacked through port forwarding?
Yes, you can. While port forwarding is generally considered safe if you have a strong firewall and use security measures, it creates opportunities for hackers to get into your device and network. Port forwarding on Xbox and PlayStation, which is also called changing your NAT Type, can be unsafe too — so only do it if you need to.
Leave a comment