
Configuring a proxy in Chrome might seem confusing at first because the browser doesn’t have a proxy settings page. Instead, you have to configure the proxy settings on your device. But don’t worry; This guide will give you step-by-step instructions to adjust these settings so you can set up your proxy to work with Chrome.
If you’re looking to set up a Chrome proxy quickly without having to change your device’s settings, we recommend trying CyberGhost VPN’s free Chrome extension instead. It works just like a proxy, with the added security of strong encryption. Because it’s an extension, all you need to do is add it to Chrome and switch it on.
What Is a Chrome Proxy?

Proxies mask your IP address and route your traffic through their servers. This means that the websites you visit see the proxy’s location instead of yours. It can also help you access websites that your network restricts.
How to Change Proxy Settings in Chrome
Chrome doesn’t have built-in proxy settings. So, you need to set your proxy up on your device instead. Your operating system doesn’t include a proxy that you can just turn on, so you will need to register for one.
If you’re using a proxy from your workplace or school, you may need to ask your network administrator for some details, like the proxy’s IP, port numbers, and script name. You should be able to find this information in your registration email or the proxy’s website if you bought your own proxy.
The first configuration steps are the same for all operating systems.
- Open Chrome, click on the menu button (the three dots), and select Settings. Or, paste chrome://settings/system into the address bar to go right to the settings page.

- Select System.

- Click on Open your computer’s proxy settings.
How to Change Proxy Settings in Chrome for Windows
Setting up a proxy on both Windows 10 and 11 follows the same process. Windows offers three methods for setting up a proxy:
- Automatic: Good for Using a School or Workplace Proxy
Toggle on Automatically detect settings in the Proxy panel. With this switched on, Windows checks if your organization has set up a proxy server for you. It finds these settings by itself, so you don’t have to type anything in. If you use your own computer and want to set up the proxy manually, you need to turn off the automatic option.

- Script Setup: Use This if Your Proxy isn’t Automatically Detected
If Windows doesn’t find the proxy settings by itself, you’ll have to provide the location of the proxy setup script. You might need to ask your organization’s IT department for assistance if they haven’t provided you this address.
Toggle on Use setup script, enter the location and hit save.

- Manual Proxy Setup: For Quickly Setting Up a Personal Proxy
This is the best option for setting up a personal proxy using the details the proxy company provided to you. You can also use it if your workplace or school has provided the proxy IP for you to use.
Toggle on Use a proxy server, type in the address, and hit save. You can also include the port number, but this is optional.

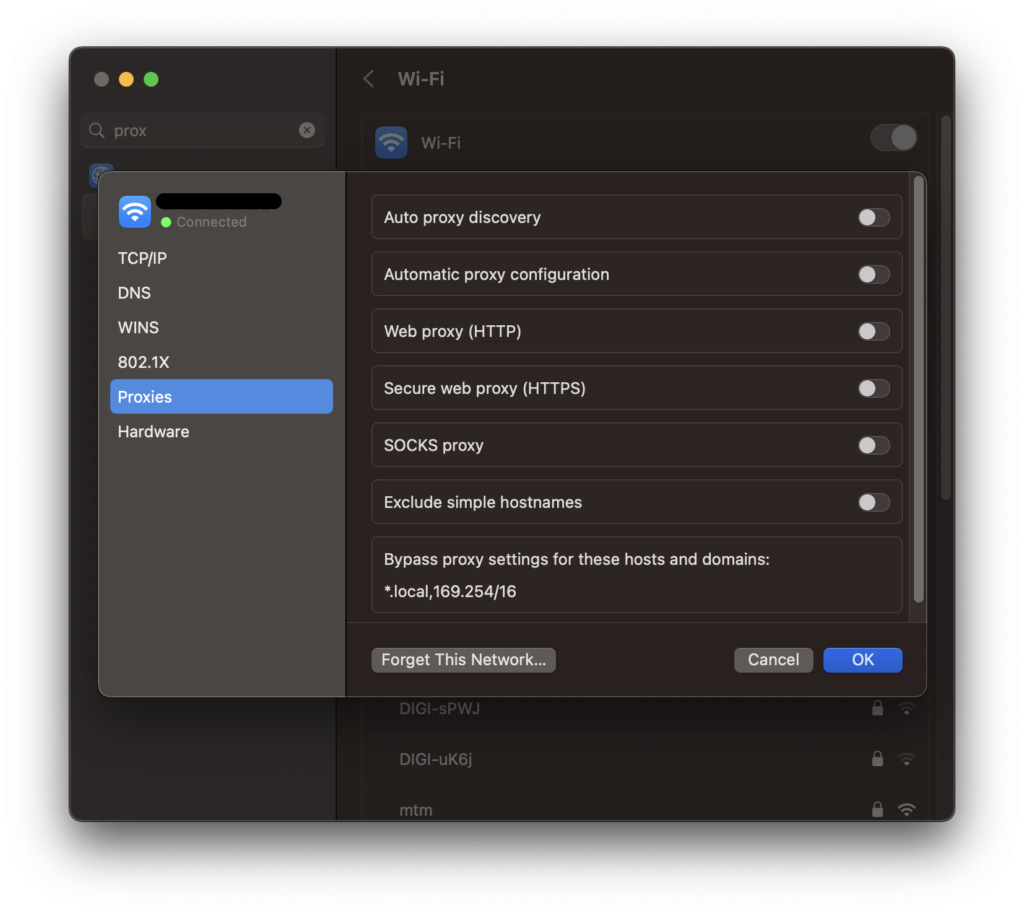
How to Change Proxy Settings in Chrome for macOS
- You can opt for macOS to automatically configure the proxy for you, or manually select the protocol that you want to use by toggling the button next to it. You can choose HTTP (basic, for browsing and general activities), HTTPS (more secure than HTTP), or SOCKS (often faster, good for P2P and getting around firewalls).

- Add the server IP and port. Also, you might need to add your credentials. Your network admin can give you a username and password. If you’re using a proxy service, you can find these credentials in your account settings.

- Hit OK.
How to Change Proxy Settings in Chrome for Linux
This is how you set up a Chrome proxy in Linux Mint—for other Linux distributions the setup process may vary:
- Open the network manager.
- Click on the Network proxy tab.

- Under Method, choose between automatic or manual setup. Automatic setup is best when the internet setup is tricky, like in a big company where settings change a lot. It’s handy because it figures out the best settings for you. Manual is best if you want more control over your connection, or if the automatic method doesn’t detect your proxy.

- Input your proxy settings, and that’s it!

Why Should I Use a Proxy in Chrome?

- Get privacy protection
Enabling proxy settings can mask your IP address and real location, enhancing privacy to some extent. That said, increased privacy isn’t guaranteed, and it depends on the type of proxy you use. Proxies don’t use encryption, which can expose your digital identity to snoops and cybercriminals.
If you aim for best-in-class privacy protection, a VPN is your best bet. CyberGhost VPN uses strong encryption and a strict no-logs policy to keep your digital identity private on all your devices.
- Access content on restricted networks
Proxy servers can help bypass certain restrictions, but they may not always work well. Some websites employ advanced blocking techniques that proxies can’t overcome.
- Boost your online security
While proxies can filter out some malicious content, they aren’t effective against all threats. Additional security measures, like antivirus software and safe browsing habits, are still necessary.
Furthermore, consider using a VPN service like CyberGhost VPN that protects your online activity with advanced security features, including strong encryption, VPN protocols, a kill switch, DNS leak protection, and a malware blocker.
Enjoy faster speeds
Proxy servers can cache data, potentially improving load times on websites you visit frequently. However, a proxy server might not make things faster in every situation. Other factors such as network congestion, the distance between you and the server, or the proxy’s own performance can affect your connection speed.
How Do I Disable My Chrome Proxy?
How to Disable Chrome Proxy Settings on Windows
- Go to the Proxy panel (enter this chrome://settings/system link in your browser’s address bar and click on Open your computer’s proxy settings.
- Toggle off Automatically detect settings under Automatic proxy setup.

- Toggle off Use a proxy server under Manual proxy setup.
- Hit Save to apply the changes.
How to Disable Chrome Proxy Settings on macOS
- Go to the Proxies tab and uncheck all the protocols in the list.

- Click OK to save the changes and remove your proxy.
How to Disable Chrome Proxy Settings on Linux Mint
Go to the Network proxy tab, and select None. This turns your proxy off.

How Do I Add an Exception to Chrome Proxy?
Some websites or services perform better without going through a proxy. By adding the websites as exceptions, you can access them directly for faster loading times.
How to Add Exceptions to Chrome Proxy Settings on Windows
- Open the Control Panel and click on Network and Internet.

- Click on Internet Options.

- Select the Connections tab.

- Click on the LAN settings.

- Enable Use a proxy server for your LAN and click on Advanced under the Proxy server setting.

- In the Exceptions box, enter the addresses or domain names you want to bypass the proxy. Each entry should be separated by a semicolon.

- Hit OK and then Apply to save the changes.
How to Add Exceptions to Chrome Proxy Settings on macOS
- Open the Proxies tab and go to the Bypass proxy settings for these hosts and domains.
- Enter the host or domain you want to bypass the proxy for. For example, you can enter *.example.com to bypass the proxy for all subdomains of example.com, or you can enter specific domains like example.com to bypass the proxy for that particular domain.
- Click OK to save the changes.
How to Add Exceptions to Chrome Proxy Settings on Linux Mint
- Go to the Network proxy tab and select Manual. Within the proxy settings, look for the Ignore Hosts option to exclude specific addresses or domains from being routed through the proxy.

- Enter the addresses or domains you want to exclude from the proxy in the designated field. You can separate multiple addresses with commas or semicolons.
What Is Better: A Proxy or a VPN?

A VPN provides advanced privacy and security features compared to a proxy. A proxy only changes your IP address, while a VPN offers encryption, a kill switch, secure protocols, and RAM-only servers for added protection.
Also, note that not all proxies are safe, and some may collect and sell your private data to third parties. CyberGhost is a premium VPN service with a strict no-logs policy, which doesn’t track, store, or give away any information about your online activity when you’re connected to its servers.
Here’s a quick comparison between a proxy vs a VPN:
| Benefit | Proxy | VPN |
| Privacy | Limited | Enhanced |
| Security | Low | High |
| Data logging | Common | Rarely |
| Encryption | None | Strong |
| Usage | Basic web browsing | All internet activity |
| Anonymity | Limited | High |
| Connection | Single application | Entire device |
| Ease of use | Manual configuration for each app | Automatic setup. Dedicated VPN apps for different devices |
FAQ
How do I change my proxy settings?
First, navigate to your device’s network settings. Look for the section dedicated to proxy settings. Within this menu, you’ll typically find fields to input the proxy server number and port number. Save the settings after you’ve added the proxy details. The process may differ based on your device, operating system, and web browser.
To change your proxy settings on your Chrome browser, just follow our easy guides for different operating systems listed above.
How do I fix my proxy server on Google Chrome?
First, check for and correct any problematic proxy settings in Chrome’s advanced option. Open Chrome and go to Settings. Scroll down and click on Advanced. Under the System section, click on Open your computer’s proxy settings. Confirm that the proxy server address and port number match the details provided by your network administrator.
If these settings are correct, try clearing your browser cache and cookies. Resetting your Chrome settings can also help. You may also need to check if your antivirus or firewall is interfering with your proxy.
How do I find automatic proxy settings in Chrome?
Chrome does not have its own automatic proxy settings, so you need to adjust the proxy settings of your operating system. To find these via Google Chrome, open your browser and click on the three dots located in the top right corner to access the menu. From there, select Settings. Next, scroll down and click on Advanced to reveal additional options.
Within the System section, click on Open your computer’s proxy settings. This action will open the system’s proxy settings window, where you can locate and configure automatic proxy settings.
What is a Chrome proxy?
A Chrome proxy routes your internet traffic through another server before it reaches a website. When set up in Chrome, your browser sends requests to the proxy server, which forwards them to the site. The site’s responses are then sent back through the proxy to your browser.
Can proxies mask my IP?
Yes, most proxies can mask your IP address. When you connect to the internet through a proxy server, it shows the server’s IP address, not yours. This means websites can’t track your real location, giving you more privacy.
That said, proxies can’t offer the same privacy and security as a VPN service. CyberGhost VPN masks your IP address and secures your internet traffic with strong encryption. This gives you powerful protection against snoops and cybercriminals, even on public Wi-Fi networks.
Does Chrome have its own proxy settings?
No. You need to set up your device’s proxy server settings. You can either opt for configuring a proxy on your Chrome browser or simply installing CyberGhost VPN’s extension for Chrome.
How do I check if my proxy is working or not?
One way to verify if your proxy is working is to perform an IP address check. You can note your IP address before and after connecting to the proxy. If the IP address changes after connecting to the proxy, it indicates that your traffic is being routed through the proxy server.
You can also take CyberGhost VPN’s privacy test and find out if your sensitive data is protected or exposed.
Should a proxy be on or off?
You should turn the proxy on if you need to route your browser’s internet traffic through a server. This may help with boosting your digital privacy and accessing content on restricted networks.
You should turn the proxy off if you stumble upon issues like difficulty in accessing websites, slower internet speeds, and network configuration conflicts.
Leave a comment