
Most people use a VPN by installing an app on individual devices. While that works, it can leave gaps in your network coverage. Some devices don’t support VPN apps at all, and managing multiple connections can quickly become inconvenient.
A VPN on your router takes a different approach. It adds an extra layer of protection across your network by covering all devices connected to your Wi-Fi — including Smart TVs, game consoles, and other devices without native VPN support. In this guide, you’ll learn how to install a VPN on a compatible router and what to expect from a network-level VPN setup.
Please note this setup only works on VPN-compatible routers and requires an active VPN subscription.
What Is a VPN Router?
A VPN router is a router configured to run a VPN connection for your entire network. It works similarly to how a VPN works on other devices, except instead of installing an app on each gadget, you set it up on a router. All devices connected to the same network then share the VPN connection.
The term “VPN router” may also refer to routers designed specifically for VPNs. This is because some routers aren’t compatible with VPN protocols. For example, routers supplied by Internet Service Providers (ISPs) typically come with settings and restrictions you can’t change, and they usually aren’t compatible with VPNs.
You can also find pre-flashed routers that come with built-in VPN software and enhanced security features. If your router supports manual VPN setup, you can install a VPN directly through its settings. However, not all routers’ stock firmware includes VPN support. In those cases, you may need to replace it with open-source firmware like DD-WRT or Tomato.
Router-basedVPN setups work a bit differently from VPN apps. When you install a VPN on your router, some app features — like split tunneling or automatic kill switches — might not be available.
How Will I Know if My Router Is VPN Compatible?
The easiest way is to go into your router’s settings and look for VPN options. If they’re there, your router likely supports VPN connections. To do this, just follow these simple steps:
- Open a web browser and enter your router’s IP address (usually 192.168.1.1 or 192.168.0.1).
- Log in using your admin username and password.
- Navigate through the settings menu.
- Look for sections labeled VPN, VPN Client, OpenVPN, or WireGuard®. If you see any of these options, your router supports VPNs.
If you don’t find these settings, the next step is to check your router model and firmware. Some routers don’t support VPNs by default but can be upgraded with custom firmware. Here’s what to do:
- Find your router’s model number (usually on the back or bottom of the device).
- Search online: “your router model + VPN support.”
- Check if it supports firmware like DD-WRT, OpenWRT, or Tomato. If it does, you can install it to enable VPN functionality.
If your router has no VPN settings and doesn’t support custom firmware, it likely isn’t VPN compatible. In that case, you’ll need to upgrade to a VPN-ready router or use VPN apps on individual devices instead.
Types of VPN Routers
Not all VPN routers work the same way. The type you choose depends on your setup, your experience level, and how much control you want. The main types include:
- Routers with built-in VPN support: These routers already include VPN features in their settings. You typically don’t need to install anything extra. They’re easier to set up and usually support protocols like OpenVPN or WireGuard®, which makes them a good choice if you want a plug-and-play setup.
- Routers with custom firmware: These are standard routers that don’t support VPNs by default but can be upgraded. You install firmware like DD-WRT, OpenWRT, or Tomato to enable VPN features. This option gives you more control and flexibility, but it takes more time and some technical knowledge.
- Pre-configured VPN routers: These come with a VPN already installed and ready to use. You usually don’t need to deal with setup or technical steps. They’re the easiest option, but they usually cost more and may have limited customization.
How Does a VPN Work on a Router?
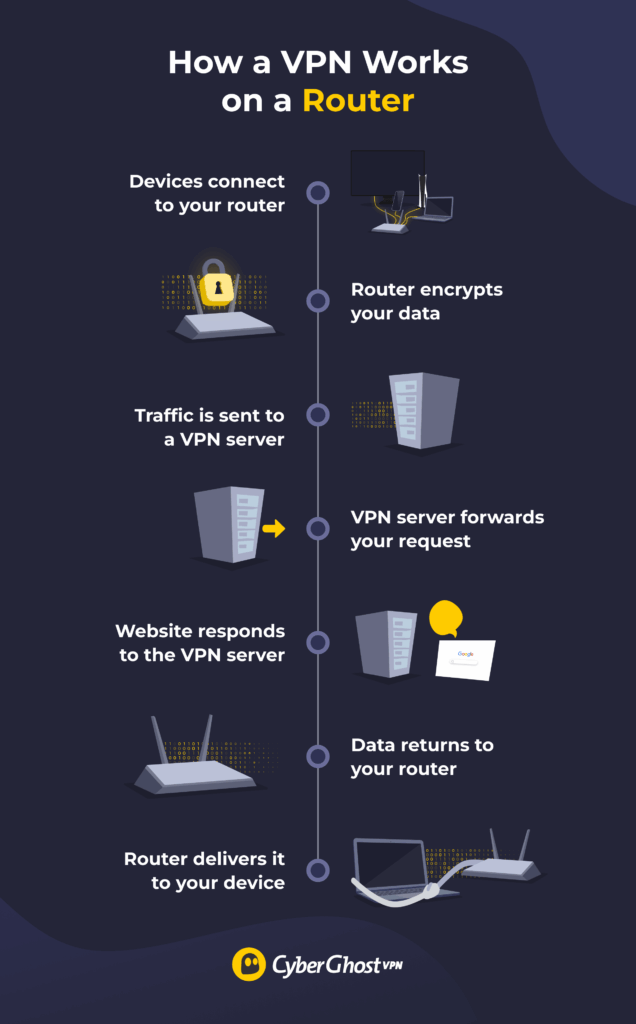
A VPN on a router reroutes all your network’s traffic through an encrypted connection to a VPN server. When you set up a VPN on your router, it creates a more secure connection to a server using VPN protocols like OpenVPN or WireGuard®. All internet traffic from devices connected to your network is then routed through this connection instead of going directly to your ISP.
Before leaving your network, the router encrypts your data, which helps protect it in transit. Because all connected devices share the same VPN connection, this setup can extend coverage to devices that don’t support VPN apps. However, it also means less flexibility than using VPN apps on individual devices, since all traffic follows the same connection.
Before You Set up a VPN on Your Router
Before you start setting up a VPN on your router, it’s important to make sure everything is ready to save time and reduce the risk of setup issues:
- Make sure your router is VPN compatible: Check your router settings or search your model online to confirm it supports VPN clients or custom firmware.
- Choose a VPN provider that supports routers: Pick a service like CyberGhost VPN that offers manual setup, supports OpenVPN or WireGuard®, and provides configuration files or setup guides.
- Gather your login details and files:
- Your router’s admin username and password
- Your VPN account credentials
- VPN configuration files if required
- Check if you need custom firmware: If your router doesn’t support VPNs by default, you may need firmware like DD-WRT, OpenWRT, or Tomato.
- Back up your router settings: Save your current configuration so you can restore it if something goes wrong during setup.
- Verify your internet connection is stable: You don’t want interruptions while configuring your router, as it could cause issues with installation.
- Consider your router’s performance: VPNs require processing power. Older or low-end routers can slow down your internet, so you may need an upgrade for better results.
How to Install a VPN on Your Router — Step-by-Step Guide
The process of installing a VPN on a router varies by brand, model, and firmware. If your router supports VPN connections, you can usually find setup instructions on the manufacturer’s website or in the device manual. Many VPN providers also offer configuration guides tailored to specific router models or firmware.
For example, CyberGhost VPN provides helpful guides for routers and other devices, including:
If you’re using CyberGhost VPN, support is available 24/7 for any questions you might have. Below is a step-by-step example of what the process might look like using CyberGhost VPN on an Asus router:
- Log into your VPN account on your browser and head to the Download Hub. Select Configure from the Routers or other devices option.
- Depending on your VPN provider, you may be able to customize various aspects of your router VPN setup. With CyberGhost VPN, you can set the VPN protocol, your desired server country, and server group. Enter the name of the device you’re setting up, turn on any extra features you want, and click Save Configuration. Once saved, you’ll be able to download it.
- Paste your router’s IP address (not the same as your public IP address) in your browser’s search bar to access the login page. Then, enter your login credentials to open the configuration panel. You can usually find them in the router manual or on a sticker on the back of your router.
- Select the VPN option. You’ll probably find this in the Advanced Settings of your router’s configuration panel.
- Click on VPN Client and select Add profile.
- Select the OpenVPN tab and fill in the following details:
-
-
- Description: This is what you choose to name this VPN connection. It can be anything, like “CyberGhost VPN.”
- Username: Enter your VPN account username.
- Password: Enter your VPN account password.
- Import .ovpn file: Upload the configuration file you saved earlier.
- Import the CA file or edit the .ovpn file manually: Uncheck this box.
-
- When done, click OK.
- Tap Activate. This normally connects your router to the VPN. You should see a blue or green mark under connection status when the VPN connection is active.
You can always come back to your router settings and deactivate the VPN connection when you don’t want to use it. In the future, you can also upload new configuration files if you want to connect to a different VPN server.
How to Flash a Router to Install a VPN
Flashing your router replaces its original firmware with custom one that can support VPN connections. This can enable VPN protocols like OpenVPN (and in some cases WireGuard®), but you need to follow the steps carefully to avoid damaging your router:
- Search your router model on DD-WRT, OpenWRT, or Tomato websites to confirm it’s supported.
- Download the exact firmware version that matches your router model.
- Log in to your router and save the current settings so you can restore them if needed.
- Plug your computer directly into the router using an Ethernet cable and avoid Wi-Fi during setup.
- Open a browser, enter your router’s IP address, and log in to the admin panel.
- Go to the firmware upgrade section and upload the file you downloaded.
- Start the upgrade and don’t turn off the router or interrupt the process.
- Wait for the router to reboot, which may take several minutes.
- Reset the router if required and log in using the new firmware interface.
- Go to the VPN section in the new firmware and enter your VPN details.
Flashing a router can be risky if done incorrectly, so always follow the exact instructions for your specific model. If you’re unsure, consider using a pre-configured VPN router instead.
Pros and Cons of Using a VPN on Your Router
Pros
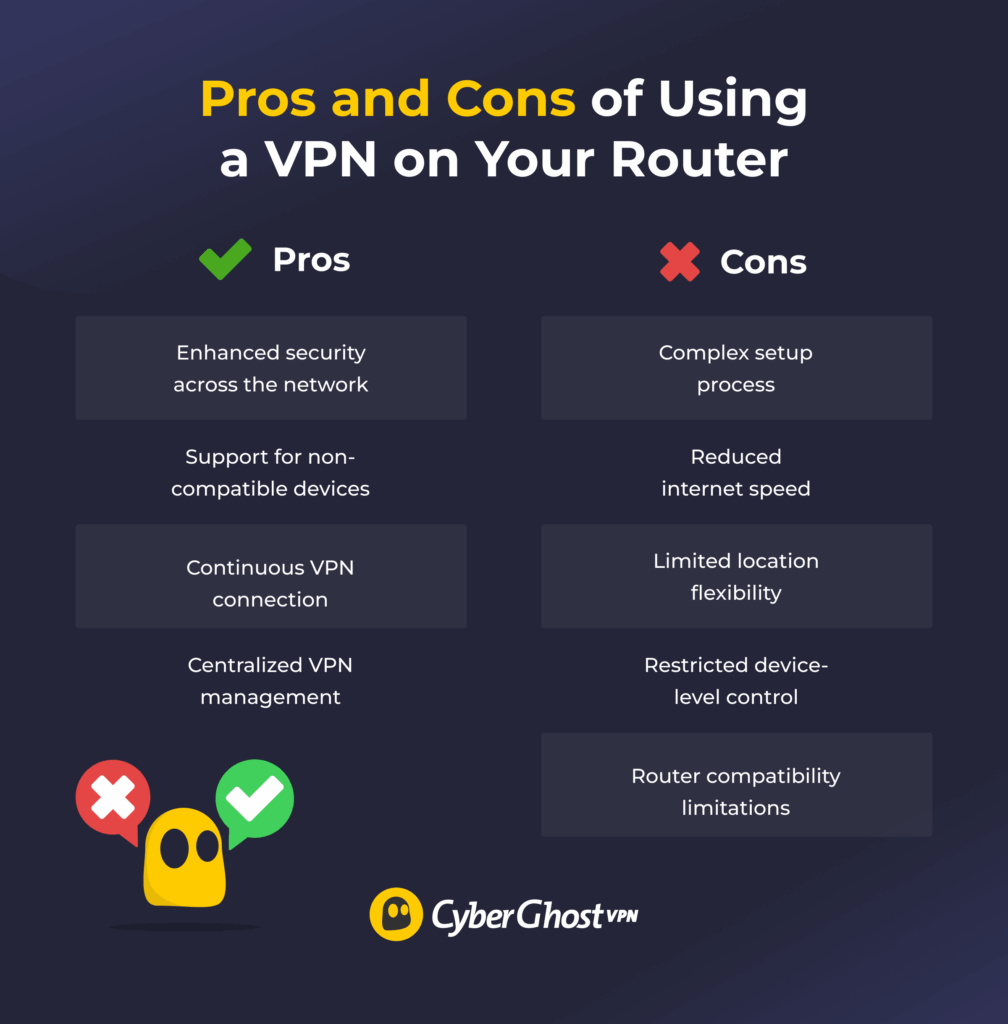
- Increased network protection: A VPN router covers all connected devices on the network without requiring separate setup.
- Support for non-compatible devices: It extends protection to Smart TVs, game consoles, streaming devices, and other gadgets on the network.
- Continuous VPN connection: The VPN runs continuously without manual switching.
- Centralized VPN management: Users don’t need to manage multiple apps or logins across devices.
Cons
- Complex setup process: Setting up a VPN router often involves manual configuration or firmware installation.
- Reduced internet speed: Encryption and routing overhead can slow down connections across all devices.
- Limited location flexibility: The network uses the same VPN server for all connected devices.
- Restricted device-level control: Individual apps offer more flexibility than a router-based setup.
- Router compatibility limitations: Many basic or ISP-provided routers don’t support VPN configuration.
Set Up a VPN on a Compatible Router with Ease
Putting a VPN on your router is one of the best ways to add a layer of protection across your entire network. You don’t need to install apps on every device, and even gadgets that can’t run VPNs can boost their security through the same connection. Setup might take a little time, but after that, it runs through your router without needing constant input. More security, less hassle.
If you’re looking for a reliable option, CyberGhost VPN is a strong choice for router setups. It offers easy-to-follow guides, fast servers, and privacy-focused features. It’s a practical solution that typically offers stable performance and simple management. You can also try it risk-free thanks to its 45-day money-back guarantee (14 days for monthly users).
FAQ
Can you install a VPN on any router?
No, you can’t install a VPN on just any router. Only routers that support VPN clients or allow custom firmware like DD-WRT, OpenWRT, or Tomato can run a VPN. Many basic or ISP-provided routers don’t support this, so you’ll need to upgrade to a VPN-compatible router or use VPN apps on individual devices instead.
Do all routers work with VPNs?
No, not all routers work with VPNs. Only routers that support VPN client features or can run compatible firmware like DD-WRT or OpenWRT can be used with a VPN. Many basic and ISP-provided routers don’t support this, so they can’t run a VPN directly.
Should I set up a VPN on my router?
You should set up a VPN on your router if you want to connect all devices on your network at once or want to run a VPN on gadgets without native VPN support. However, it may not be ideal if you want to switch locations per device. It can also slow down your internet if your router isn’t powerful enough.
Does a VPN router slow down internet speed?
Yes, a VPN router may slow down your internet speed. This happens because your data is encrypted and routed through a VPN server, which adds extra processing time and distance. The impact depends on your router’s power, the VPN server location, and your base internet speed. A strong router and a nearby server can reduce the slowdown, while older or lower-end routers may cause more noticeable speed drops.
Is it easy to set up a VPN on your router?
No, it’s not always easy to set up a VPN on your router. It can be simple if your router has built-in VPN support or comes pre-configured. However, it can be more complex if you need to install custom firmware or enter settings manually. The process depends on your router and your experience level.
Is it a good idea to use a free VPN on your router?
No, it’s usually not a good idea to use a free VPN on your router. Free VPNs often have limits on speed, data, and server options, which can affect your entire network. Some may also log your activity or show ads, which can reduce the privacy benefits of using a VPN. Since a router VPN handles all your traffic, it’s better to use a reliable paid service for better security, performance, and stability.
Leave a comment