
Setting up a VPN is a great way to add extra security to your “Linux box” while benefiting from extra privacy online. In this tutorial, you’ll learn how to get CyberGhost VPN for Linux up and running without breaking a sweat.
Why Use a VPN for Linux?
Linux is arguably the most secure OS, but it leaves your internet data just as vulnerable as it is on Windows or macOS. A VPN gives you more privacy and security online, as well as offering other benefits.
- VPNs encrypt your internet connection, stopping cyberthieves, network snoops, and nosy ISPs from seeing your personal information.
- Encryption also protects you against cyberattacks, especially on unsecured public Wi-Fi networks.
- VPNs mask your IP address, making it much harder for third parties to track your activity and harvest your data, giving you more privacy and anonymity online.
- Some networks block certain sites. A VPN lets you bypass those restrictions so you can use the internet more freely.
- A VPN lets you change your virtual location so you can access region-restricted services such as your online banking app when you travel abroad.
- Some VPNs, including CyberGhost, offer servers that have been optimized for streaming and P2P traffic, giving you secure and reliable access to your favorite content.
What You Need to Set Up a VPN on Linux
To make sure your Linux VPN installation runs smoothly, you’ll need the following:
- A computer running Linux (CyberGhost VPN supports Ubuntu 20.04, Ubuntu 22.04, PopOS, Kali, Fedora 32, and CentOS 7)
- A basic understanding of how to use the Linux terminal
- Sudo privileges and your computer’s root password
- A VPN subscription
- OpenVPN config files (optional — you only need these if you’re going to set up your VPN using the Linux Network Manager or the OpenVPN app)
How to Set Up a VPN on Linux
You can choose one of three ways to set up a VPN on Linux, but if you want to benefit from features such as servers optimized for streaming or torrenting, your best bet is to use a Linux VPN app.
CyberGhost VPN has a native app for Linux that gives you access to server locations in more than 100 countries all over the world, including dedicated streaming and torrenting servers.
How to Set Up the CyberGhost VPN Client on Linux
You can set up CyberGhost VPN on any of our supported Linux flavors – and probably a bunch of other ones, too – but for this article, we’re setting up CyberGhost VPN on Linux Mint.
- Download the configuration file for your Linux distro from the Download Hub in your CyberGhost control panel.

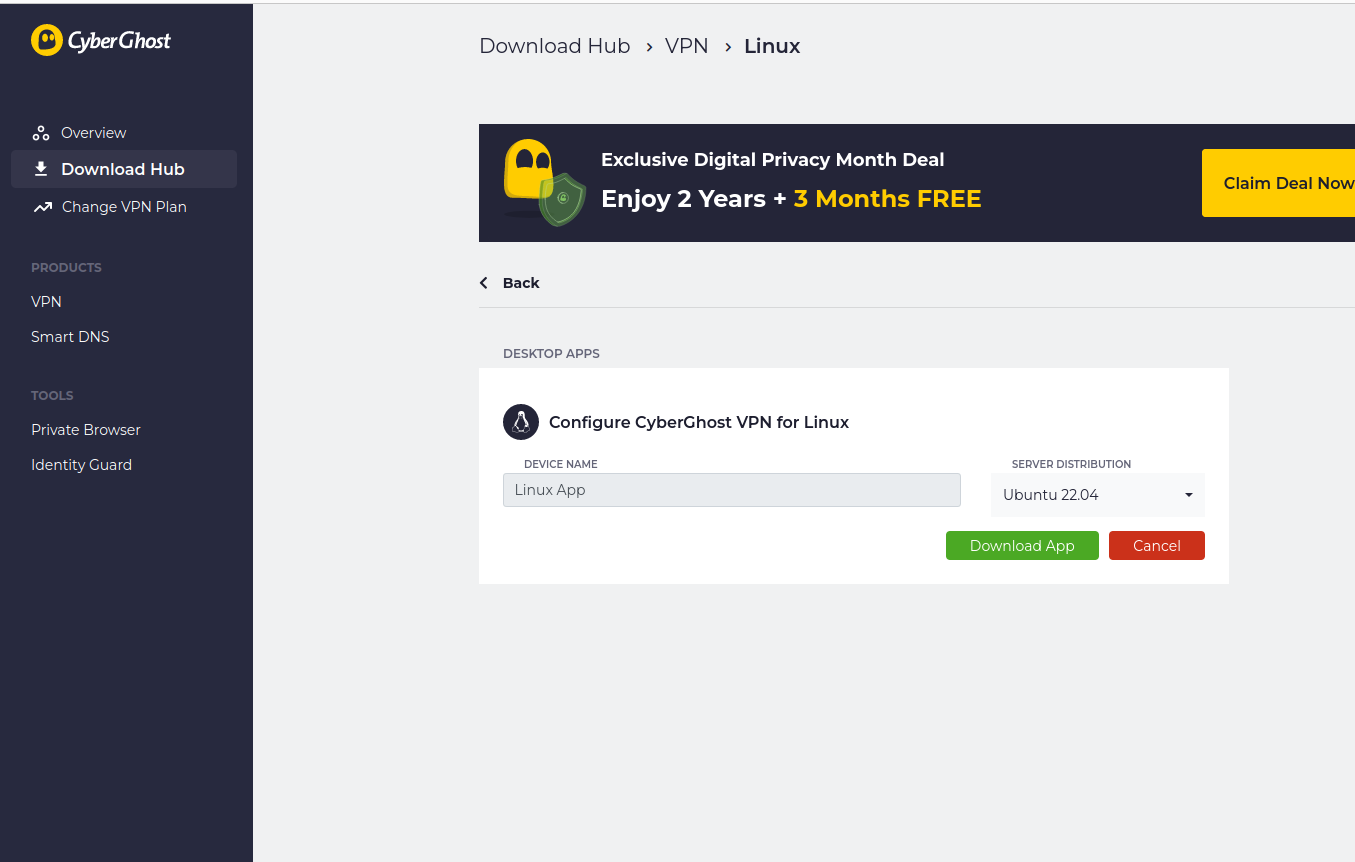
- Click on Configure next to CyberGhost VPN for Linux and choose your Linux flavor from the menu.
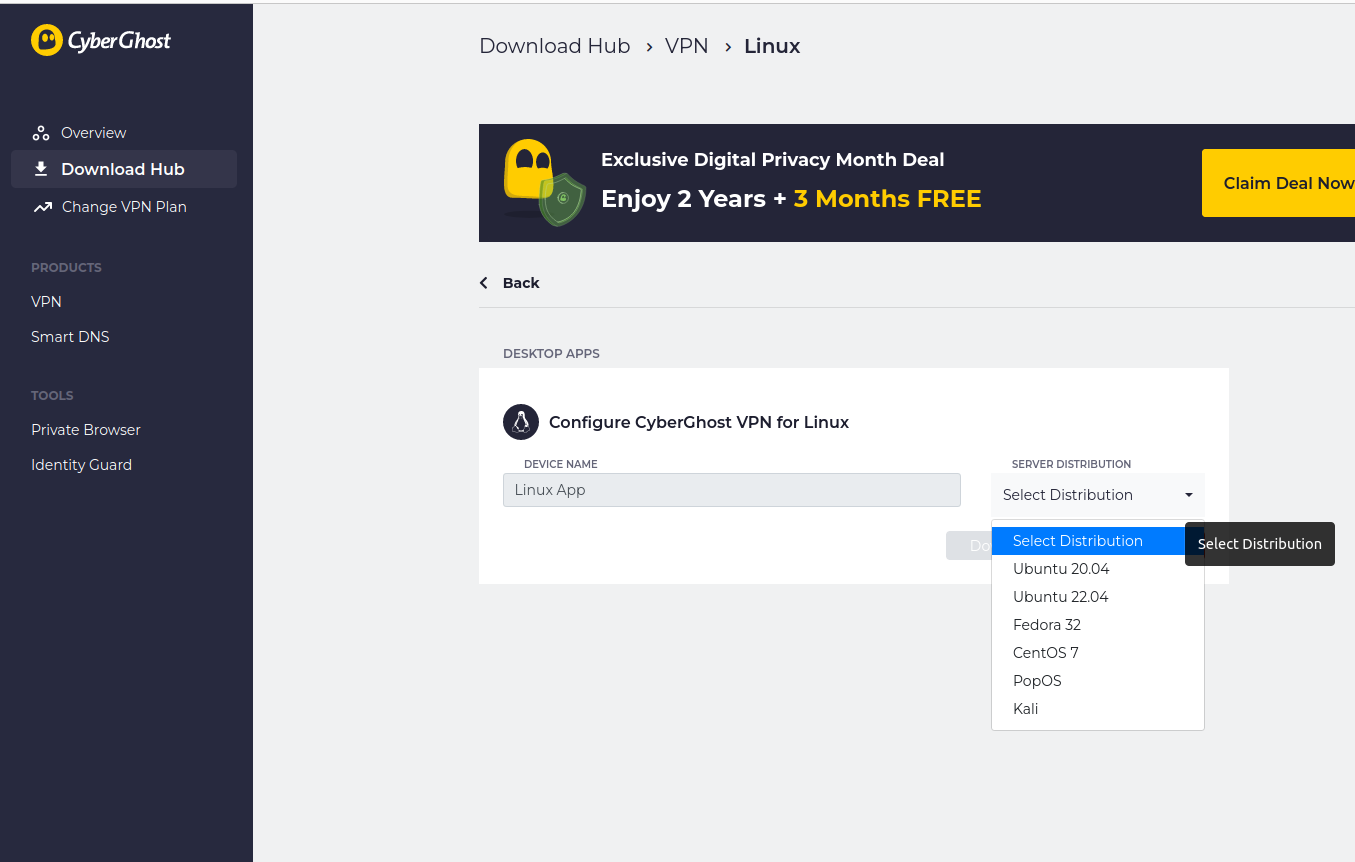
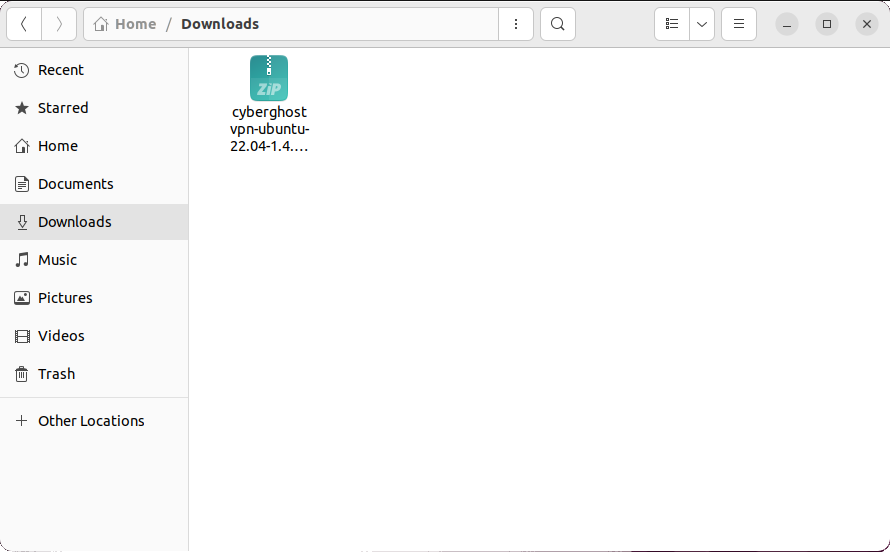
- Now click Download App. The file will download to the Downloads folder on your Linux system (unless you’ve configured a different default download location).
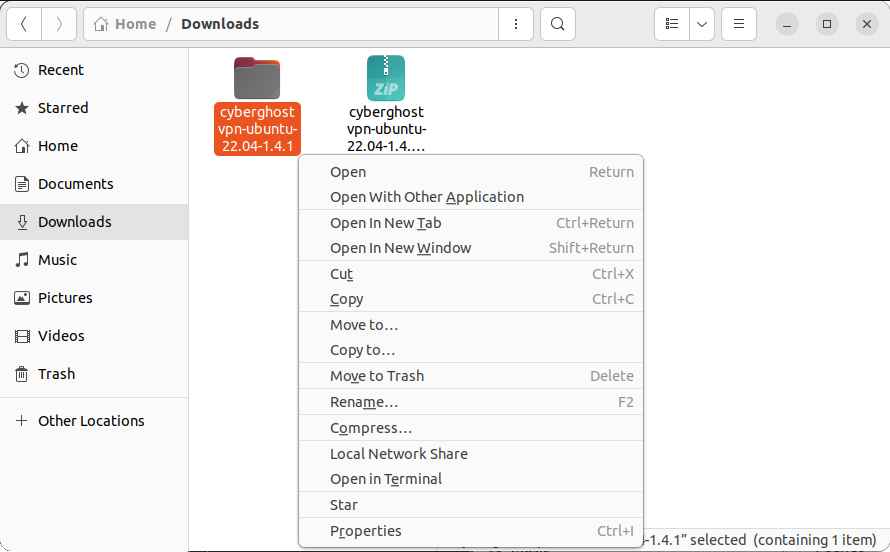
- Using your file browser, navigate to your Downloads folder and find your CyberGhost config file. This will be a .zip file, so you’ll need to extract it before you can run the installer.
- Right-click (or ctrl+click) on the zip file, and click on Extract Here.
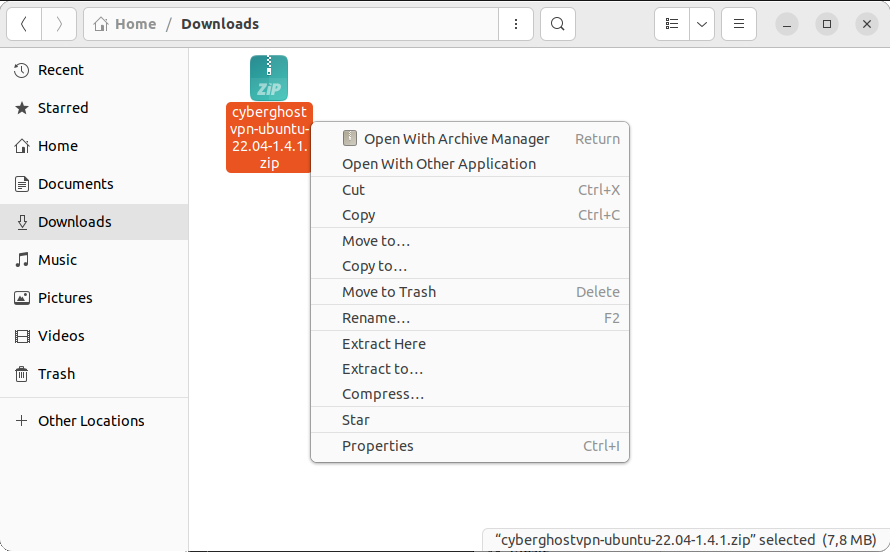
- You’ll now see a folder with the same name as the .zip file. Right-click on this folder and select Open in Terminal.
- A terminal window will open. Type sudo bash install.sh and press return.
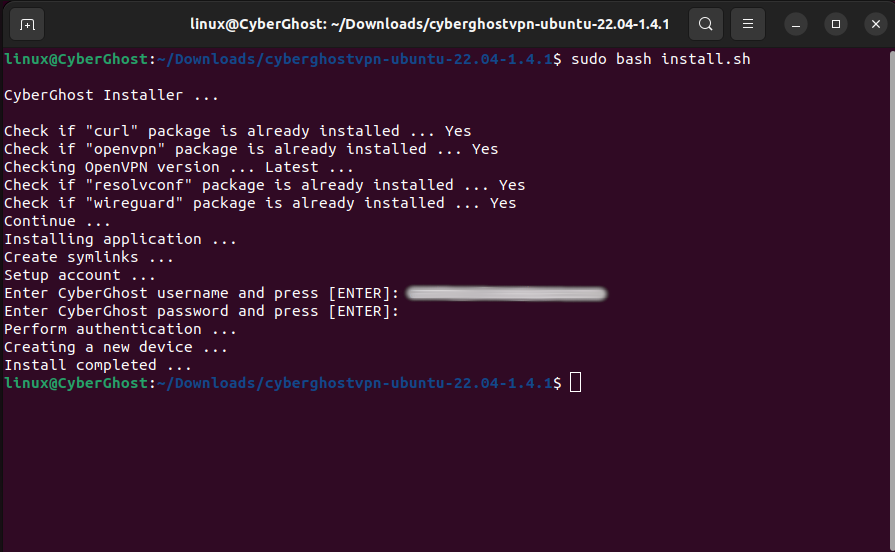
- The CyberGhost Linux VPN app will install and you’ll be asked for your login credentials. Enter your username and password to complete the setup.
(If you’re new to Linux, don’t worry if nothing happens on the screen when you’re typing your password — this is so nobody can see it by looking over your shoulder.)
When the installation is complete, you’ll see the message “Install completed…” followed by a command prompt.
- Your CyberGhost VPN app for Linux is ready to use! Enter the command cyberghostvpn to see the list of available commands.
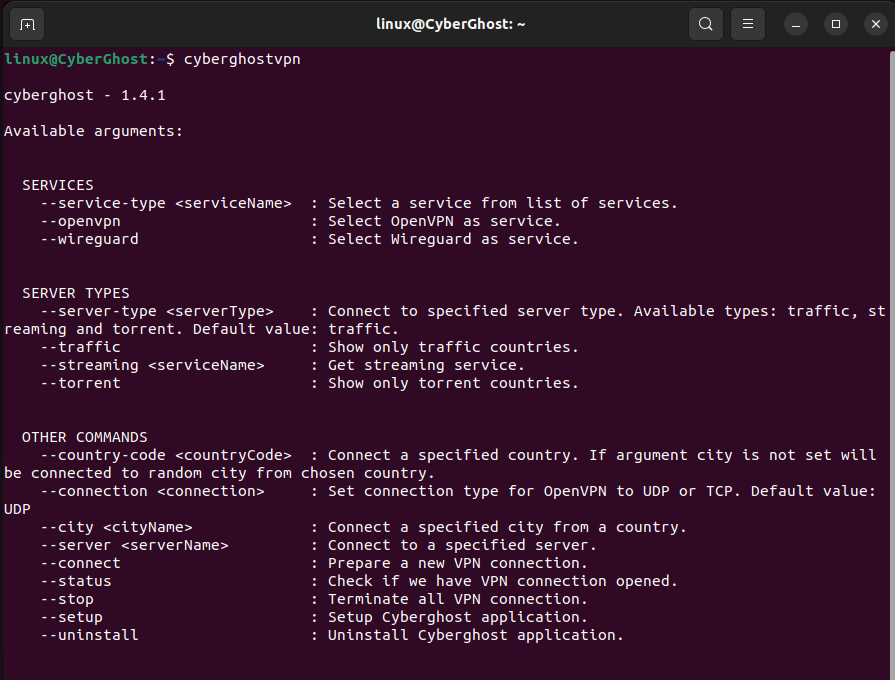
CyberGhost VPN Linux Commands
Using CyberGhost VPN from your linux terminal is easy once you know how. You can use the commands below to choose a server, connect, check your connection, and disconnect when you’re done.
| cyberghostvpn | See the list of available commands |
| sudo cyberghostvpn –country-code US –connect | Quick connect |
| cyberghostvpn –traffic –country-code | See the country code list for regular traffic |
| cyberghostvpn –torrent –country-code | See the country code list for torrenting (P2P) |
| cyberghostvpn –streaming –country-code | See the country code list for streaming |
| sudo cyberghostvpn –country-code US –openvpn –connect | Select OpenVPN as the connection protocol |
| sudo cyberghostvpn –country-code US –wireguard –connect | Select WireGuard® as the connection protocol |
| sudo cyberghostvpn –country-code US –tcp –connect | Specify a TCP connection |
| sudo cyberghostvpn –country-code US –udp –connect | Specify a UDP connection |
| cyberghostvpn –status | Check if the VPN is connected |
| sudo cyberghostvpn –stop | Disconnect from the VPN server |
I’ve used the US as the default location in the commands shown above, but you can use any location you like. Find the two-letter country code using one of the commands shown, and substitute it for US.
For example, if you want to quick connect to a server in Germany, you would use the command
sudo cyberghostvpn –country-code DE –connect.
If you want to connect to one of our torrenting- or streaming-optimized servers, use one of the commands above to see servers in your chosen category and location, and incorporate the server name into your command like this
sudo cyberghostvpn –streaming ‘Netflix US’ –country-code US –connect
Other Ways to Set up a VPN on Linux
If you’re the kind of person who wants to roll up their sleeves and get stuck into the command line, you may want to set up a Linux VPN manually. As you’d expect, there are loads of free and open-source software out there that will do the job, but to keep it simple, we’ll look at the two most popular ways here.
How to Set Up OpenVPN on Linux
OpenVPN is an open-source VPN protocol used by most commercial VPNs. You don’t need a VPN app to use it, but you will need a subscription to a VPN service, or the configuration file for a server set up with OpenVPN. It’s a little too complicated to cover in detail here, but to give you an overview, here’s a simple breakdown of how it’s done:
- Install OpenVPN and its dependencies using your distro’s package manager.
- Download OpenVPN config files from your VPN provider (if you’re using CyberGhost VPN, you need to log in to your control panel page on our website to find these).
- Open the terminal and connect to a server using the command: sudo openvpn [CyberGhost config filename]
How to Set Up a VPN on Linux Using Network Manager
This process is similar to setting up your connection with the OpenVPN app but without the need to install any software. Here’s a simplified overview:
- Download OpenVPN config files from your VPN provider (you can find these in your CyberGhost VPN control panel on our website).
- Make a separate note of the server address, username, password, and pre-shared key for every individual server config file.
- Open the linux Network Manager and create a new VPN profile.
- Select Import from file, point the file browser to your chosen OpenVPN config file, and click Open.
- Populate the fields in the Add VPN window using the information you wrote down in step 2.
- Specify your port, virtual device type, ping interval, exit ping, cipher, and HMAC authentication type in the advanced settings section.
- Open your VPN connection in the Network Manager window.
See our support page for full details on how to set up a VPN using the Linux Network Manager.
How to Set Up a VPN Server on Linux
Setting up your own VPN server can be a great way to get secure remote access to your network. You can even set up your VPN on a remote server if you want a DIY equivalent to a commercial VPN — although you’ll only have one location, of course.
A full tutorial is beyond the scope of this page, but to give you an idea, here are the basic steps needed to create a local VPN server:
- Install Shadowsocks
- Create a configuration file for Shadowsocks containing your password and encryption type
- Start your Shadowsocks server
Now that your server is running, here’s how to connect to it:
- Download the Shadowsocks client to the machine you want to connect with
- Click the + button to add a server, enter your server details, and click save
- Click on your server to connect
Why CyberGhost Is the Best VPN for Linux
If you like tinkering with code, that’s great, but if you just want a Linux VPN you can install quickly so you can get on with something else, CyberGhost VPN is your best bet.
Our easy-to-use Linux client installs in a single command and supports the most popular Linux flavors, including Ubuntu 20.04, Ubuntu 22.04, PopOS, Kali, Fedora 32, and CentOS 7.
CyberGhost VPN offers industry-standard protocols and encryption, ensuring you get a secure and reliable connection. We have servers in 100 countries, so you’ll always be able to find one in your chosen location.
Our vast network includes specialized servers for streaming and P2P file sharing – perfect for watching Netflix on or downloading the latest Linux .iso. You get 7 simultaneous device connections, so you can do both at the same time and use it on all your tech without having to log in and out constantly.
Try it for yourself with our 45-day money-back guarantee.
FAQ
Can you make your own VPN with Linux?
Yes, with a little knowledge and some free open-source software, you can make your own VPN. You’ll need a computer to act as the VPN server either on your home network or in a different location. Install and configure Shadowsocks on your server, then use the Shadowsocks Electron client to connect to it.
You’ll need some familiarity with Linux and using the command line, but other than that, it’s fairly straightforward. If that sounds like it might be too difficult, get CyberGhost VPN for Linux instead. It installs with a single command, has a server network spanning 100 countries, and delivers a blazing-fast connection.
How does a VPN work on Linux?
A VPN works on Linux the same way it works on any other operating system. It creates an encrypted tunnel between your computer and a VPN server, which stops anyone monitoring your network from seeing your online activity. It also protects your passwords and other sensitive information from online snoops and cyber crooks.
Does Linux have a free VPN?
Some free VPNs have Linux clients, but they’re usually slow and only have a few server locations. This can make them frustrating to use, even for simple browsing. If you want an affordable VPN that gives you fast connection speeds, access to servers in 100 countries, and 24/7 customer support, get CyberGhost VPN. Our 45-day money-back guarantee lets you try it risk-free.
Why should I use a VPN for Linux?
For the same reason, you would use a VPN on any other device — to hide your IP address and protect your privacy online. A VPN offers more than simple online security, though. You can also use it to bypass network restrictions and unblock streaming or torrenting sites. It’s also effective against activity-based ISP throttling.
How do I know if my VPN is running on Linux?
Most VPN providers have a web page that will show you if your VPN is running. If you’ve created your own VPN server, or just want to get a bit more nerdy, you can use the ifconfig command in the terminal. If your VPN connection is active, the command output will contain a line beginning with tun0, showing the details of your connection.
Leave a comment