
Ever tried to access a website, only to find it blocked or mysteriously missing from your search results? The problem often lies with your domain name system (DNS) server.
Many ISPs configure their DNS servers to restrict certain websites, whether for censorship or other reasons. This can limit your online freedom and even slow down your connection. Worse, using your ISP’s default DNS server can expose you to privacy risks and security vulnerabilities. You don’t have to stick with your network’s default DNS server, though.
Changing your DNS settings can help you bypass unnecessary restrictions, protect your privacy, and even speed up your browsing. In this guide, we’ll explain what a DNS changer is, why it matters for your online freedom and security, and how to use CyberGhost VPN to easily configure a secure DNS setup.
Get Improved Privacy, Speed, and Access with CyberGhost VPN’s DNS Servers
CyberGhost VPN automatically changes your DNS requests when you connect to one of our servers, letting you regain access to your favorite content while traveling. Our VPN also prevents DNS leaks, keeping your online activity private and secure. With CyberGhost VPN, you can browse and stream without worrying about your DNS server getting in the way.
What Is a DNS?
A DNS works like the internet’s phonebook, translating easy-to-remember domain names (like www.yourfavoritewebsite.co.uk) into the numerical IP addresses that computers use to locate websites.

When you enter a domain name, your device sends the request to a DNS server, which processes it and provides the IP address registered to that website. This process is usually handled by your ISP’s default DNS server. Your browser can then connect to the website and display the content you’re looking for.
While this system works smoothly most of the time, relying on your ISP’s default DNS server can cause issues like:
-
- Blocked content: ISPs may restrict access to certain websites.
- Slower speeds: ISP servers can become overcrowded during peak hours.
- Privacy risks: ISPs can track and log your DNS queries.
What Is a DNS Changer?
Using a DNS changer is an easy way to avoid these problems and improve your online experience and anonymity. A DNS changer helps you switch from your ISP’s default DNS server to a different one. This can help you:
-
- Access websites your ISP blocks.
- Avoid overcrowded servers that slow down your browsing.
- Prevent your ISP from tracking your activity.
There are different ways to change your DNS. You can adjust the settings on your device, use a Smart DNS, or rely on a VPN like CyberGhost to take care of it for you.
Examples of DNS Changers
Here are some common ways to change your DNS:
1. Device Settings
Most devices let you manually change DNS settings. For example:
-
- On Windows or macOS, you can update DNS settings in your network preferences.
- On Android or iOS, you can change DNS in the Wi-Fi settings for each network.
- On your router, you can set up DNS for your entire network.
2. Third-Party DNS Servers
There are many DNS providers you can switch to for faster or more private browsing. Popular examples include:
-
- Google Public DNS (8.8.8.8, 8.8.4.4)
- Cloudflare DNS (1.1.1.1, 1.0.0.1)
- OpenDNS (208.67.222.222, 208.67.220.220)
3. Smart DNS Services
Smart DNS services reroute your DNS requests to make it look like you’re browsing from another location. Popular options include:
-
- Unlocator
- SmartDNSProxy
- Getflix
4. VPNs with DNS Features
VPNs like CyberGhost VPN automatically route your DNS requests through private servers. This means you don’t have to manually configure anything, and you also get extra privacy with encryption to secure your entire connection.
5. DNS Changer Apps
Apps like DNS Jumper for Windows or DNS Changer by Blokada for Android and iOS make it easy to adjust your DNS settings.
What’s the Difference Between Smart DNS and a VPN?
| Smart DNS | VPN |
| 👍🏻Can be cheaper than a VPN 👍🏻Lets you choose a server location to replace your regional information in requests | 👍🏻Encrypts your data to keep it concealed 👍🏻Masks your IP address to hide your location and make you harder to track 👍🏻Easy to set up 👍🏻Lets you choose from worldwide server locations |
| 👎🏻Doesn’t encrypt your activity 👎🏻Doesn’t hide your location 👎🏻Can be tricky to set up 👎🏻Can’t bypass firewalls 👎🏻Limited server locations | 👎🏻Can be more expensive than Smart DNS 👎🏻Encryption can slow your connection a little, but shouldn’t be noticeable |
Smart DNS doesn’t secure your connection or change your IP address. It only alters how websites interpret your location based on your DNS requests. Snoopers can still spy on your traffic and services can easily apply IP blocking measures to keep you out.
Smart DNS can be helpful but isn’t ideal if you need privacy for online banking or protecting sensitive data. Smart DNS won’t help you get around network firewalls either, such as those at school or work. You’d need encryption to mask your traffic so the firewall can’t see which sites you’re accessing.

CyberGhost VPN combines the best of both worlds, offering secure DNS handling alongside robust encryption, IP address masking, and high-speed servers.
How to Change Your DNS
Before you get started, you may also want to know how to find your router’s IP address (also known as your gateway IP address) and choose your new DNS IP address. You’ll find many reliable third-party DNS providers to choose from. Google DNS and Cloudflare DNS servers are the most common go-to’s.
If you want to use these DNS servers, note down their IP addresses:
-
- Google DNS: 8.8.8.8 or 8.8.4.4
- Cloudflare DNS: 1.1.1.1 or 1.0.0.1
To change your DNS manually, follow the step-by-step instructions provided below for your specific device:
-
- Android TV
- Android
- Windows 10
- MacOS
- iOS
- Linux
- Chromebook
- Router
Configure Your VPN DNS Settings with CyberGhost
The easiest option for changing your DNS is to use CyberGhost VPN. Simply sign up, download the app, log in, and connect to the server location of your choice to access streaming services while traveling. It’s perfect for phones, desktop computers, laptops, and tablets. You can also configure CyberGhost VPN on your router to cover all the devices in your house.
Change DNS on Android TV
Here’s how you can change your DNS servers on an Android TV:
- Find the Settings gear on your Smart TV.
- Go to Network & Internet, and note down the IP address.
- Click on IP settings and switch to Static.
- Enter the IP address from step 2.
- Enter your Gateway (router) IP address.
- Set the network prefix length to 24 if it isn’t already.
- Enter your first new DNS address followed by the second DNS address.
Change DNS on Android

Follow these steps to change your DNS on Android:
- Open Settings
- Go to Connections and select Wi-Fi.
- Tap on the gear icon next to your current network connection and choose Advanced.
- Change the IP settings to Static.
- Enter the new DNS addresses in the DNS 1 and DNS 2 fields.
For mobile devices, you’ll need to change your DNS settings every time you connect to a new Wi-Fi network. Alternatively, you could buy a Smart DNS app for a more permanent change.
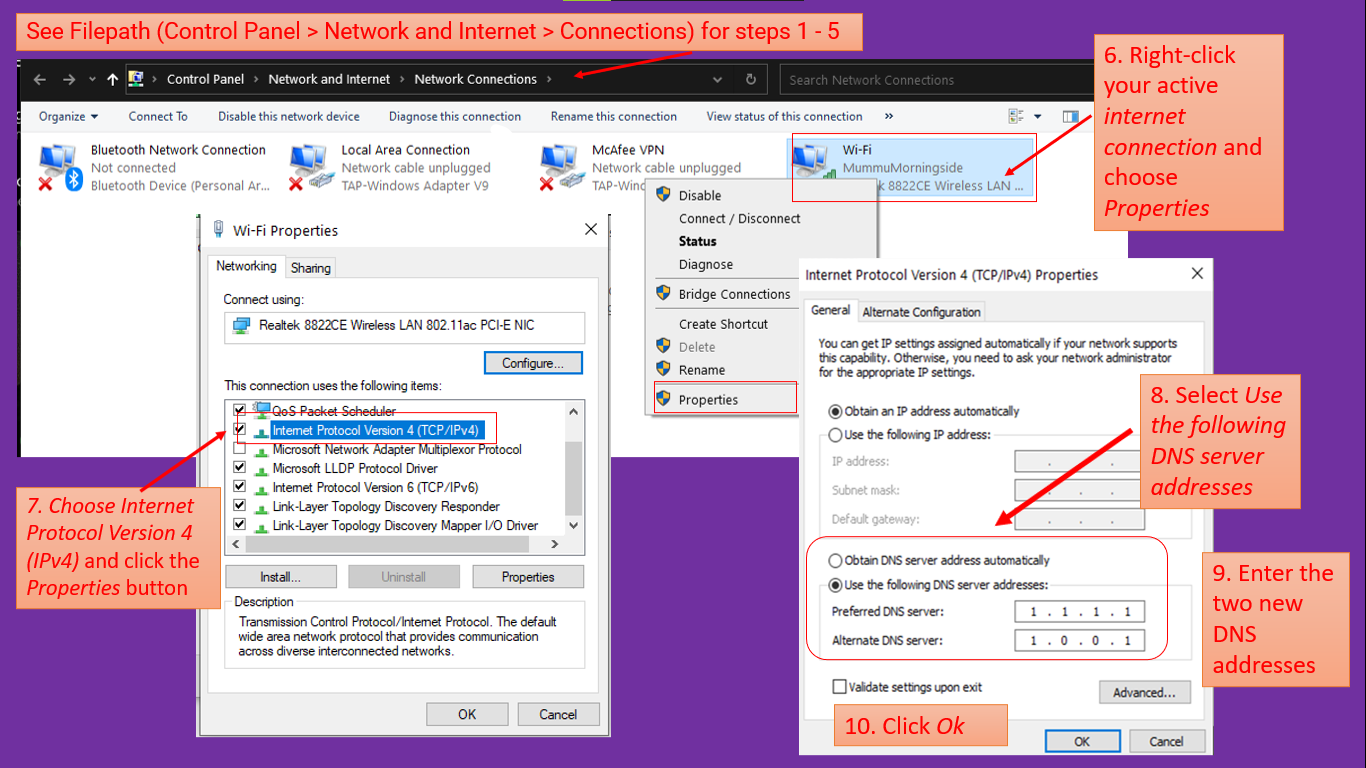
Change DNS on Windows 10
Follow these steps to change your DNS in Windows 10:
- Click on the Windows button.
- Select the Settings gear icon.
- Click Network & Internet and select Status.
- Scroll down to Advanced network settings.
- Select Change adapter options.
- Right-click your internet connection and choose Properties.
- Choose Internet Protocol Version 4 (IPv4) and click the Properties button.
- Select Use the following DNS server addresses.
- Enter the two new DNS addresses.
- Click Ok.
- Repeat the process from Step 6 for Internet Protocol Version 6 (IPv6).
Change DNS on macOS
Here’s how to change your macOS DNS server in just 7 steps:
- Go to System Preferences.
- Click the Network icon.
- Select your Wi-Fi connection and click Advanced at the bottom right.
- Click the DNS tab.
- Hit the plus (+) sign to add both IPv4 and IPv6 DNS addresses.
- Remove existing addresses with the minus (-) sign button.
- Click Ok, and you’re all set!
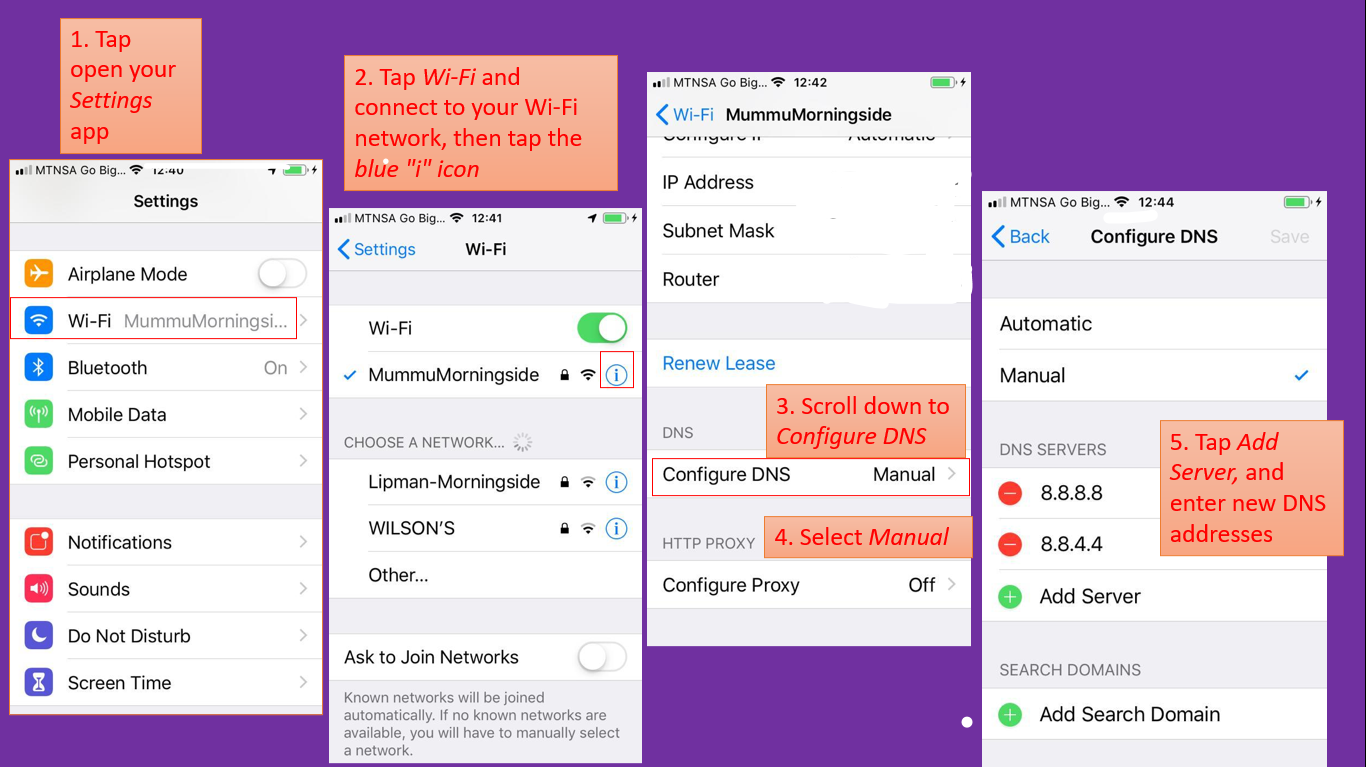
Change DNS on iOS
iOS is easier than macOS for DNS changes. Simply follow these steps:
- Tap open your Settings app.
- Tap Wi-Fi and connect to your Wi-Fi network, then tap the blue “i” icon.
- Scroll down to Configure DNS.
- Select Manual.
- Tap Add Server, and enter the new DNS addresses.
Change DNS on Linux
Linux takes a little technical know-how. Here’s how to change your DNS:
- Use a Linux text editor like nano to open resolve.conf. You can also create the file with the following command: sudo nano /etc/resolv.conf
- If the file already includes nameserver lines, simply change the DNS IP addresses. If not, you can add new lines by typing nameserver followed by a space and the new DNS server IP address. Repeat with your second DNS IP address.
- Save the file to ensure the changes take effect.
Change DNS on Chromebook
Follow these steps to change DNS servers on a Chromebook:
- Open the Settings app from the quick settings panel.
- Select Wi-Fi then your Wi-Fi network’s name.
- Select Network to expand network configuration settings.
- Under Name servers, select Custom name servers and enter the new DNS IP address.
Change DNS on Your Router

Routers differ in configuration, but the steps to change your DNS are usually as follows:
- Get your router’s IP address (note this isn’t the same as your public IP address)
- Type it into your browser and hit Enter.
- Enter your router login details
- Navigate to the DNS settings (possibly under the WAN tab if you’re connected over Wi-Fi).
- Enter your new DNS addresses.
- Restart your router.
Why Would You Change Your DNS?
Switching to a different DNS server can help you improve your internet connection, increase your online privacy, and help you avoid restrictions. Here’s why a DNS changer is a smart choice.
Avoid Website Blocks
Your ISP’s default DNS server may block certain websites due to regulations, censorship issues, or network policies. This means you might struggle to access certain social media platforms, gambling websites, cryptocurrency exchanges, or news websites.
A Smart DNS server helps you bypass these restrictions by directing your traffic through a DNS server that doesn’t enforce these blocks. Unlike your ISP’s DNS, Smart DNS doesn’t reroute all your traffic – it only replaces the DNS requests that reveal your location.
Boost Your Connection Speed
ISP DNS servers can become congested with connection requests, leading to delays. Switching to CyberGhost VPN’s servers helps avoid slowdowns by processing requests faster and more efficiently. We have fast 10-Gbps servers across 100+ countries, so you shouldn’t struggle to find a server nearby to connect to. This can improve your speed because it reduces the travel distance for requests between your device and the server. We also provide unlimited bandwidth across our entire network – no throttling here!
Enhance Privacy
ISP DNS servers usually track your online activity, which includes your searches, the websites you visit, and the apps you use. In some countries, this information might even be shared with advertisers or government agencies.

CyberGhost VPN doesn’t log your DNS requests. Our servers process your requests securely, stopping your ISP and others from monitoring what you do online. Unlike a Smart DNS service, a VPN also encrypts your data and masks your IP address to conceal your location from watchful eyes.
Smart DNS doesn’t encrypt your connection or hide your IP address, so third parties like your ISP can still spy on you and see what you’re doing. To boost your online privacy further, you can try CyberGhost VPN. Our VPN automatically changes your DNS requests, encrypts all your internet traffic, and masks your IP address. This hides your online activity from ISPs, advertisers, and cybercriminals, so no one can see what you’re doing or where you are.
Improve Online Security
Default DNS servers can be vulnerable to attacks like DNS spoofing or cache poisoning, where cybercriminals manipulate DNS requests to redirect you to malicious websites. This can expose you to phishing scams or theft of sensitive information like passwords and financial data.
Switching to secure DNS servers can help you minimize the risk of these attacks. CyberGhost VPN’s servers also ensure your queries are routed safely and protect you from risky leaks. For added protection, CyberGhost VPN encrypts your traffic to safeguard your information from cybercriminals and other cyber threats.
FAQs
What is a DNS changer?
A DNS changer switches your connection from default ISP DNS servers to third-party DNS servers. While this can improve your traffic’s speed and security, it doesn’t encrypt your data, leaving you vulnerable to tracking. CyberGhost VPN goes beyond DNS changes by encrypting your traffic, masking your IP address, and providing features like a Kill Switch and automatic Wi-Fi protection.
What is DNSChanger?
DNSChanger, not to be confused with a DNS changer, is a type of malware that alters a computer’s DNS settings without user consent, redirecting internet traffic to malicious sites. This can lead to exposure to phishing scams and other cyber threats. To protect yourself, ensure your system is equipped with reputable anti-malware software and regularly monitor your DNS settings for unauthorized changes.
Is it safe to change my DNS?
Yes, it’s safe, but only if you switch to trusted DNS providers like Cloudflare or Google DNS. Changing your DNS with a VPN is even safer because it ensures your browsing data is encrypted and protected from ISPs, third parties, and cybercriminals. CyberGhost VPN, handles your DNS requests securely and routes your traffic with DNS leak protection, shielding your identity and keeping your online activity private.
What does changing my DNS do?
Changing your DNS directs your DNS requests from your ISP’s servers to third-party DNS servers. This lets the third-party DNS translate domain names into numerical IP addresses instead of relying on your ISP. Switching your DNS can improve your connection speed, enhance security, and let you access restricted websites.
What is a DNS leak?
A DNS leak occurs when your DNS requests bypass your VPN or Smart DNS and get routed back to your ISP’s DNS servers. This exposes your online activity to your ISP and anyone monitoring your connection. To check for DNS leaks, use our privacy test.
Can changing my DNS improve streaming quality?
Yes, switching to a third-party Smart DNS over your default ISP DNS can improve your streaming experience by reducing latency. For even better streaming quality, you can use CyberGhost VPN rather than a Smart DNS service. Connect to our fast 10-Gbps servers to securely stream from anywhere with DNS leak protection and unlimited bandwidth. Our VPN automatically handles all your DNS requests to keep your activity private.
What’s the difference between Smart DNS and a VPN?
Smart DNS alters how websites see your location, while a VPN encrypts your data and masks your IP address. CyberGhost VPN has lightning-fast servers across the globe, letting you change your IP address to one from almost anywhere. Our VPN’s DNS leak protection feature also makes sure your ISP (and other snoopers) can’t see your real DNS requests. This means you don’t need to manually change your DNS.
Leave a comment