
Setting up your own VPN can be appealing if you want more control over your connection. Maybe you need secure access to your home network while traveling, or you’d rather manage your own privacy tools instead of trusting a third-party service. A self-hosted VPN can do that — but it also comes with trade-offs that aren’t always obvious.
Creating a VPN from scratch means you have to handle setup, security updates, and performance tuning. It can require extra hardware, a cloud server, or both. This guide shows you how to create a VPN using a PC, router, or cloud platform, and what level of privacy and speed you can expect. We also explain how to test for potential DNS leaks and what else you should watch out for, including ongoing maintenance.
Quick Overview: What Are DIY VPNs Good For?
- Letting small teams connect safely to internal tools on a single work machine.
- Securing remote access to devices and services on your home network, like admin consoles, file storage, and Network Attached Storage (NAS).
- Protecting your connection and data in transit on public Wi-Fi networks.
Do You Actually Need to Create Your Own VPN?
Setting up your own VPN can be useful if your main goal is secure access to a private network. It lets you connect to your home setup while you’re away, so you can access admin dashboards and files on a PC or NAS without exposing those services directly to the internet. Some small teams also use a DIY VPN for remote access to internal tools in a controlled environment.
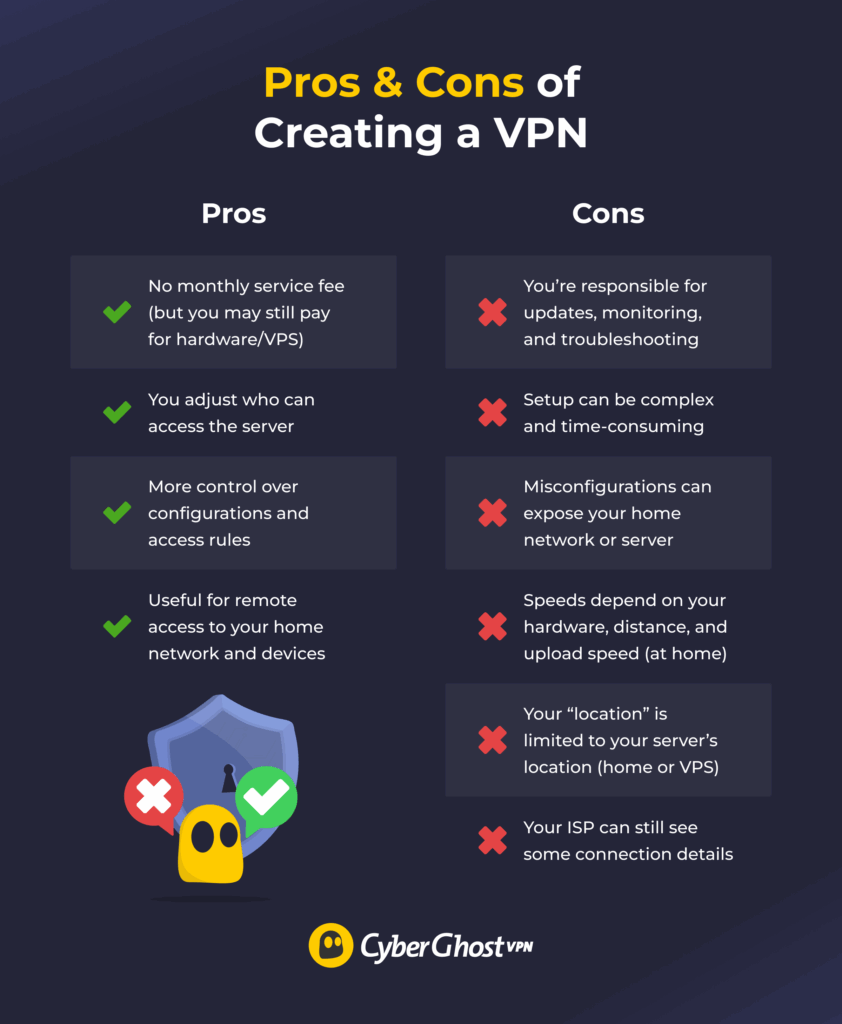
Creating your own VPN server has the additional benefit of letting you customize it to suit your needs exactly, though it can be a very complex process. It also doesn’t involve monthly fees like a cloud-hosted or commercial VPN would, though you still have to pay for the power usage and the hardware you use.
A self-hosted VPN means you have more control over your traffic, and you’re less reliant on a VPN provider’s infrastructure. However, since your VPN server typically has a single IP address, third parties might link your online activity back to it — and to you. Your security also depends on how well the VPN is configured and maintained, which means you have to handle updates, patch vulnerabilities, manage firewall rules, and constantly monitor the setup. Without it, a self-hosted VPN can quickly become a weak point.
Difference Between a VPN Server and a VPN Client
To set up a DIY VPN, you have to configure both the VPN server and the VPN client, so it’s important to know exactly what they do and what the difference is between them.
The VPN server and VPN client function as two ends of a secure tunnel. You can create a VPN server and use it to access the network remotely. Once you do, you need to configure a VPN client on the devices you want to connect.
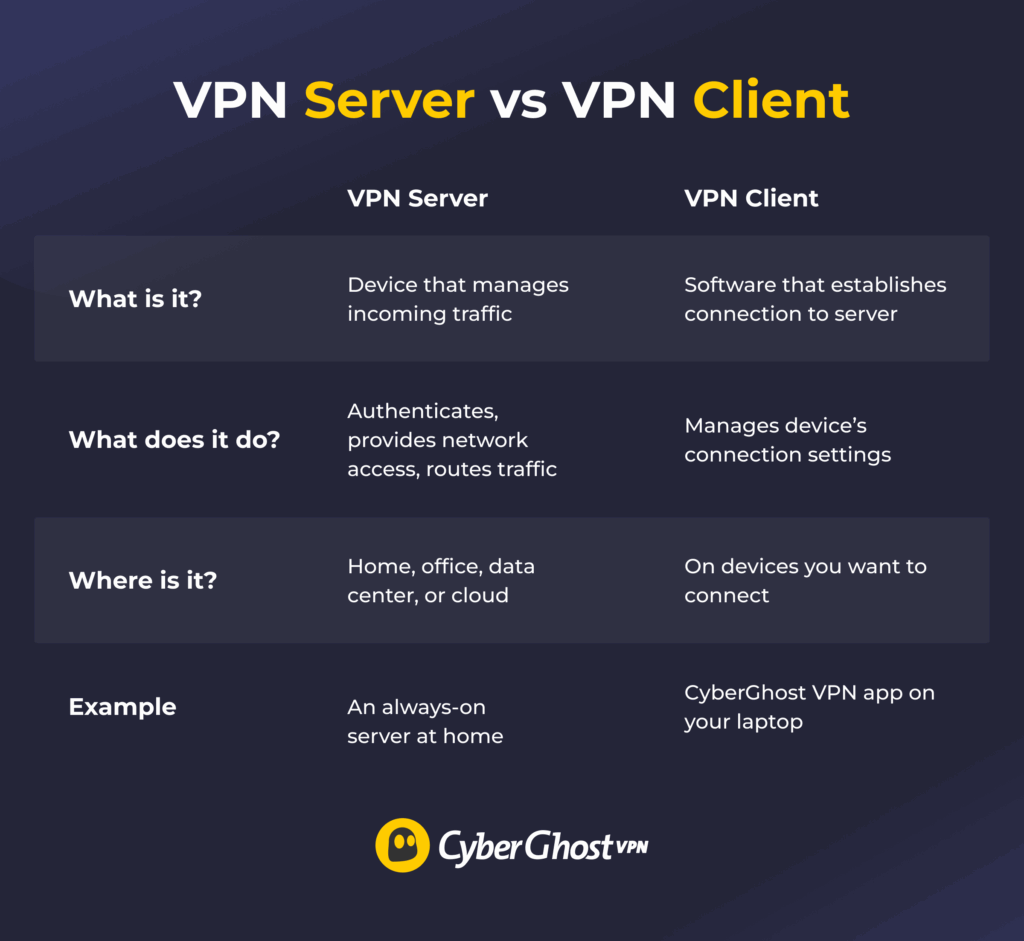
A VPN server is a device that acts as an endpoint for your VPN tunnel. When you connect to it, your traffic is encrypted between your device and the server, and websites you visit see the server’s IP address as the “public” IP for that session. If your VPN server is at home, sites may still see an IP tied to your home internet connection. The main win is securing the connection and enabling remote access to your home network.
A VPN client is software on the devices you want to connect to the VPN server. It typically encrypts your device’s traffic and then routes it to the server. Because your traffic is going through a secure tunnel, it’s harder for snoops to see some details about your connection.
What You Need Before You Start Making a VPN
Quick DIY VPN Success Checklist Before You Start
Before setting up a DIY VPN, make sure you:
- Choose a VPN protocol you plan to use (for example, WireGuard®, OpenVPN, or IPsec).
- Decide if you’re hosting the VPN server on your router, the cloud, or a dedicated device.
- Brush up on basic networking knowledge, including router setup, firewall rules, port forwarding, and DDNS.
- Check your ISP limitations on port forwarding, dynamic IPs, and CGNAT use.
- Set up a regular maintenance plan for the VPN server.
- Have a recovery plan if you brick your router or lock yourself out.
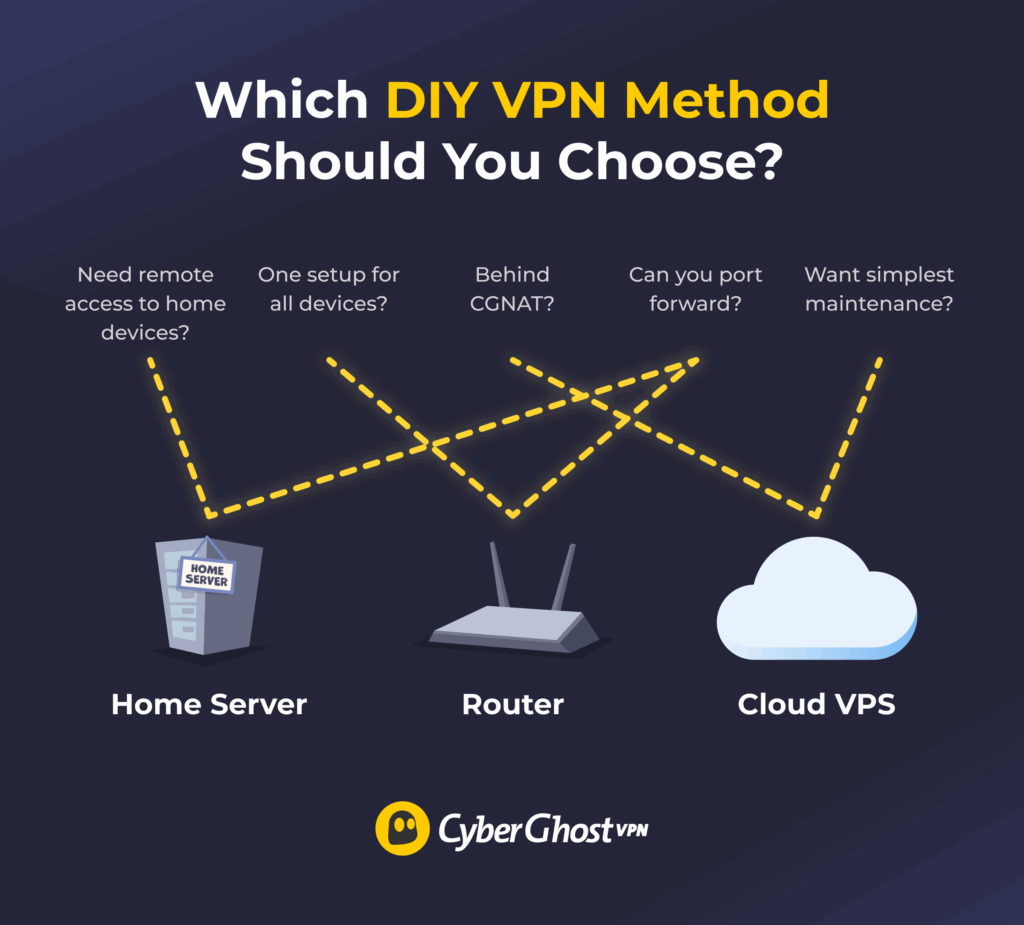
Once you’ve checked the basics above, use the quick guide below to choose the DIY VPN method that fits your network setup and how much maintenance you want to take on:
Making your own VPN requires some hands-on technical work. You should know what VPN protocols are, how they work, their differences, and which one is best for you. Regardless of where you host the VPN, the setup process can be complex, so you should follow the provided instructions very carefully.
If you’re hosting a VPN at home, a lot of the work is done on your router. This may include enabling port forwarding, adjusting firewall rules, flashing a router’s software, and setting up Dynamic DNS (DDNS). Not all routers support these features, so confirm compatibility before you begin. You should also check the details of your connection with your ISP, because some ISPs don’t allow port forwarding.
ISP limitations can also affect whether a DIY VPN is feasible. Some providers block port forwarding entirely, while others use CGNAT (Carrier-Grade Network Address Translation). With the latter, multiple users share the same public IP address, which prevents inbound connections to your home network. In these cases, hosting a VPN server locally may not work unless your ISP offers a public or static IP address, often for an additional fee.
Guide: How to Create Your Own VPN
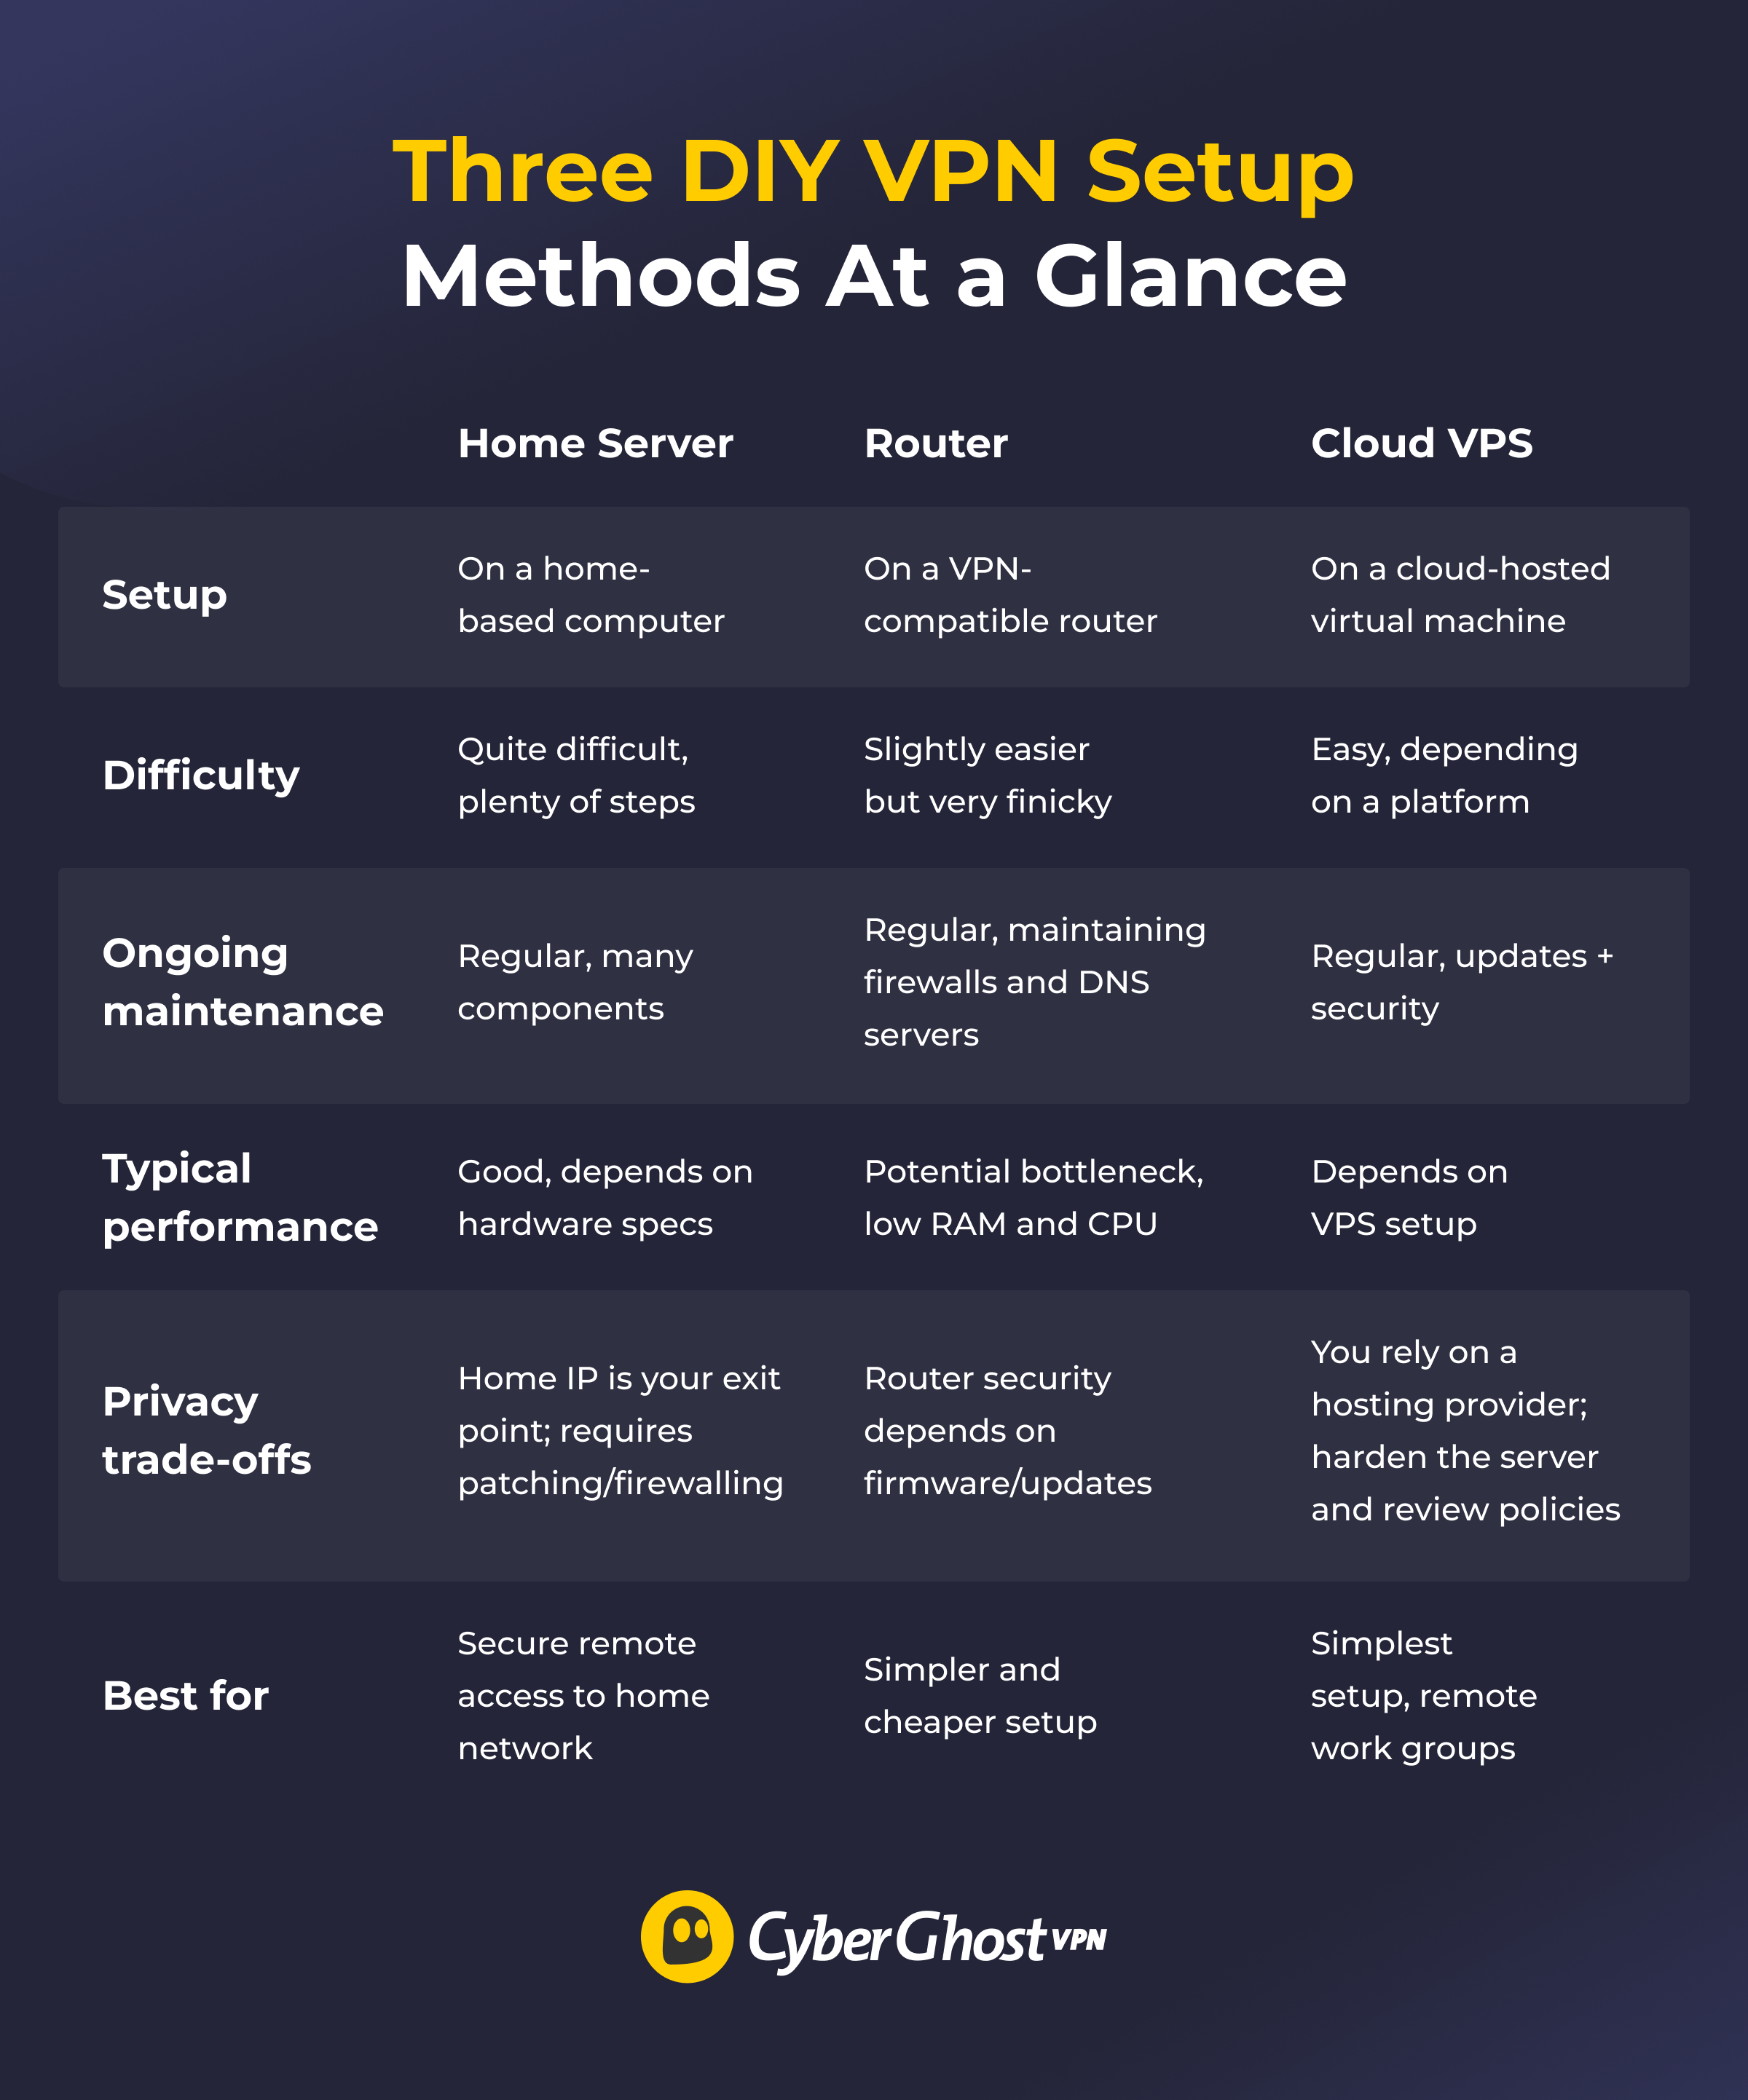
Method 1: Create a VPN on a Computer at Home
Before you start, you should check whether your ISP assigned a static or dynamic IP address to your home network. Static IP addresses are always the same, while dynamic IP addresses occasionally change. If you have a dynamic IP address, you could set up DDNS on your router. It maps your dynamic IP address to a static domain name, so you don’t have to reconfigure your VPN every time your IP address changes.
| 1. Choose the device you want to use as your server. It’s typically a PC, mini PC, or Raspberry Pi. 2. Set up a good cooling system for the device of your choice and make sure it has a reliable power line. The VPN server is supposed to stay on at all times. 3. Install a lightweight operating system on your server device, such as Ubuntu Server or Debian. 4. Configure a static local IP address for the server device. 5. Choose a VPN protocol. Common options include OpenVPN and WireGuard®, which are widely used and supported across many devices. 6. Follow the instructions provided by the protocol and install it on your server device. 7. Open your router’s dashboard and log in. 8. Configure the router’s port forwarding rules using your server device’s local IP address and the port number specific to the protocol you choose. 9. If the router’s firewall isn’t already configured, this is a good time to do it. 10. Create keys and credentials for your devices using your server’s protocol software and configurations. 11. Set up a VPN client on a device using the generated credentials and test the connection. |
Method 2: Create Your Own VPN on a Cloud VPS
Some cloud platforms let you build a virtualized server in the cloud, called a virtual private server (VPS). It behaves like a physical server, and setting up a VPN on a VPS mostly follows the same procedure. However, the exact steps might differ depending on the cloud platform you choose.
| 1. Choose a cloud platform to host your VPS. Review the platform’s privacy and data logging policies in detail before committing. 2. Pick the resources you need, like storage space, virtual location, and number of users. Keep in mind this might affect your subscription cost. 3. Pick any additional features you might need, like IPv6 support or DDoS protection. 4. After you set up your VPS, choose a VPN protocol, like OpenVPN or WireGuard®. 5. Follow the instructions for your chosen protocol. The exact process can vary, but it includes uploading the protocol’s configuration files to your VPS. 6. Set up IP forwarding, which lets you route traffic through your VPS so you can use it as a VPN. 7. Configure firewall rules, like opening the port associated with your VPN protocol and closing any unnecessary ones. 8. Set up the VPN client on your devices using the configuration from your VPS and chosen protocol. |
Tip: Commercial VPNs typically charge a monthly fee, so it’s a good idea to compare them with cloud-based VPNs and see what suits your needs best.
Method 3: Create Your VPN on a Router
| 1. Log in to your router’s dashboard and find the VPN settings, usually in a section titled Advanced Settings or something similar. 2. Check if your router already supports VPN protocols like OpenVPN or WireGuard®. 3. If not, you can buy a router with built-in VPN support. They typically provide the firmware and configuration files you need. 4. Alternatively, you can change (or “flash”) your router’s firmware to one that supports VPNs, such as DD-WRT, OpenWRT, or Tomato. However, this is a finicky process that could render your router unusable and void your warranty on an ISP-issued router. 5. Follow the instructions specific to your chosen VPN protocol. Every firmware has its own procedure, but it always includes uploading the .conf or .ovpn configuration file you get when you choose the protocol. 6. If they’re not already set up, you need to configure port forwarding and add your router’s firewall allowlist. 7. That’s it; you successfully set up the VPN server on your router. Now, you need to configure the VPN client on the devices you want to connect. |
Keep in mind that a router-based VPN server might create a bottleneck on the network because router CPUs tend to have less capacity than a computer-based server’s CPU.
Quick Regular Maintenance Checklist:
- Update your software regularly.
- Run IP leak tests to ensure your VPN runs properly.
- Review your connection logs.
- Set a rotation for your VPN server’s security keys.
Why DNS Leak Protection Is Important
A DNS leak happens when your device sends a DNS query outside of the VPN tunnel. The DNS resolver you reach can see the domains you’re looking up and the IP address your query comes from. Even if you’re using a VPN, a DNS leak can reveal details about your online activity (like which websites you’re visiting) to your ISP or your DNS provider.
You can avoid DNS leaks by configuring your VPN properly. Start by making sure your VPN only uses secure DNS servers instead of your ISP’s. You can also use a firewall to block all traffic that doesn’t go through the VPN.
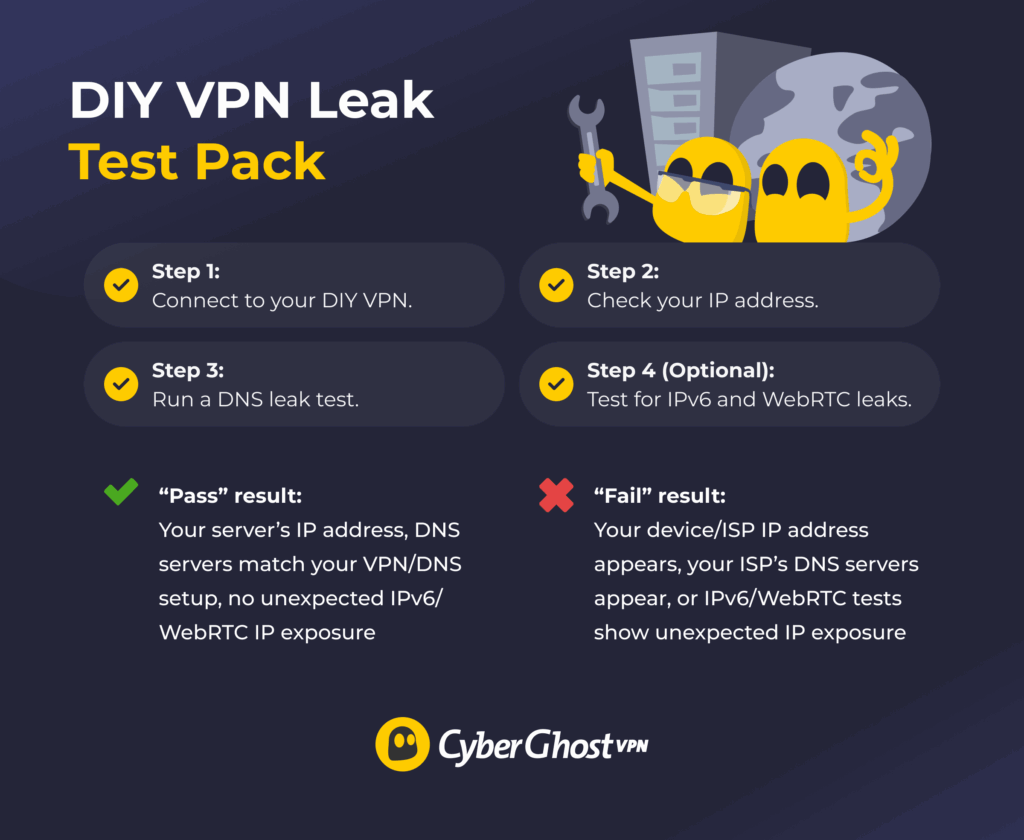
To check for DNS leaks, you need to run a series of quick tests. First, connect to your DIY VPN server. Then, check your IP address using a free online IP checker, like WhatIsMyIPAddress. The next step involves running direct DNS leak tests using DNS checkers, such as CyberGhost’s own tool. Finally, finish with IPv6 and WebRTC leak checks using BrowserLeaks or any other popular online tool.
What the results mean:
- Pass: Your VPN server IP shows, and the DNS servers listed match your VPN/DNS configuration, not your ISP’s default resolvers.
- Fail: Check the client DNS setting (or the DNS pushed by your VPN server), then confirm your firewall rules aren’t allowing DNS requests outside the tunnel.
Quick DNS Leak Checklist (Takes 1–2 Minutes):
- Check the IP address. Is your traffic going where it should be?
- Check the DNS servers. Are queries going to the right servers?
- Disconnect your device from the VPN, reconnect, then run the IP leak test. Have the parameters changed?
- Put your phone into sleep mode and wait a few seconds. Wake the device and run the IP test immediately after. Does the VPN work?
How to Connect Your Devices to a DIY VPN
Once your VPN server is running, you can add it to each device as a VPN connection (or import a .config file, depending on your setup). Typically, this requires your VPN server address, protocol, and either login details or a configuration file/keys.
- Windows: Settings → Network & Internet → VPN → Add VPN → choose the built-in option → enter your server details → Save.
- Android: Settings → Network/Connections (or VPN) → Add VPN → choose protocol (if prompted) → enter server address + credentials → Save.
- macOS: System Settings → VPN → Add VPN Configuration → select protocol → enter server details → Create.
- iOS: Settings → General → VPN & Device Management → VPN → Add VPN Configuration → choose protocol → enter server address + credentials → Done.
- Linux: Install VPN protocol package → Network Manager → VPN → Import from file → pick protocol configuration file → Turn on the connection.
VPN Server Performance Impact and Limits
The main factor affecting your VPN server’s performance is the hardware hosting it. If you opt for a cloud-based VPS, you pick a plan with specific CPU and RAM resources, but real-world performance still depends on provider allocation and host load.
If you’re using your device to make a VPN server, it has to be on at all times. This can increase power usage and how much the device heats up. The VPN server could shut down because of overheating or a power outage, so you can’t connect remotely, and you have to physically reboot the server itself.
Setting up a VPN on your router might cause a bottleneck for the connection. Routers typically have less RAM than a PC build, so the encryption process might move to the router’s similarly weaker CPU. WireGuard® can be a more efficient option for a router-based VPN server because it’s generally less resource-heavy than other protocols.
On the other hand, the devices you use to connect to the VPN server can also have performance issues. The encryption and connection upkeep processes could drain your phone battery because they increase resource usage and network activity. Similarly, lightweight protocols can help mitigate the effect.
Is a DIY VPN Worth It?
A DIY VPN can be a good choice if you mainly want secure remote access to your home network and basic protection on public Wi-Fi. You can host it on a PC, a mini PC, a Raspberry Pi, a compatible router, or a cloud-hosted virtual machine. The trade-off is time and upkeep. Setup can be tricky, and you need to handle all the updates, troubleshooting, and ongoing hardware or hosting costs.
If you’d rather skip the setup and maintenance, a commercial VPN like CyberGhost VPN is a simpler option. It lets you connect up to 7 devices at once, and you can also set it up on a router to cover your whole home network. With multiple plans available, it’s easy to compare pricing against the cost of running your own VPN. You can even try it out risk-free thanks to its 45-day money-back guarantee.
FAQ
Can you make your own VPN for free?
Only if you already own a VPN-compatible router and a spare device to host the server. Creating your own VPN can be costly, depending on your specific setup and the maintenance you need to do regularly. A commercial VPN like CyberGhost VPN might be more budget-friendly, thanks to its 45-day money-back guarantee on long-term plans.
How much does it cost to create a VPN?
The overall cost of making your own VPN depends on many factors, for instance, whether you’re investing in a cloud VPS or a VPN server on your device. Cloud platforms can charge for creating the VPS and any additional features you might want, like extra CPU or RAM. Servers you make yourself require frequent maintenance. They also need to always be on, which can affect your power bill.
Is creating your own VPN legal?
Yes, creating a VPN from scratch is generally legal. However, setting up a VPN on your router might require flashing its firmware. If your router is issued by your ISP or a third party, you might void your warranty or break the Terms of Use. Remember the law stays the same whether you’re using a VPN or not,, so you should always pay attention to any applicable local legislation.
How do I test my DIY VPN for DNS leaks?
You can easily check your DIY VPN for DNS leaks by running an online leak test tool. You pass if your public IP shows as the VPN server and the DNS servers match your VPN/DNS setup, not your ISP. If it fails the test, you should check the VPN’s DNS setup and firewall rules.
Will a self-hosted VPN drain my phone battery or slow my network?
A self-hosted VPN can cause performance issues on your device, particularly on devices with weaker specs, like less RAM or CPU power. Running the VPN client continuously on a device, such as your phone, can increase battery usage and slow down your connection due to the resource demands of the encryption process.
Leave a comment
Donatien
Posted on 02/05/2023 at 12:56
Honestly, I don’t know how to open a vpn account
Ghostie
Posted on 02/05/2023 at 13:37
Hello Donatien,
Have you considered trying our VPN? You can try it for 45 days.
It’s easy to set up too, or you can reach out to our Customer Support team if you need more help.
I hope that helps!
Rene
Posted on 16/04/2023 at 04:25
Quiero crear una aplicación VPN gratuitos pero nose cómo aserlar
Ghostie
Posted on 18/04/2023 at 12:31
Hola, Rene! You can try out our tips in this article and see how it goes.