
A pfSense VPN setup lets you send traffic from connected devices through a VPN tunnel without installing VPN software on every gadget. It’s a practical way to protect devices that don’t support VPN apps, like game consoles and some smart devices. It also lets you manage your network from a single dashboard and apply more advanced routing and firewall settings.
This guide walks through setting up pfSense as a VPN client using OpenVPN with a VPN provider. We’ll take you through the configuration step by step, including the DNS, NAT, firewall, and routing settings you’ll need to get everything working properly. We’ll also show you how to test the connection and troubleshoot common problems.
Before You Start: Choose the Right pfSense VPN Setup
Before you configure anything, make sure you’re following the right type of guide. A common source of confusion is that setting up a VPN on pfSense can mean several different things. Some people want to route their internet traffic through a VPN provider, while others want to access their home network remotely or connect two locations.
| Your Goal | Best pfSense Configuration | Covered |
| Route your whole network through a VPN provider | pfSense VPN client | ✅ |
| Send only selected devices through the VPN | Policy routing | ✅ |
| Access your home network while away | VPN server or remote-access setup | ❌ |
| Connect two homes or offices | Site-to-site VPN | ❌ |
| Block WAN fallback if the VPN disconnects | Firewall-based kill switch | ✅ |
A VPN client sends traffic from your network through a VPN provider. Policy routing gives you more control, letting you choose which devices use the VPN gateway.
Remote access and site-to-site connections serve different purposes and require separate configurations. You also won’t need the OpenVPN Client Export package for this guide. It creates configuration files for devices connecting to a pfSense VPN server.1
What You Need Before Installing a VPN on pfSense
Spending a few minutes preparing now can save a lot of troubleshooting later. Before you install a VPN on pfSense, make sure you have:
- Administrator access to the pfSense web interface
- A working WAN connection
- An up-to-date version of pfSense
- A VPN subscription with manual router setup support (CyberGhost VPN offers that)
- Your LAN subnet, such as 192.168.1.0/24
- A recent backup of your pfSense configuration
- A device connected to the LAN for testing
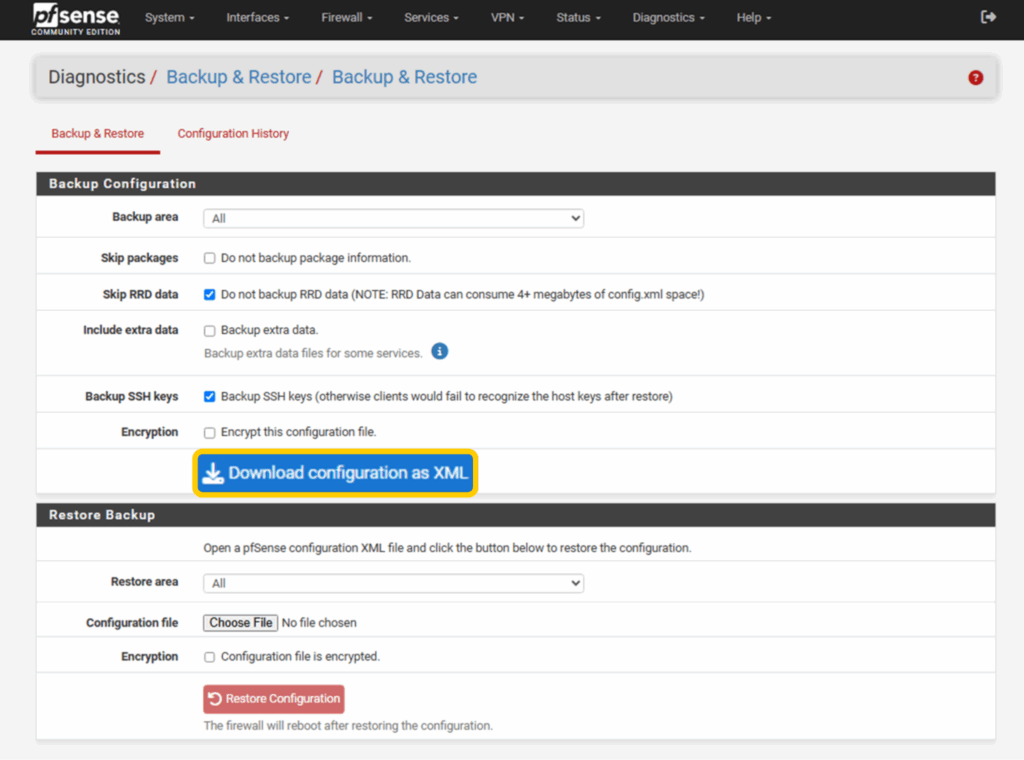
Once these are ready, you can download the OpenVPN files and connection details you’ll import into pfSense.
Important: Your manual VPN username and password may be different from the credentials you use to sign in to your account. Check your VPN provider’s manual setup area before you continue.
Which VPN Protocol Is Best for pfSense?
OpenVPN is the best starting point for most pfSense VPN setups. It works with most VPN providers that support manual router configuration and uses downloadable configuration files.
WireGuard® may deliver faster performance with a lighter setup, but manual support varies between providers. Some use app-only WireGuard®-based protocols that won’t work with a router setup.
We’ll use OpenVPN in this guide because it offers broad compatibility for pfSense client setups. If your VPN provider supports manual WireGuard® configuration for pfSense, you can consider it as an alternative.
How to Set Up a VPN on Your pfSense Router With OpenVPN
The setup follows the same basic flow: download your VPN provider’s configuration files, create the OpenVPN client, then configure routing, DNS, NAT, and firewall rules.
1. Download Your VPN Configuration Files
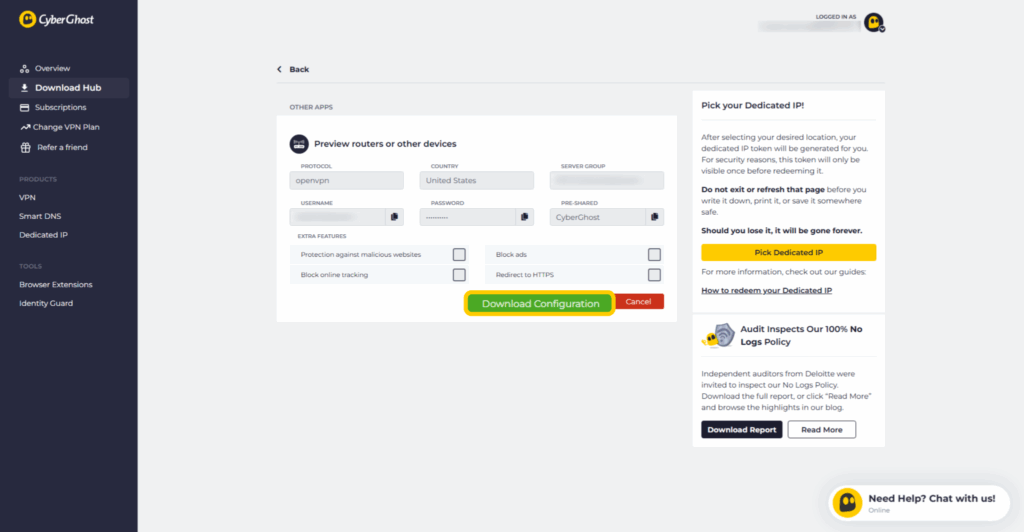
Log in to your VPN provider’s dashboard and open the Manual Setup, Router Setup, or OpenVPN section. Choose the server you want to use, then collect:
- OpenVPN configuration (.ovpn) file
- Manual VPN username
- Manual VPN password
- Certificate authority (CA) certificate
- TLS authentication key, if required
- VPN server hostname or IP address
- Server port
- Connection protocol, usually UDP or TCP
Keep these details handy. You’ll need them throughout the setup.
2. Log In to the pfSense Web Interface
Now it’s time to access your pfSense router.
- Open a web browser on a device connected to your local network.
- Enter your pfSense LAN IP address in the address bar. This is often 192.168.1.1, but your network may use a different address.
- Sign in with an administrator account.
- If you’re still using the default administrator password, change it before continuing. Default credentials make your firewall easier to compromise and shouldn’t be left in place after deployment.
Leave the dashboard open for the remaining steps.
3. Import the Certificate Authority
Import your VPN provider’s certificate authority (CA) so pfSense can verify the VPN server.
- In the pfSense dashboard, open System > Certificates > Authorities.
- Click Add.
- Give the certificate authority a descriptive name, such as your VPN provider’s name.
- For Method, select Import an existing Certificate Authority.
- Open the CA certificate in a text editor or locate the <ca> section inside your .ovpn file.
- Copy the entire certificate, including the BEGIN CERTIFICATE and END CERTIFICATE lines, and paste it into the Certificate Data field.
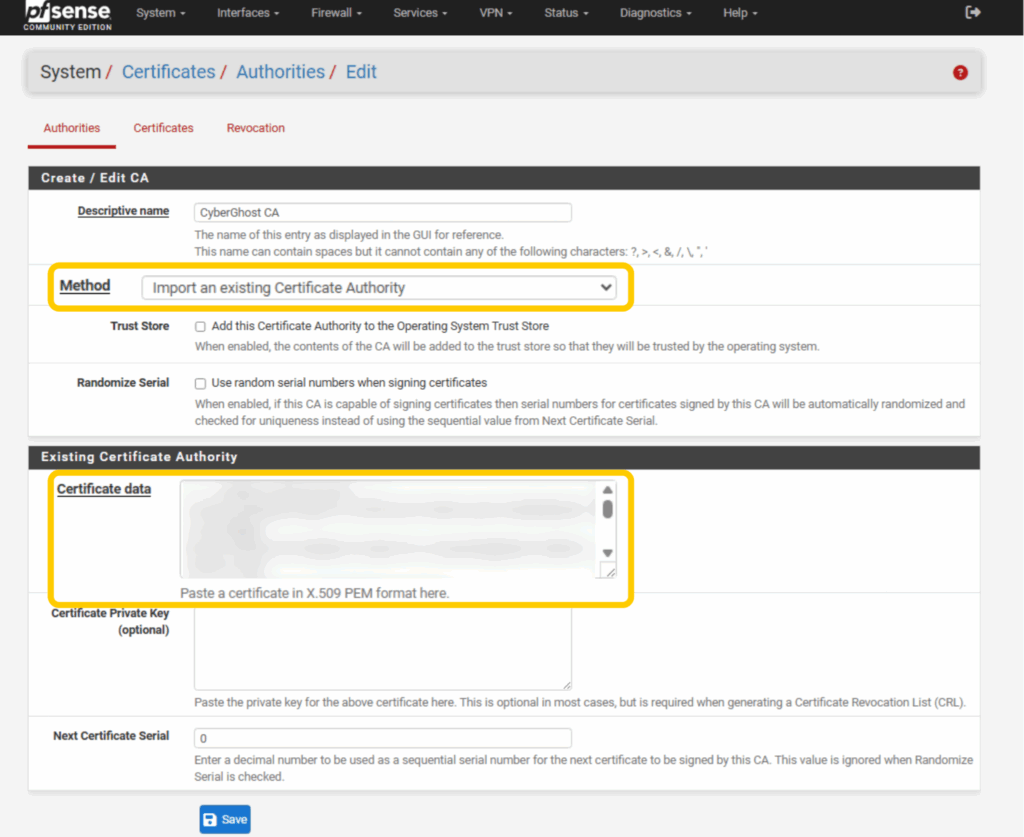
- Click Save.
If your provider supplies a client certificate, client key, or TLS key, keep it ready for the OpenVPN client settings.
Tech tip: Copy and paste the certificate exactly as provided. Even an extra space or a missing line can prevent OpenVPN from authenticating successfully.
4. Create the OpenVPN Client
Go to VPN > OpenVPN > Clients and click Add. Use the values from your VPN provider’s .ovpn file and manual setup page.
General Settings
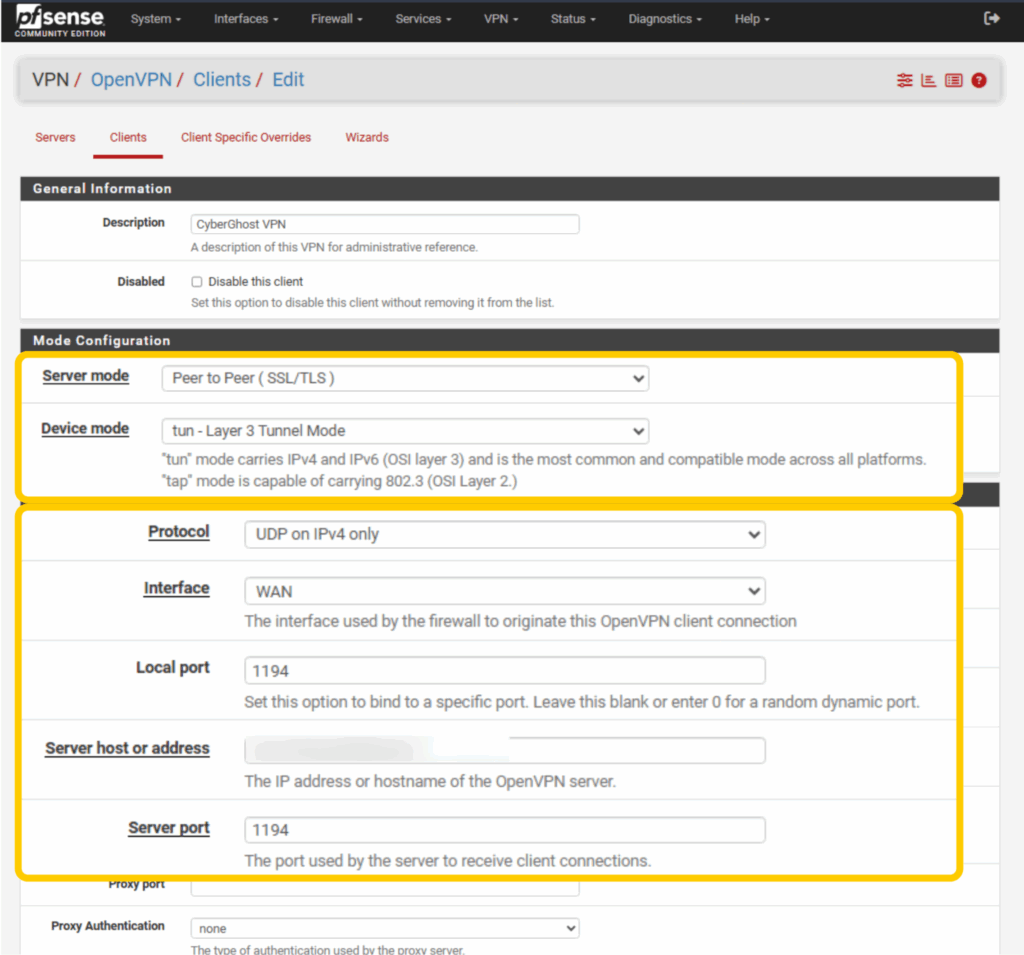
Configure the basic connection details using the settings provided by your VPN provider:
- Server Mode: Typically peer-to-peer (SSL/TLS).
- Protocol: UDP on IPv4 (or TCP if your provider recommends it).
- Device Mode: tun
- Interface: WAN
- Server Host or Address: The VPN server hostname or IP address.
- Server Port: The port listed in your configuration file.
- Description: A recognizable name for your connection.
User Authentication and Cryptographic Settings
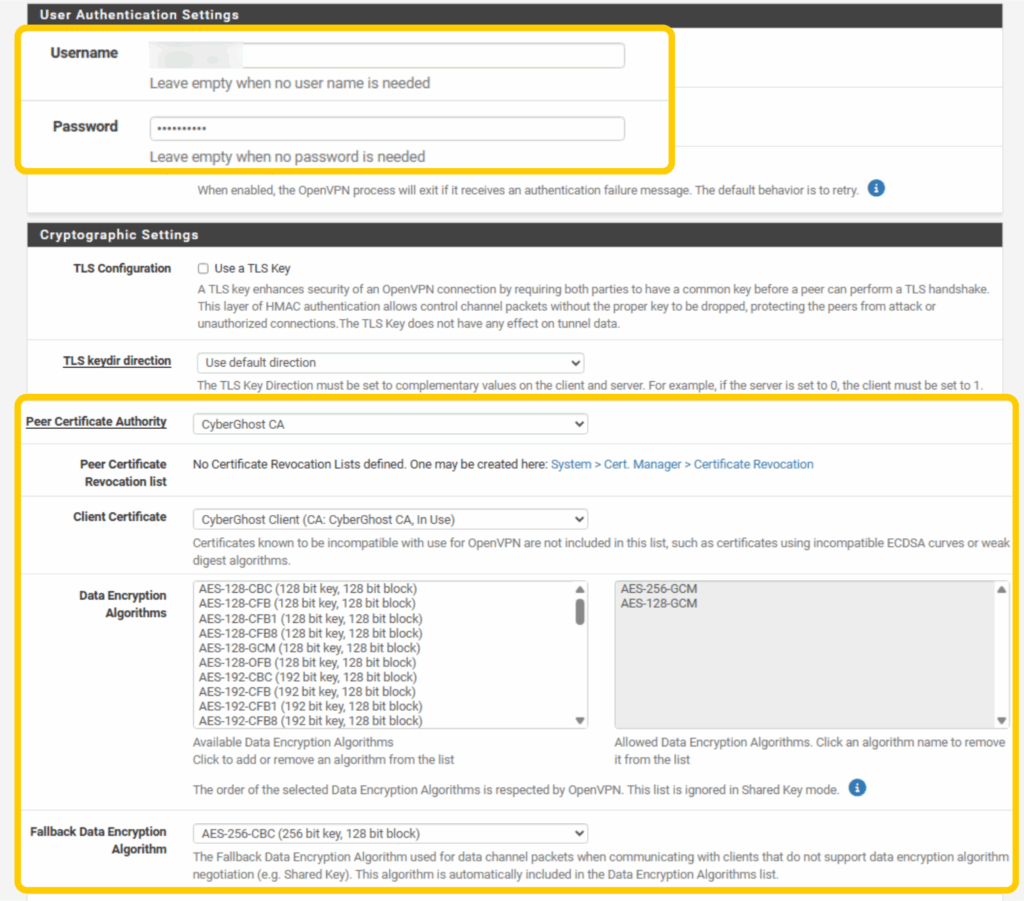
Enter the manual VPN username and password you downloaded earlier. If your provider uses certificate-only authentication, you may not have to fill out these fields. This section must match your VPN provider’s configuration.
Depending on your provider, you’ll select or import:
- Certificate Authority (CA)
- Client certificate (if required)
- TLS authentication key (if required)
- Data encryption algorithm
- Authentication digest algorithm
Avoid changing encryption settings unless your provider instructs you to. The values in the configuration file should match the VPN server. Netgate also recommends using Peer-to-Peer (SSL/TLS) mode for modern OpenVPN client deployments as it has deprecated shared-key mode.2
Tech tip: Don’t worry if your screen contains settings that we haven’t mentioned. Many options can remain at their default values unless your VPN provider tells you to change them.
5. Check That the VPN Tunnel Connects
Confirm that the VPN tunnel is connected before configuring routing, DNS, NAT, or firewall rules. Open Status > OpenVPN and check whether your new client shows as Connected. You should also see an assigned virtual IP address and an active connection time.
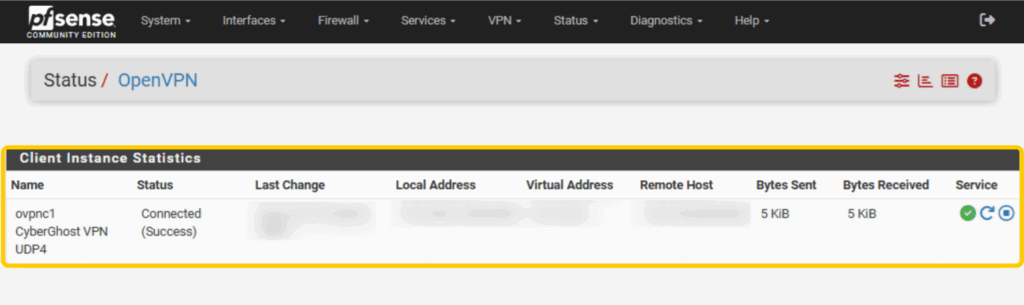
If the client doesn’t connect, open Status > System Logs > OpenVPN to review the log entries. Look for authentication failures, certificate errors, or an incorrect server address, as these can help you identify the problem.
If the client shows as Connected, move on to the interface assignment.
Assign Your VPN Interface
A connected OpenVPN client won’t route traffic until pfSense can use it as an interface. Assigning the interface lets you create gateways, NAT rules, and firewall rules for the VPN.3
- Go to Interfaces > Assignments.
- Under Available Network Ports, select your client interface. It’s usually named something like ovpnc1.
- Click Add. pfSense will create a new optional interface, typically named OPT1.
- Open the new OPT1 interface.
- Check Enable Interface.
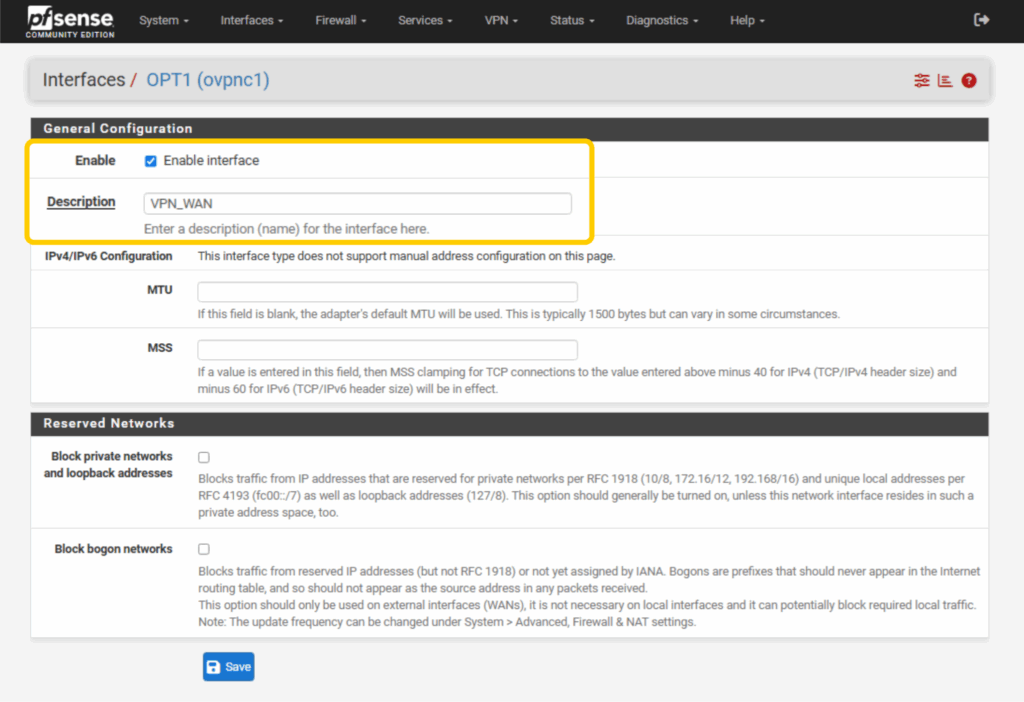
- Rename it to a descriptive name, such as VPN_WAN or CyberGhost VPN.
- Click Save, then Apply Changes.
After saving, open the OpenVPN client and save it again so pfSense reloads the VPN with the new interface assignment.
Tech tip: Choose a descriptive interface name from the start. It’ll make the next sections much easier to follow, especially if you add multiple VPN connections later.
Configure DNS for the VPN Tunnel
DNS requests don’t always follow the same route as web traffic. If DNS still goes through your ISP, you may see a DNS leak even when the VPN tunnel works. Use your VPN provider’s DNS servers when available.
Configure the DNS Servers
- Open System > General Setup.
- Under DNS Server Settings, add the DNS servers provided by your VPN provider.
- If a Gateway option is available, select your VPN gateway for those DNS servers.
- Disable DNS Server Override if you don’t want pfSense to use DNS servers received from your ISP.4
Next, review the DNS Resolver configuration.
- Go to Services > DNS Resolver > General Settings.
- If you’re forwarding DNS queries, set the Outgoing Network Interfaces to your VPN interface where appropriate.5
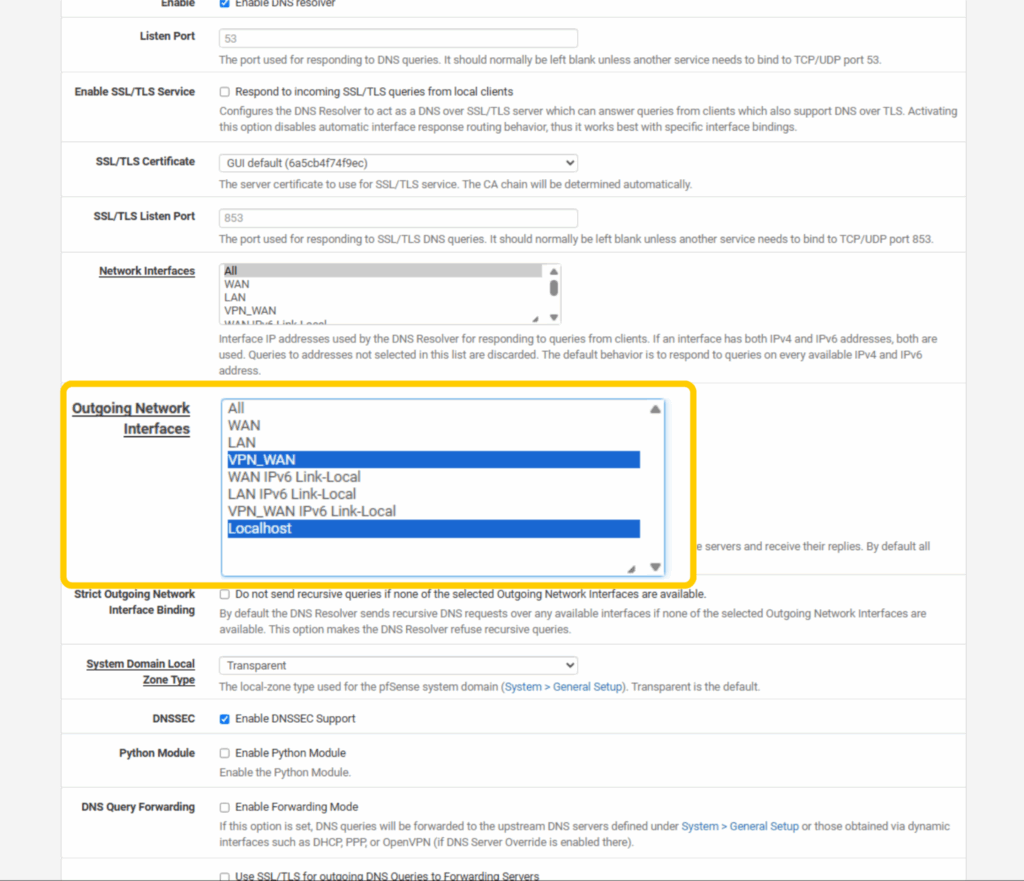
- Save your changes and click Apply Changes.
Tech tip: Some VPN providers can push DNS servers to pfSense through the client. If your provider supports this, Pull DNS can let pfSense use those VPN-assigned DNS servers for its own DNS lookups.
Test from a LAN device after saving. Your DNS results should match your VPN configuration rather than using your ISP’s DNS servers.
Configure NAT Rules for VPN Traffic
Outbound NAT helps LAN traffic leave through the VPN interface correctly. Network Address Translation (NAT) changes the source address of traffic as it exits an interface. Without the right outbound NAT rule, devices may connect to the VPN but fail to reach the internet.
Configure Outbound NAT
- Open Firewall > NAT > Outbound.
- Change the Outbound NAT Mode to Hybrid Outbound NAT. If you’re already using Manual Outbound NAT, you can keep that mode.
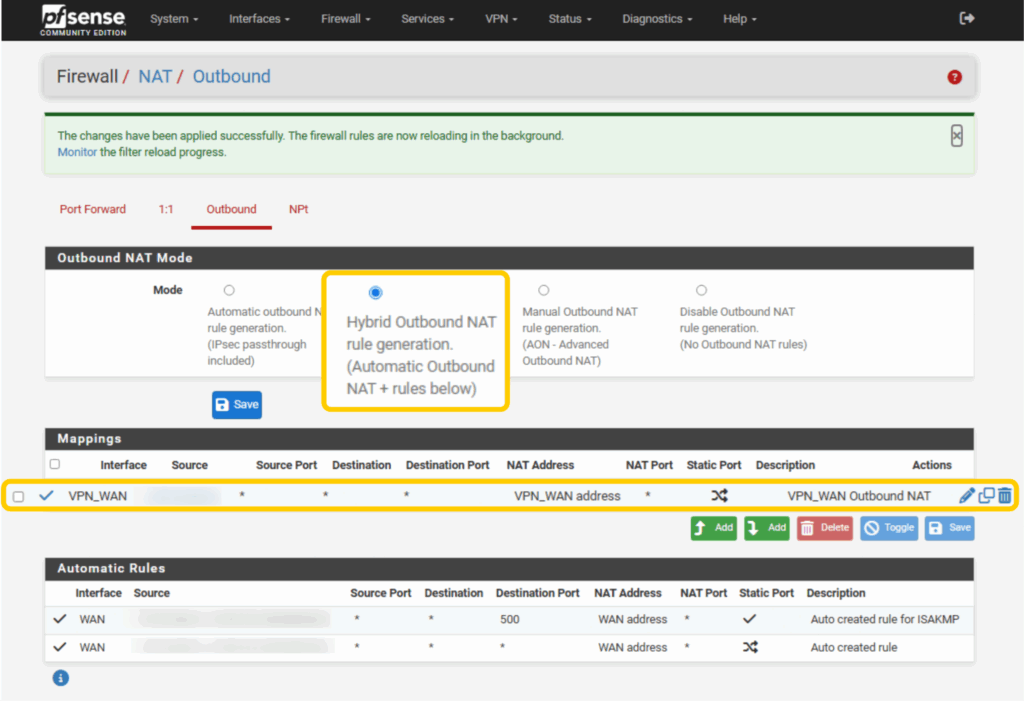
- Click Save.
- Tap Add to create a new outbound NAT rule.
- Set the Interface to your VPN interface (for example, VPN_WAN) and Source to your LAN subnet, such as 192.168.1.0/24.
- Leave Translation Address set to Interface Address.
- Click Save, then Apply Changes.
Tech tip: Hybrid Outbound keeps pfSense’s automatic NAT rules while letting you add custom for VPN traffic. Manual mode gives you more control but also requires you to maintain every outbound NAT rule yourself.6
Route Traffic Through the VPN
Firewall rules decide which traffic uses the VPN gateway. You can route the whole LAN through the VPN or use policy routing for selected devices.
Route All LAN Traffic Through the VPN
- Go to Firewall > Rules > LAN.
- Add a new Pass rule or edit your existing LAN rule.
- Set Source to LAN net and Destination to Any.
- Under Advanced Options, choose your VPN gateway as the Gateway.
- Save the rule and click Apply Changes.
pfSense processes firewall rules by rule order, so place VPN routing rules above more general LAN rules. Firewall rules configure policy routing that specify the gateway traffic should use.7
Route Only Selected Devices Through the VPN
If you only want certain devices to use the VPN, use policy routing instead of routing your entire network. Create a firewall rule that matches the device or an alias containing multiple devices, then assign the VPN gateway to that rule. Traffic that doesn’t match can continue to use your normal WAN connection.
Add a Kill Switch
To help prevent VPN-routed traffic from falling back to your regular WAN connection if the VPN goes down, add a firewall rule that blocks that traffic from using WAN. Make sure the rule applies to the same devices or network you’ve configured to use the VPN.
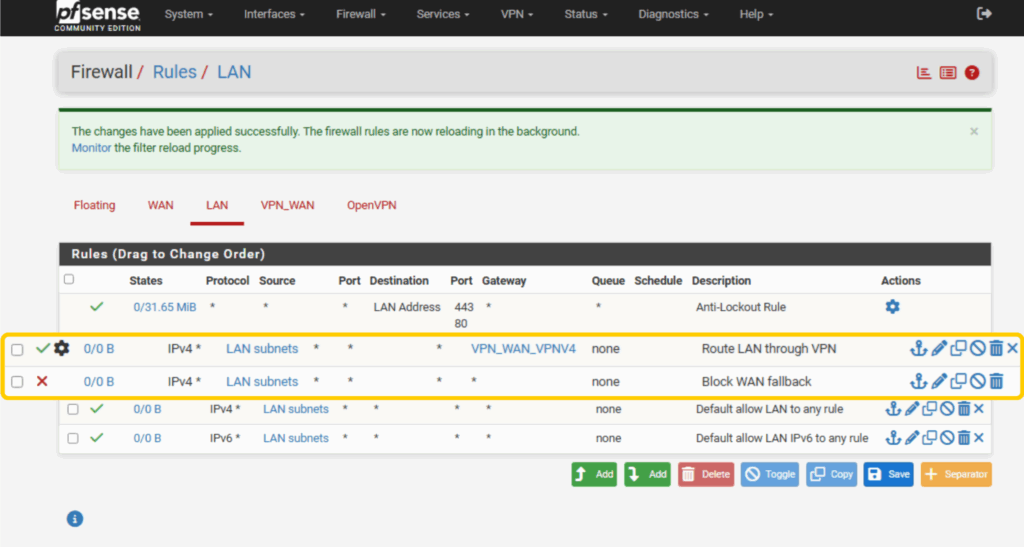
Test the setup after saving to confirm that affected devices lose internet access when the VPN tunnel is unavailable rather than reconnecting to your ISP.
Tech tip: If traffic still follows the old route after changing firewall rules, clear existing connection states or reconnect the affected device. Existing sessions may continue using their original path until they’re re-established.
Test Your pfSense VPN Connection
Test the setup from both pfSense and a device connected to your LAN. A VPN can appear connected while traffic still bypasses the tunnel due to a DNS, NAT, firewall, or routing issue.
Run through this checklist:
- Go to Status > OpenVPN and confirm the client shows as Connected.
- Go to Status > Gateways and check that the VPN gateway is Online.
- Open an IP-checking tool on a LAN device and confirm that the public IP address matches your VPN server.
- Run a DNS leak test and check that DNS requests aren’t using your ISP’s servers.
- Temporarily disconnect the VPN to test your kill switch.
- Test more than one device if your whole LAN should use the VPN.
If any result looks wrong, use the troubleshooting table below to narrow down the issue.
Troubleshooting: Why Is My VPN Not Working on pfSense?
Most pfSense VPN issues come from a small number of configuration mistakes. Check one item at a time, then test again before changing anything else. Making several changes at once can make it much harder to identify what actually fixed the problem.
| 🚨 Problem | 🔍 Likely Cause | ✅ What to Check |
| OpenVPN won’t connect | Wrong server address, port, certificate, or credentials | Check Status > OpenVPN and review the logs |
| Authentication failed | You’re using your account login instead of manual OpenVPN credentials | Confirm you’re using the manual username and password generated for router setup |
| TLS or certificate errors | Incorrect CA certificate or TLS key | Re-import the certificate and TLS key exactly as provided |
| VPN connects, but there’s no internet | Missing outbound NAT rule or incorrect LAN gateway rule | Review your outbound NAT rule and LAN firewall rule |
| Traffic still uses your ISP IP | The VPN gateway isn’t routing the traffic | Check LAN rule order and confirm you selected the VPN gateway |
| DNS leak test shows ISP servers | DNS Resolver or DNS server settings are incorrect | Confirm DNS settings use the VPN provider’s DNS servers or route through the VPN interface |
Use Diagnostics > Ping and Diagnostics > DNS Lookup if you still can’t isolate the issue. If those tests fail from pfSense itself, check your WAN connectivity, DNS settings, and firewall rules as possible causes.
Does Running a VPN on pfSense Slow Down Your Internet?
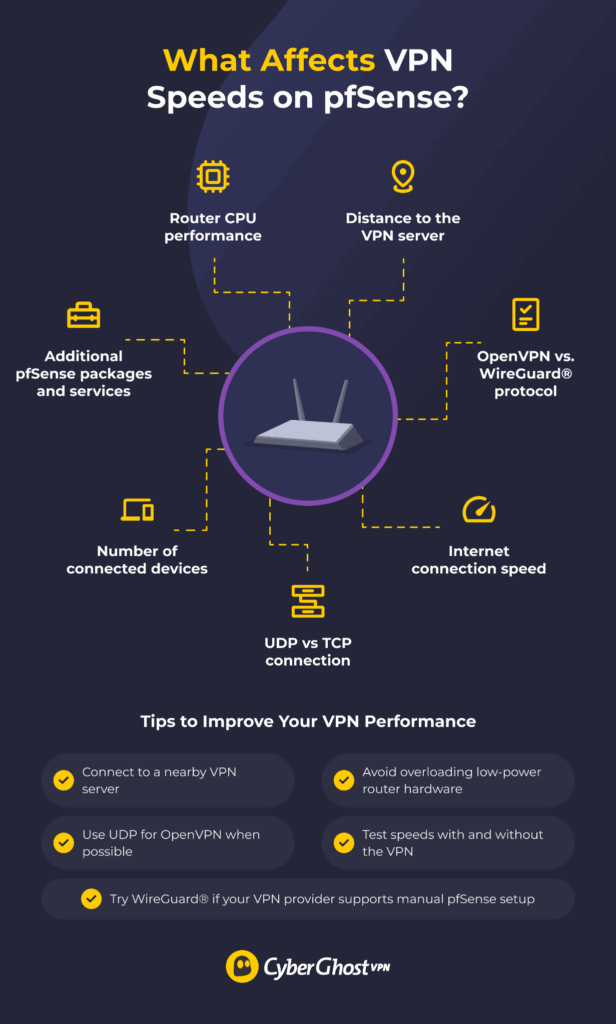
Yes, it can. Running a VPN adds encryption and extra routing to your connection, while pfSense may also inspect or filter traffic before forwarding it. How much this affects your connection depends on your hardware, VPN protocol, server distance, and network load.
Common speed factors include:
- Router hardware: A faster CPU handles VPN encryption more efficiently.
- VPN protocol: WireGuard® may be faster when it supports manual setup, while OpenVPN offers broader compatibility.
- Server location: A nearby VPN server can reduce the distance your traffic has to travel, although routing and congestion also affect latency.
- UDP vs TCP: UDP is usually faster for OpenVPN unless your network requires TCP.
- Extra pfSense packages: Heavy add-ons can slow down low-power hardware.
To improve performance, choose a nearby VPN server, use UDP for OpenVPN, test WireGuard® if your provider supports manual pfSense setup, and compare speeds with and without the VPN to find the bottleneck.
Get More From Your pfSense VPN Setup
Setting up a VPN on your pfSense router takes a little time, but it gives you much more control over how traffic moves across your network. Once you’ve configured the VPN client, DNS, NAT, and firewall rules, you can route your network traffic through an encrypted VPN tunnel and cover devices that don’t natively support VPN apps.
You can also build on your setup as your needs change. Add VPN connections for different locations, use policy routing to change which devices route through the VPN, or fine-tune firewall rules. If you ever make changes, revisit the testing checklist to verify your traffic is still using the VPN as expected.
CyberGhost VPN supports manual OpenVPN configuration for compatible routers. It’s a practical choice for pfSense users who want centralized VPN protection across a home or office network.
FAQ
Can I install a VPN on a pfSense router?
Yes. You can configure pfSense as a VPN client with a provider that supports manual router setup. This lets your router send selected network traffic through the VPN instead of installing VPN apps on every device.
Can I use WireGuard® instead of OpenVPN on pfSense?
Yes, if your VPN provider supports manual WireGuard® configuration for pfSense. OpenVPN remains the most widely supported option for commercial VPN providers, while WireGuard® may offer better performance on compatible setups.
How do I import VPN configuration files into pfSense?
You’ll import different parts of the configuration in different pfSense screens. Add the CA certificate under System > Certificates > Authorities, then create the VPN connection under VPN > OpenVPN > Clients using the server address, port, protocol, authentication, and cryptographic values from your provider’s .ovpn file.
Why is my VPN not working on pfSense?
Common causes include incorrect manual credentials, a bad CA certificate, a missing TLS key, no outbound NAT rule, the wrong gateway in LAN rules, or DNS settings that still use the WAN connection. Start with Status > OpenVPN, then check NAT, firewall rules, and DNS.
How can I improve VPN speeds on pfSense?
Choose a nearby VPN server, use UDP for OpenVPN, and avoid running heavy pfSense packages on low-power hardware. WireGuard® may also improve performance if your VPN provider supports manual pfSense setup.
References:

Leave a comment